


한 줄 요약
네이버 계정을 활용해 로그인 및 회원가입 플러그인입니다.
This is plugin that enables login/signup by using naver account


후원 받은 커피는 더 많은 플러그인을 만드는 원동력이 됩니다.
Intro
1. Why
유저가 서비스에 처음 방문하고, 맞이하는 가장 큰 허들은 회원가입입니다. 회원가입이 길고 지루하면, 유저 경험이 급격히 떨어지며 서비스에 좋지 않은 감정을 느낍니다. 유저가 서비스를 빠르고 쉽게 시작할 수 있도록, 국내에서 카카오와 네이버 간편 로그인 기능이 있습니다. 하지만 아직까지 네이버 간편 로그인 플러그인이 없어서 구현했습니다.
The biggest hurdle users face when visiting a service for the first time is often the registration process. If registration is lengthy and tedious, user experience dramatically declines, and users may develop negative feelings towards the service. To allow users to start using the service quickly and easily, there are simplified login options available in Korea, such as Kakao and Naver login. However, as there is currently no Naver simplified login plugin, I have implemented it myself.

2. ChangeLog
1.0.0
•
네이버 로그인 및 회원가입
logIn / signUp by naver account
•
유저 정보 확인
read user’s info
Core
1. Instruction
본 플러그인을 사용하려면 네이버 API 등록이 필요합니다. 아래의 [튜토리얼] 섹션에서 관련 정보를 확인할 수 있습니다.
You must have Naver API settings for using this plugin. You can check how to get this in [Tutorial] section below.
2. Related Docu
플러그인 페이지


데모 링크


에디터 링크

3. Action
a. login/signup with naver
네이버 계정을 활용해 로그인 및 회원가입을 진행합니다.
Login/singup by using naver account
Input
field | type | Required | 설명 |
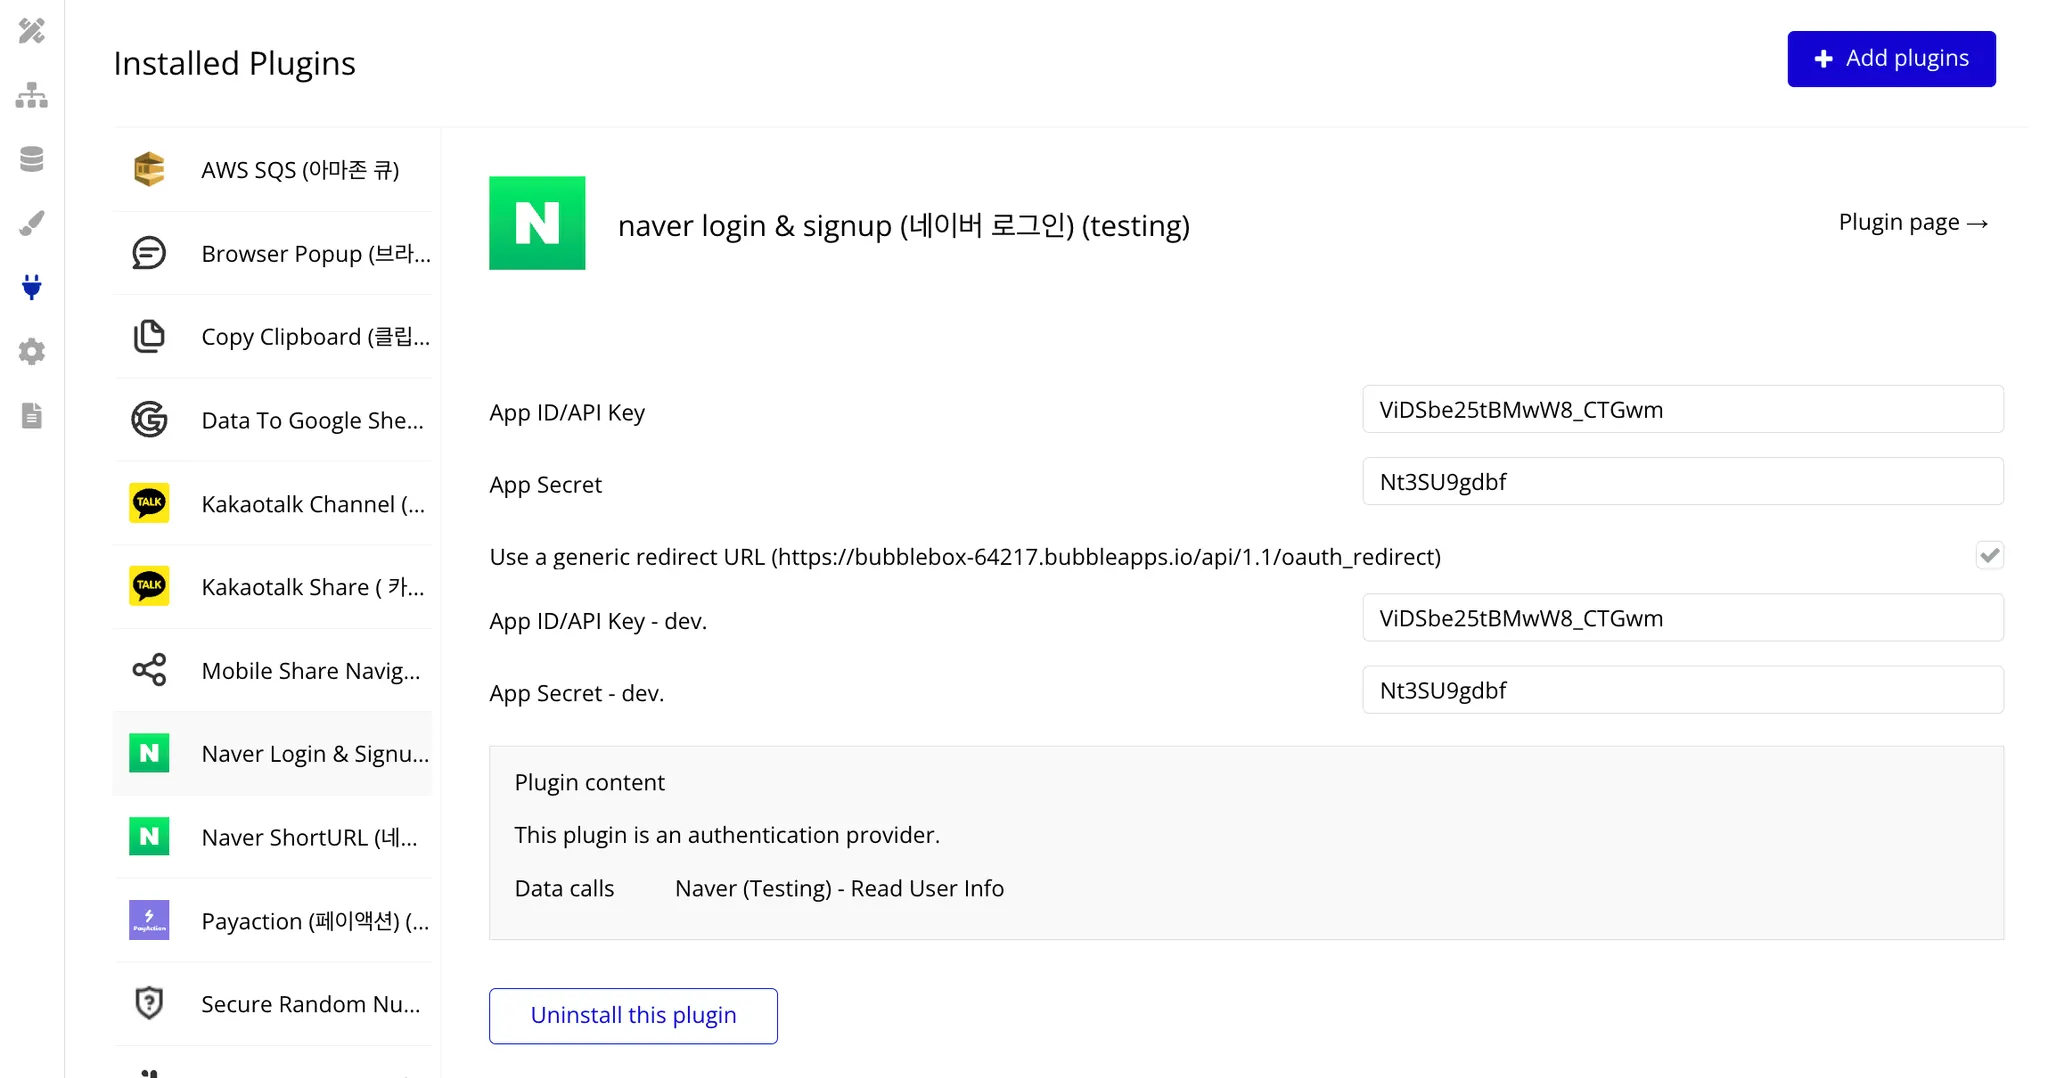
App ID/API Key | string | | 등록한 네이버 어플리케이션의 client Id를 [플러그인] 설정 페이지에서 입력해야 합니다.
Input client Id of naver application in [Plugin] tab |
App Secret | string | | 등록한 네이버 어플리케이션의 secret Key를 [플러그인] 설정 페이지에서 입력해야 합니다.
Input secret Key of naver application in [Plugin] tab |
use a generic redirect URL | boolean | | redirect URL을 [플러그인] 설정 페이지에서 활성화 해야 합니다.
Activate on redirect URL in [Plugin] Tab |
Return
b. read user info
회원가입을 완료한 유저의 정보를 불러옵니다.
read the information of user who has done to sign up
해당 액션 이벤트를 사용하기 위해선, [login/singup with naver]가 존재하는 워크플로우에서 함께 사용해야 합니다,
you must use this action with [login/signup with naver] action event together
return
{
"resultcode": "00",
"message": "success",
"response": {
"email": "bubbleboxeroffical@gmail.com",
"nickname": "bubblebox",
"profile_image": "https://ssl.pstatic.net/static/pwe/address/nodata_33x33.gif",
"age": "20-29",
"gender": "M",
"id": "32742776",
"name": "이명성",
"birthday": "12-13",
"birthyear": "1996",
"mobile": "010-0000-0000"
}
}
JavaScript
복사
Tutorial
1. Env. Setup
네이버 API에서 네이버 로그인 API를 제공합니다. 해당 플러그인은 네이버 로그인 API를 활용해 버블에서의 로그인 및 회원가입 기능을 지원합니다. 이를 사용하기 위해 아래 조건을 모두 준비해야 합니다.
네이버 어플리케이션 등록 및 네이버 로그인 API 신청
client Key와 secret Key 설정
웹 환경 등록 (서비스 URL, callback URL)
유저 수집 정보 설정
To utilize the Naver login API plugin in Bubble, which leverages the Naver login API, you need to prepare the following conditions:
Register an application with Naver and apply for Naver login API.
Set up client key and secret key.
Register web environment (service URL, callback URL).
Define user data collection settings.
네이버 어플리케이션 등록 및 네이버 로그인 API 신청
Register an application with Naver and apply for Naver login API.
네이버 개발자 계정에 들어가 네이버 API 계정을 등록하고, 어플리케이션을 등록합니다.
Register your application and apply for the Naver login API.

애플리케이션 등록 시, [사용 API]에 네이버 로그인을 선택해야 합니다.
When registering the application, choose Naver login under "사용 API" (Use API).

client Key와 secret Key 설정
Set up client key and secret key.
생성한 애플리케이션을 클릭하고 [개요] 탭에 들어가면, client Id와 client Secret 을 확인할 수 있습니다.
After creating the application, navigate to the "개요" (Overview) tab to find the client ID and client secret.
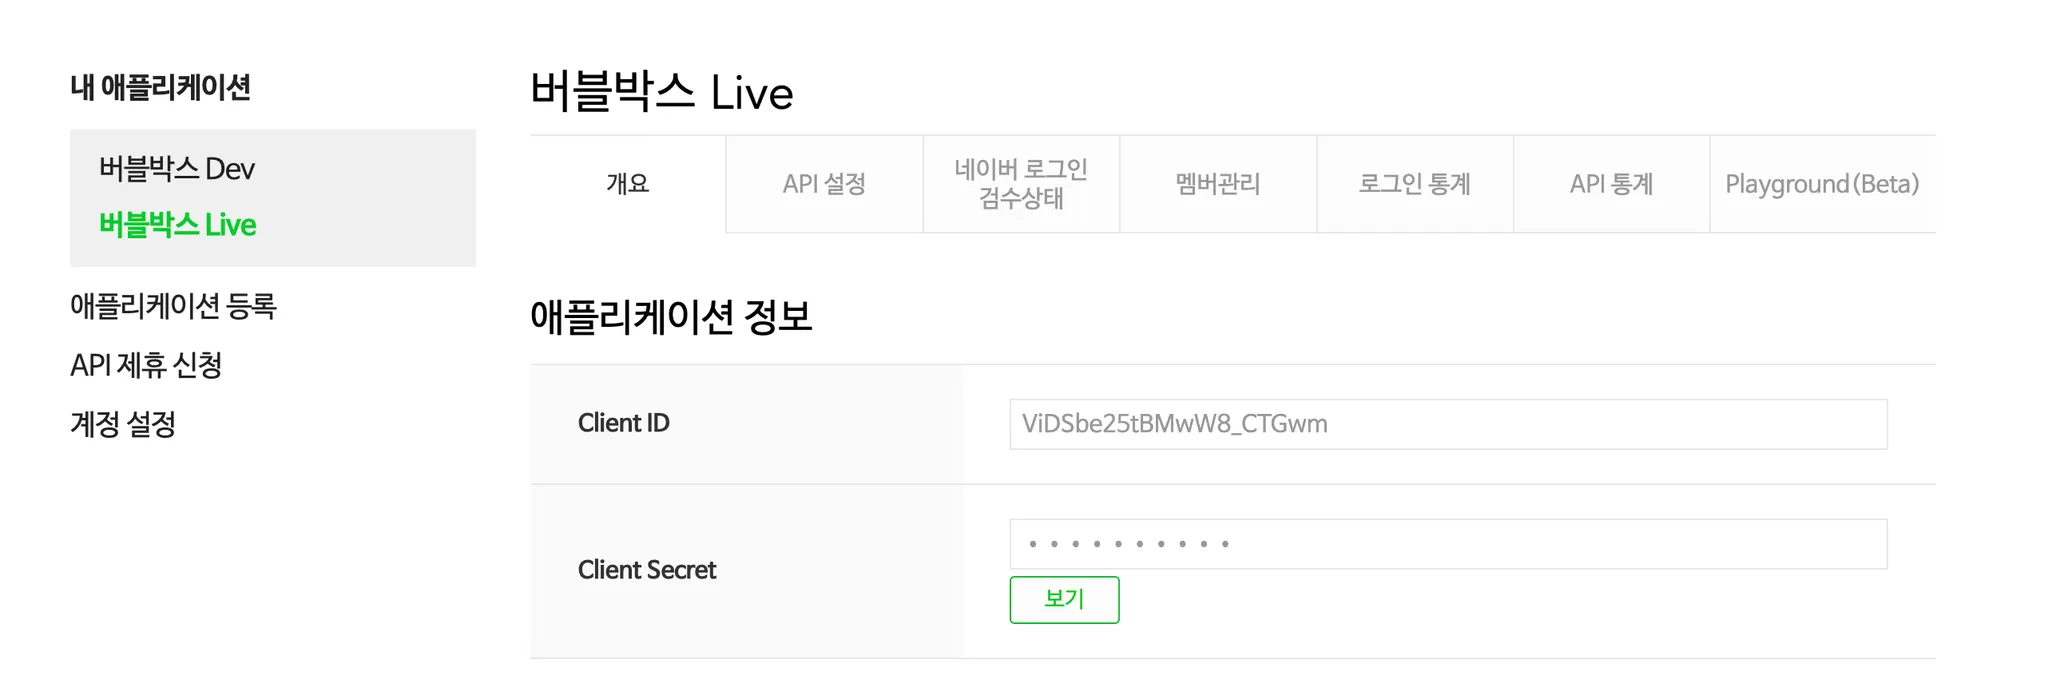
해당 값을 버블 에디터의 [플러그인] 탭에서 입력합니다.
These keys will be used in your Bubble editor under the Plugins tab.
웹 환경 등록 (서비스 URL, callback URL)
Register web environment (service URL, callback URL).
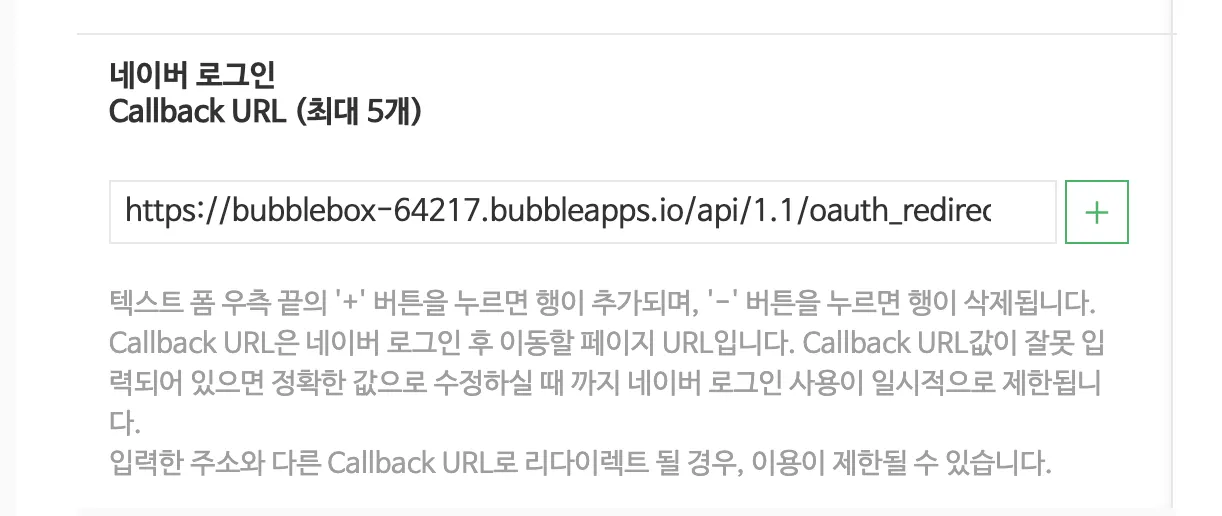
이어서 [Use a generic redirect URL]을 활성화합니다. 그리고 적혀 있는 URL 값(”https://{serviceURL}/api/{version}/oauth_redirect”)을 복사합니다. 해당 URL을 네이버 로그인 및 회원가입 시, callback URL로 사용합니다.
Enable "Use a generic redirect URL" and copy the provided URL ("https://{serviceURL}/api/{version}/oauth_redirect"). This URL will be used as the callback URL during Naver login and signup.

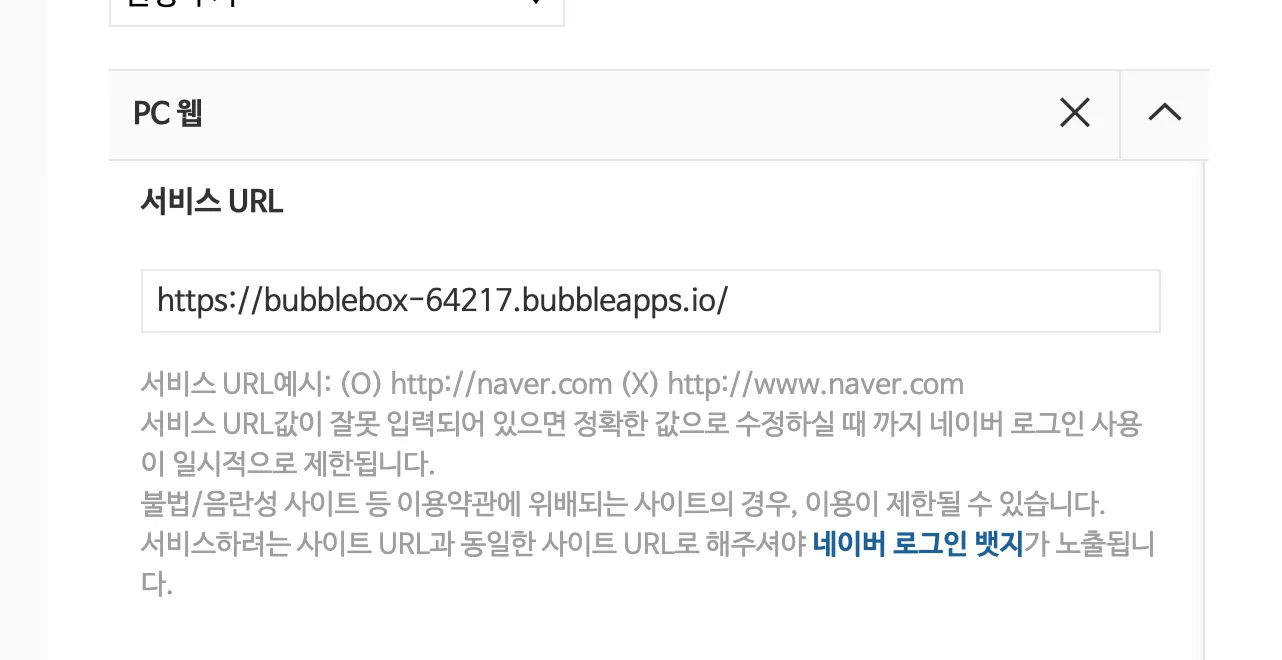
생성한 애플리케이션을 클릭하고 [API 설정] 탭에 들어갑니다. [로그인 오픈 API 서비스 환경] 섹션에서 [WEB 설정]을 추가하고, 버블로 만든 서비스의 URL을 입력합니다.
In the [API Settings] tab of your application, add a [Web Settings] under [Login Open API Service Environment] section and input your Bubble service's URL.

그리고 앞서 복사한 generic redirect URL을 [네이버 로그인 Callback URL]에 붙여넣기합니다.
and pasts the generic redirect URL in [네이버 로그인 Callback URL] field
유저 수집 정보 설정
Define user data collection settings.
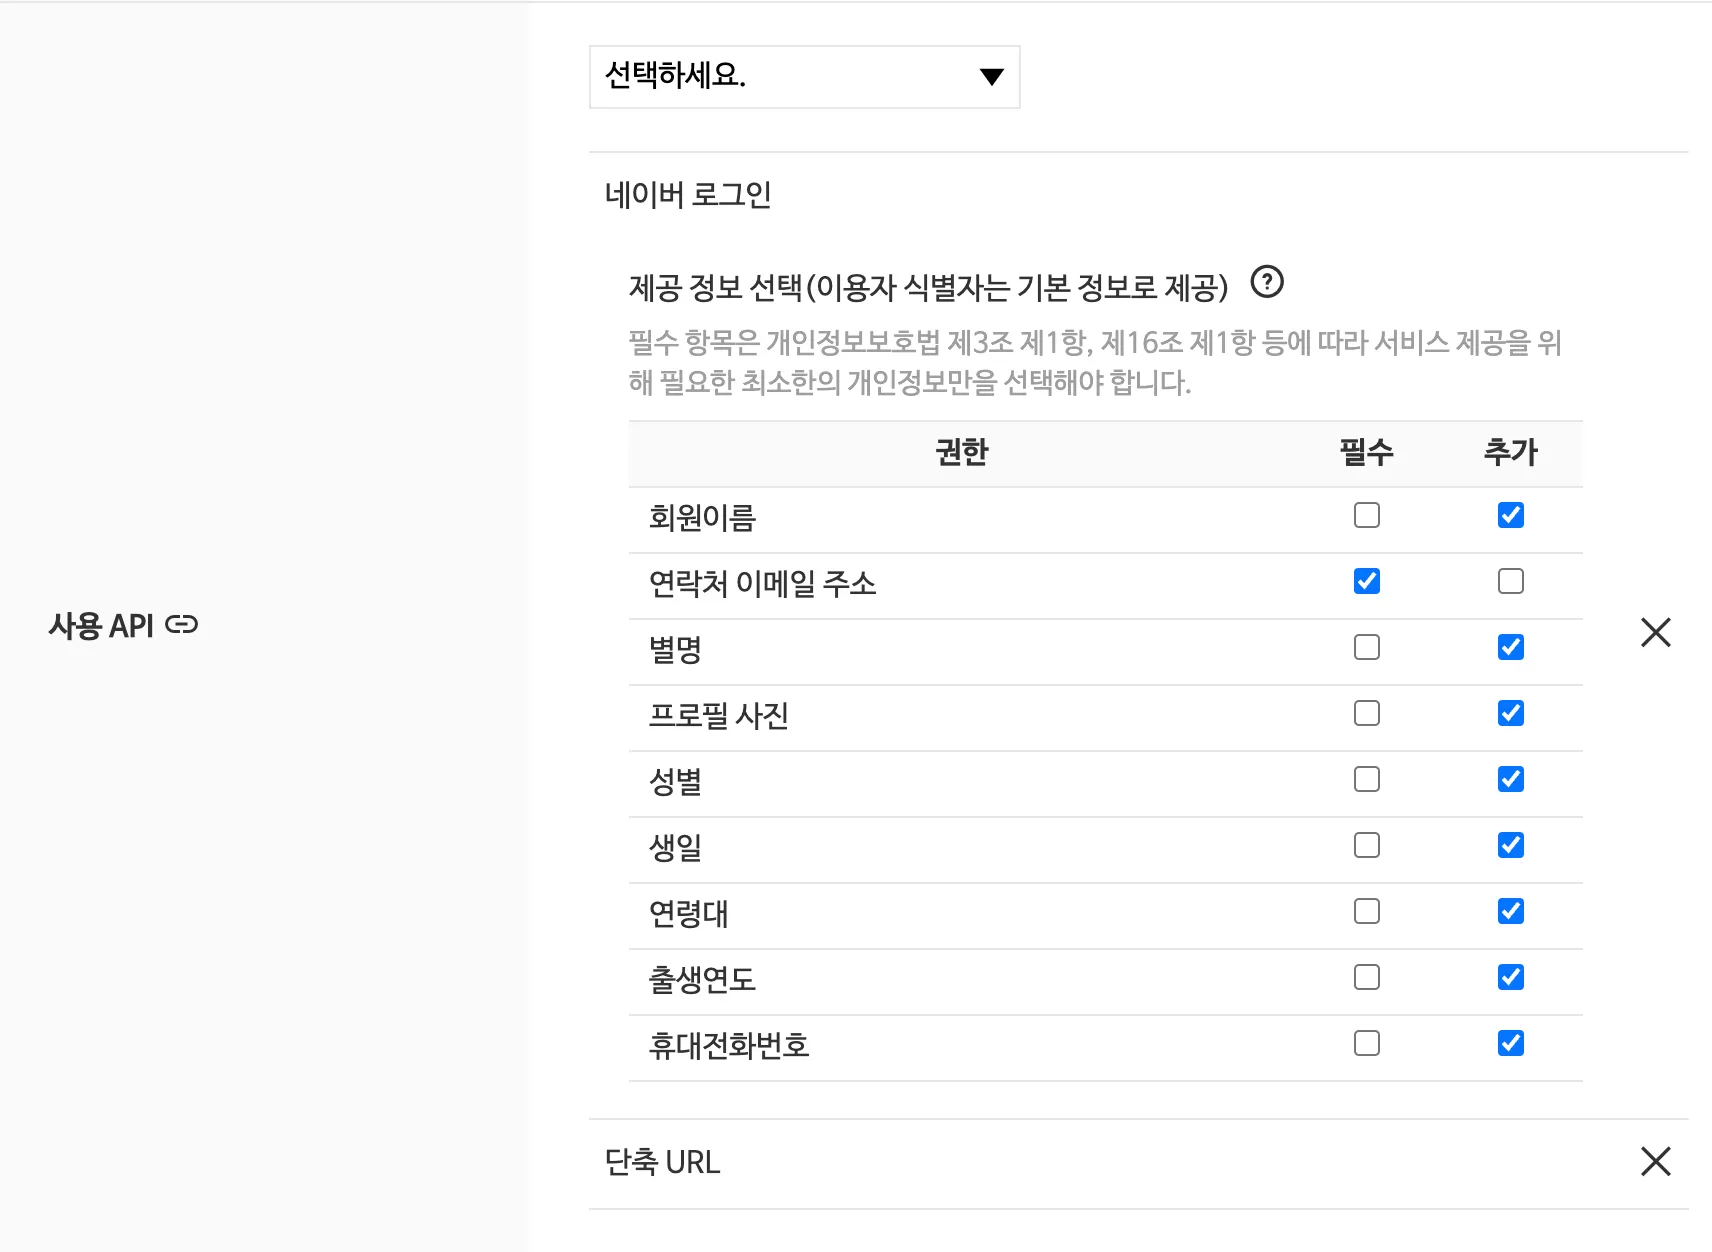
[API 설정] 탭의 [사용 API] 섹션에서 네이버 로그인을 확인할 수 있습니다. 여기서 유저가 네이버로 회원가입을 할 때, 어떤 정보를 받아올지 설정할 수 있습니다.
In the [API Settings] tab, under [Use API], you can configure what user information you want to collect when users sign up with Naver login.
2. Naver Login/Signup
로그인 및 회원가입 페이지에서 버튼 요소를 생성하고, 해당 버튼 요소를 클릭할 때 실행하는 워크플로우를 만듭니다. 그리고, [Signup/login with social network] 액션 이벤트를 생성합니다.
Create a button element on your login and signup page and create a workflow that triggers when the button is clicked.
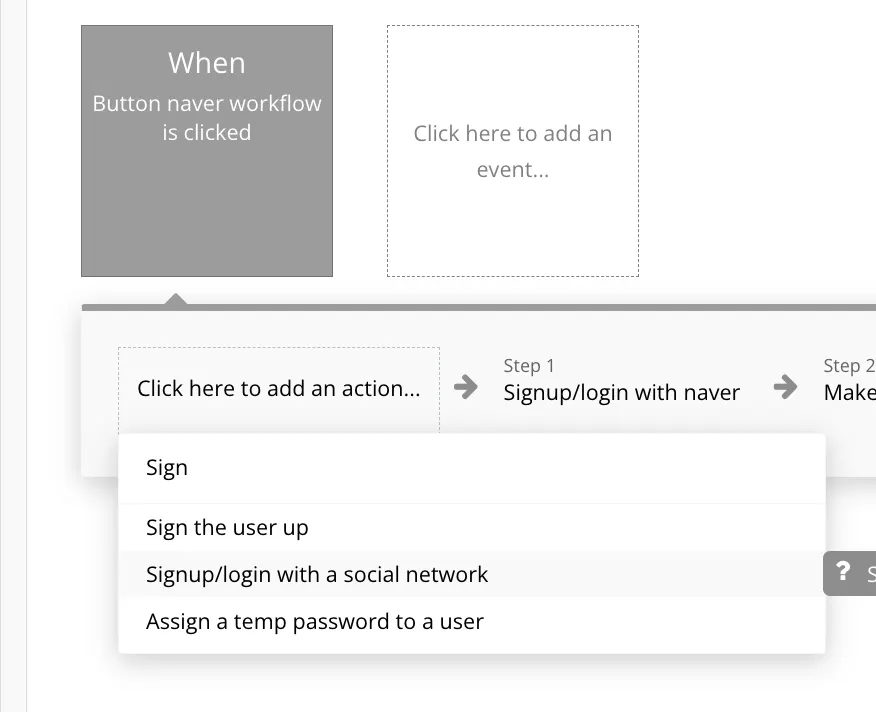
그리고 해당 이벤트의 OAuth provider를 [naver]로 선택합니다.
Add the action event [Signup/login with social network] to this workflow and select [naver] as the OAuth provider.

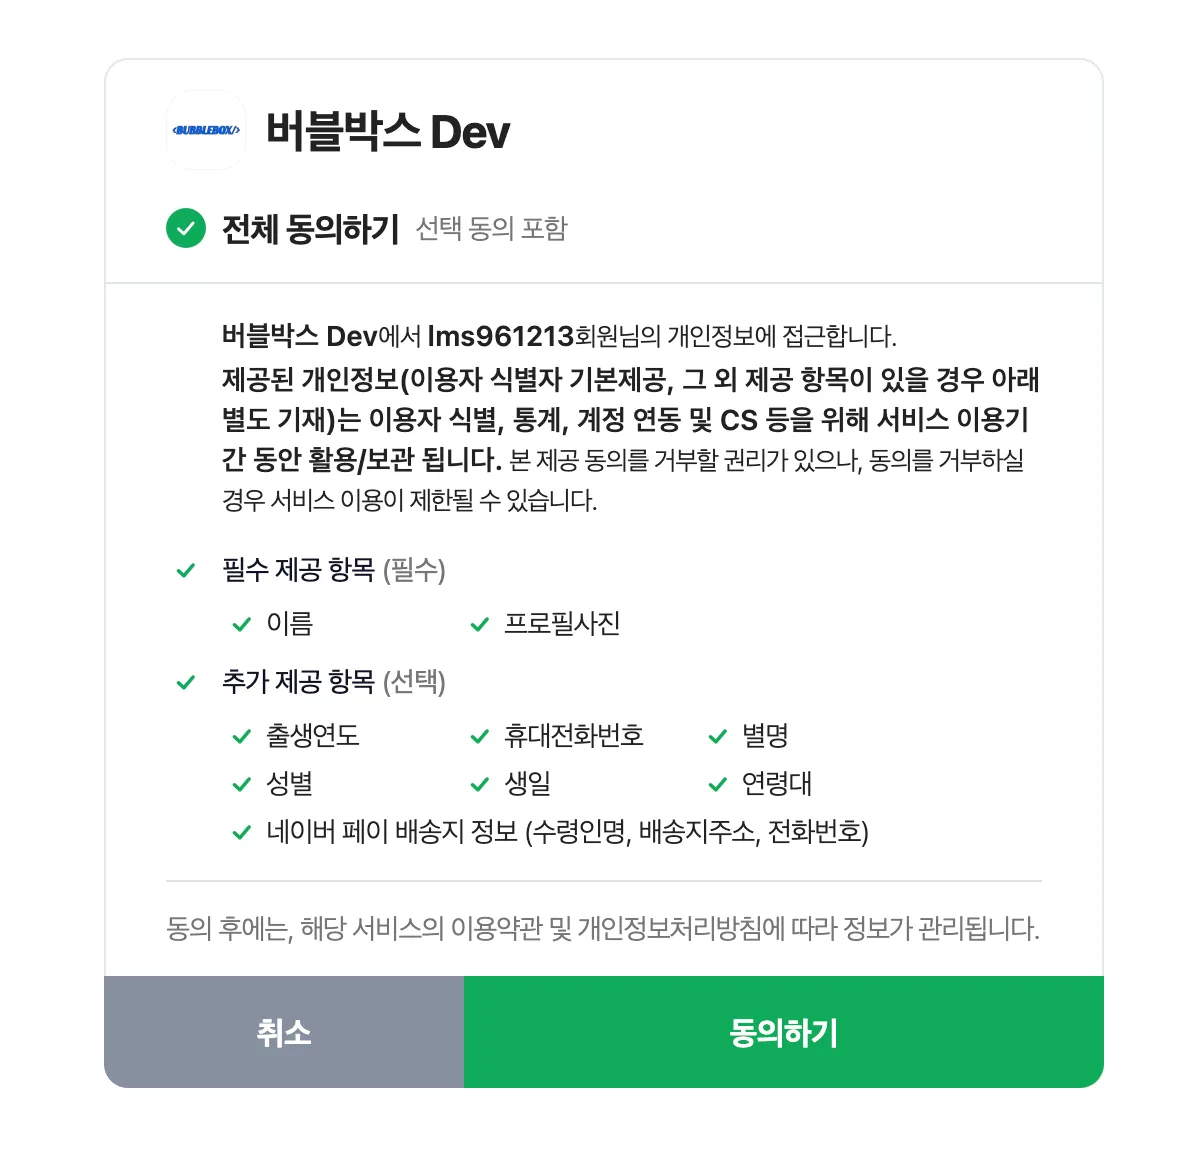
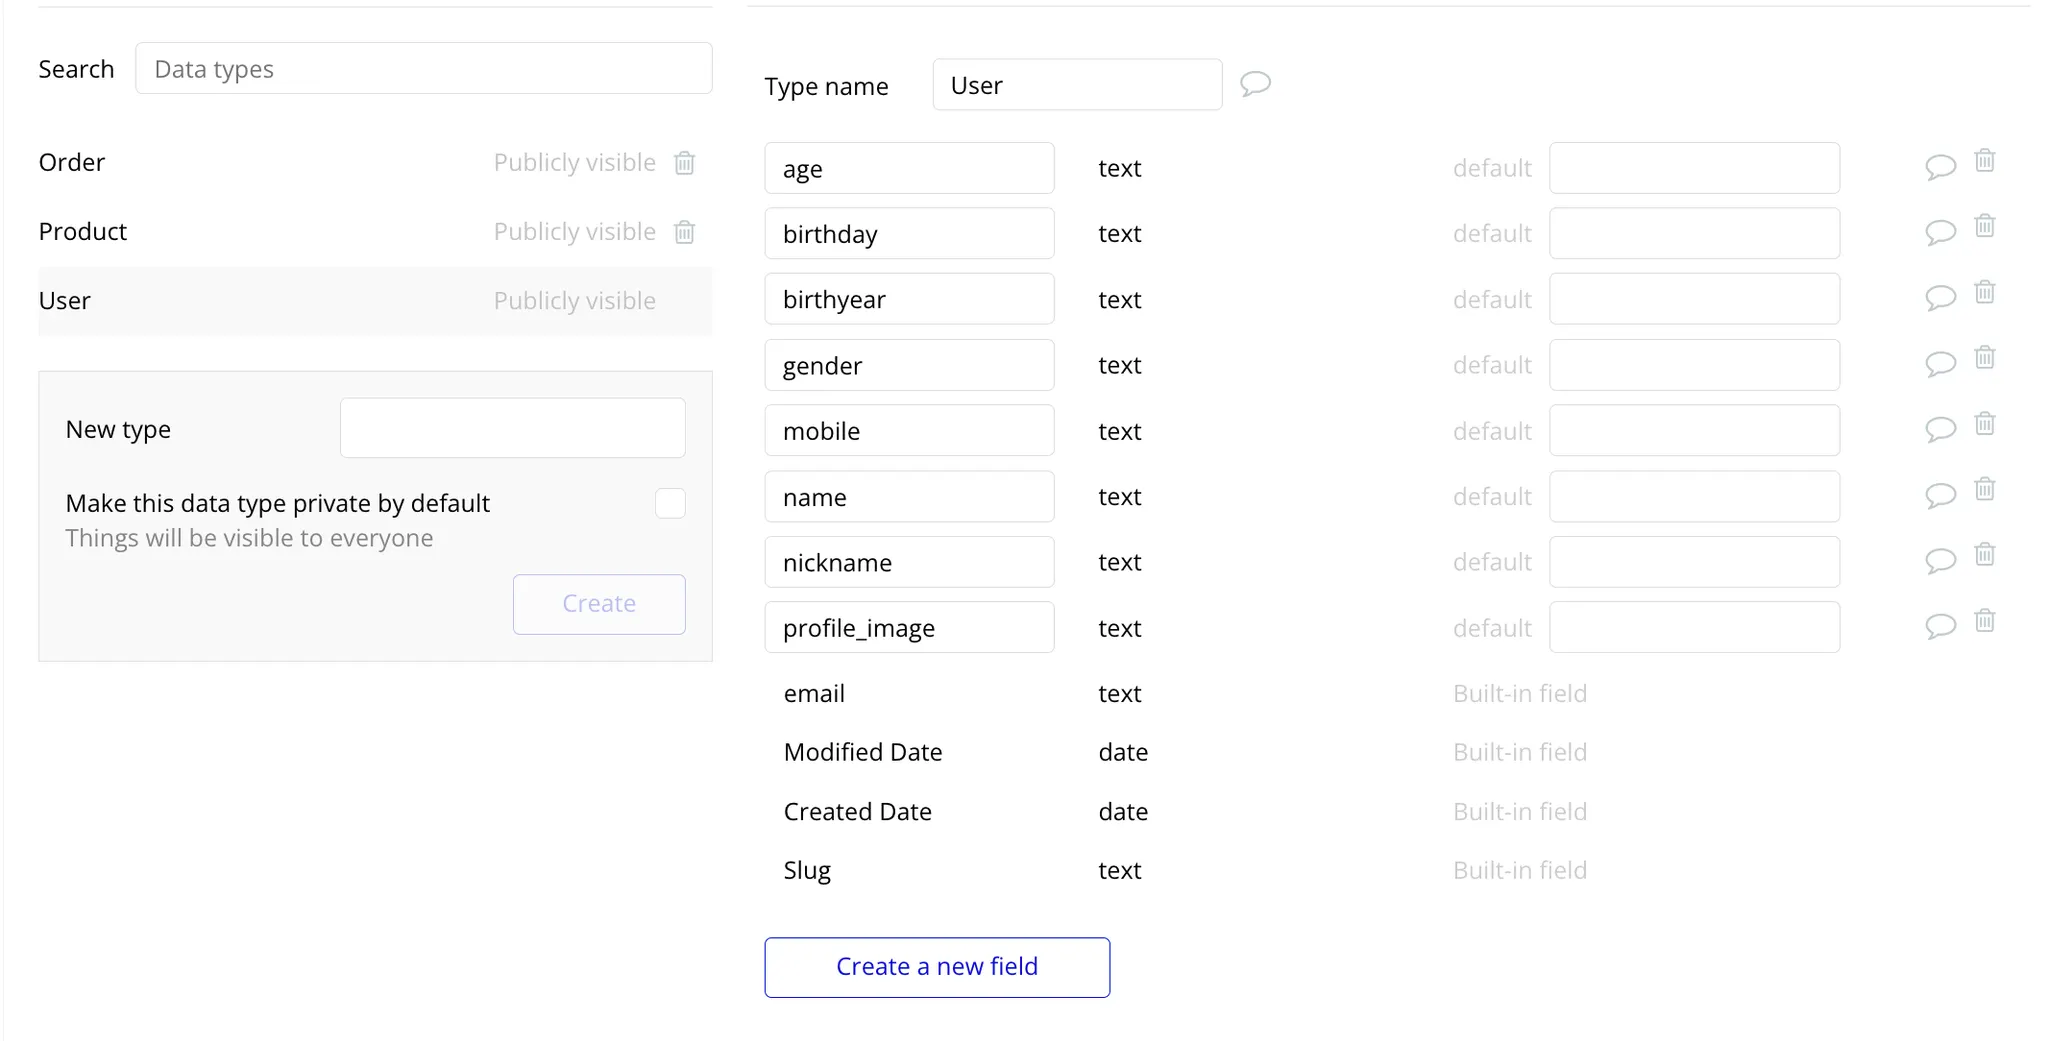
그러면 해당 이벤트가 일어날 때마다, 네이버 회원가입 창으로 리다이렉트 됩니다. 여기서 [동의하기] 버튼을 유저가 클릭하면 다시 버블 페이지로 이동하고 회원가입이 완료됩니다. 그리고 데이터베이스의 User Table에서 유저 레코드가 새로 생성되며, 이때 [Email] 필드에는 유저의 네이버 이메일이 자동 입력됩니다. 단, 유저의 수집 정보를 설정할 때, [연락처 이메일 주소]를 필수로 하지 않으면, [Email] 필드는 공백으로 남을 수 있습니다.
When this event occurs, the user will be redirected to the Naver signup page. Once the user clicks the "Agree" button, they will be redirected back to the Bubble page, and the signup process will be completed. A new user record will be created in the User Table of the database, with the user's Naver email automatically entered into the "Email" field. However, if you do not set the user's email as a required field, the "Email" field may remain blank.


3. Read User’s Info
유저의 수집 정보에서 활성화 한 선택지의 값을 버블의 User Table에 추가하고 싶다면, [read user info] 액션을 함께 사용해야 합니다.
If you want to add the values of the options activated in the user's data collection information to the Bubble User Table, you need to use the [read user info] action together.

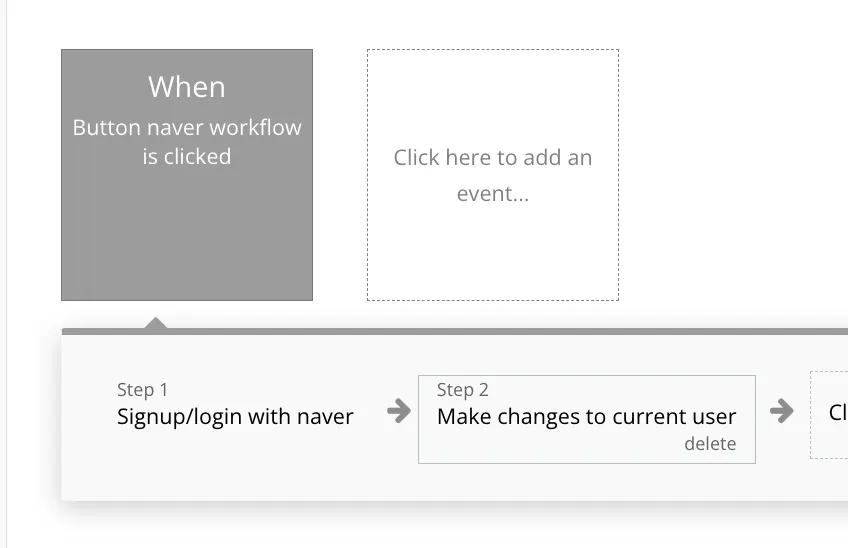
[read user info] 액션은 앞선 [Signup/login with social network]가 존재하는 워크플로우에서 함께 사용해야 합니다. 그래야만 네이버로 회원가입 및 로그인한 유저의 토큰을 발급 받아 정보를 얻을 수 있습니다. 앞서 [Signup/login with social network] 액션이 존재하는 워크플로우에서 후속 액션으로 [Make changes to cuurent user]를 생성합니다.
The [read user info] action must be used together in the workflow where [Signup/login with social network] is present. This is necessary to obtain the token of the user who signed up or logged in with Naver and retrieve their information. In the workflow where [Signup/login with social network] action exists, create a subsequent action [Make changes to current user].
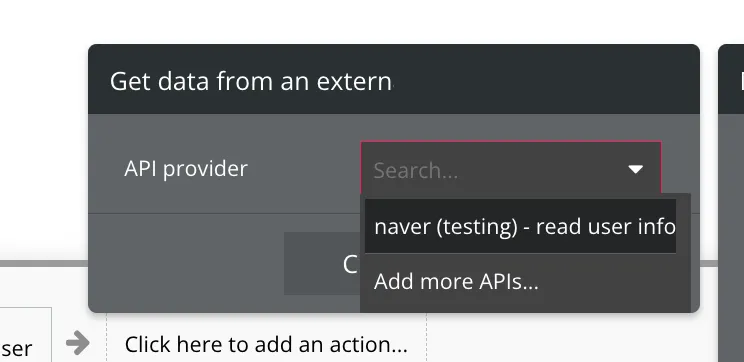
그리고 업데이트하고자 한 필드의 값으로 [Get data form an external API]를 선택합니다. 그리고 [API provider] 선택란에서 [naver - read user info]를 선택합니다.
Then, you select [Get data from an external API] as the value for the field you want to update. In the [API provider] dropdown menu, choose [naver - read user info].

그러면 [Signup/login with social network] 선행 액션으로 로그인 및 회원가입을 한 유저의 정보를 불러옵니다. 여기서 활용하고자 한 값을 선택해 사용하면 됩니다. 예를 들어, 유저의 나이대를 입력하고 싶은 경우, [’s response age]를 선택합니다.
Then, from the information retrieved using the preceding action [Signup/login with social network], you can select the value you want to utilize. For instance, if you want to input the user's age range, you would select [’s response age].

참고로 여기서 불러올 수 있는 유저 데이터는 유저의 수집 정보에서 선택한 값에 기반합니다.
Please note that the user data you can retrieve here is based on the values selected in the user's data collection preferences.
{
"resultcode": "00",
"message": "success",
"response": {
"email": "bubbleboxeroffical@gmail.com",
"nickname": "bubblebox",
"profile_image": "https://ssl.pstatic.net/static/pwe/address/nodata_33x33.gif",
"age": "20-29",
"gender": "M",
"id": "32742776",
"name": "이명성",
"birthday": "12-13",
"birthyear": "1996",
"mobile": "010-0000-0000"
}
}
JavaScript
복사

후원 받은 커피는 더 많은 플러그인과 자료를 만드는 원동력이 됩니다.

