


중요 공지
“버블박스”가 “노코더스”라는 이름으로 변경됐어요
현재 사이트는 더 이상 운영하지 않으니
노코더스 사이트로 이동해주세요


한 줄 요약
네이버 지도 API를 활용해 (1) 주소를 검색하거나 (2) 특정 위치를 네이버 지도로 표기합니다
Using the Naver Maps API to (1) search for an address or (2) display a specific location on Naver Maps


버블박스를 운영하는 페임리가 궁금하다면?
If you're curious about FameLee?
Intro
1. Why
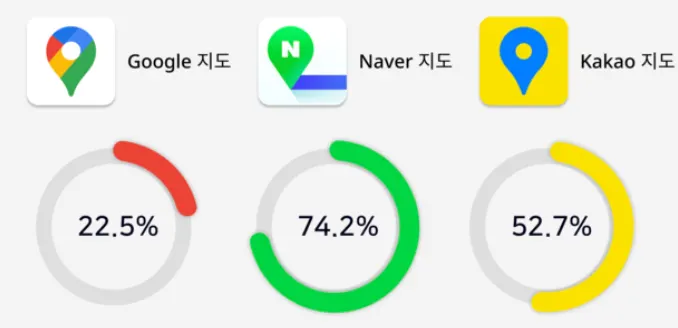
버블에서 기본적인 지도 서비스로 “구글 맵”을 제공합니다. 하지만 해당 서비스는 국내에서 잘 사용하지 않으며, 주로 네이버나 카카오 지도를 사용합니다. 유저 친화적으로 네이버 지도로 특정 위치를 제공할 수 있도록 해당 플러그인을 개발했습니다.
In the Bubble platform, the default map service provided is "Google Maps." However, this service is not commonly used in South Korea, where Naver Maps or Kakao Maps are preferred. To enhance user experience, we developed this plugin to display specific locations using Naver Maps.
출처 : 에듀팡
2. ChangeLog
1.0
•
신주소 / 구주소 검색 (Search by new address / old address)
•
네이버 지도 상으로 위치 표기 (Display location on Naver Maps)
•
네이버 지도에 마커 표시 (Display marker on Naver Maps)
•
네이버 지도에 정보창 커스터마이징 (Customize information window on Naver Maps)
Core
1. Related Docu
플러그인 페이지


데모 링크


에디터 링크


2. Composition
a. naver map
Element
네이버 지도에서 특정 위치를 보여줍니다. 마커 및 정보창을 추가적으로 활용할 수 있습니다. 위도 및 경도 값은 [geocoding] Action에서 주소 검색으로 확인할 수 있습니다.
Naver Maps can display a specific location. You can also use markers and information windows.
Input
field | type | Required | 설명 | 예시 |
longitude | number | | Input the longitude (x)
경도(x)를 입력해주세요 | 126.9386 |
latitude | number | | Input the latitude (y)
위도(y)를 입력해주세요 | 37.5678 |
zoom | number | Input the zoom level
줌 크기를 입력해주세요 | 16 | |
zoomControl | boolean | Select whether to display the zoom controller
줌 컨트롤러 표시 유무를 선택해주세요 | TRUE | |
zoomPosition | number | Input the position of the zoom controller (0-12)
줌 컨트롤러의 위치(0~12)를 입력해주세요 | 1 | |
markerVisible | boolean | Select whether to display a marker
마커 표시 유무를 선택해주세요 | TRUE | |
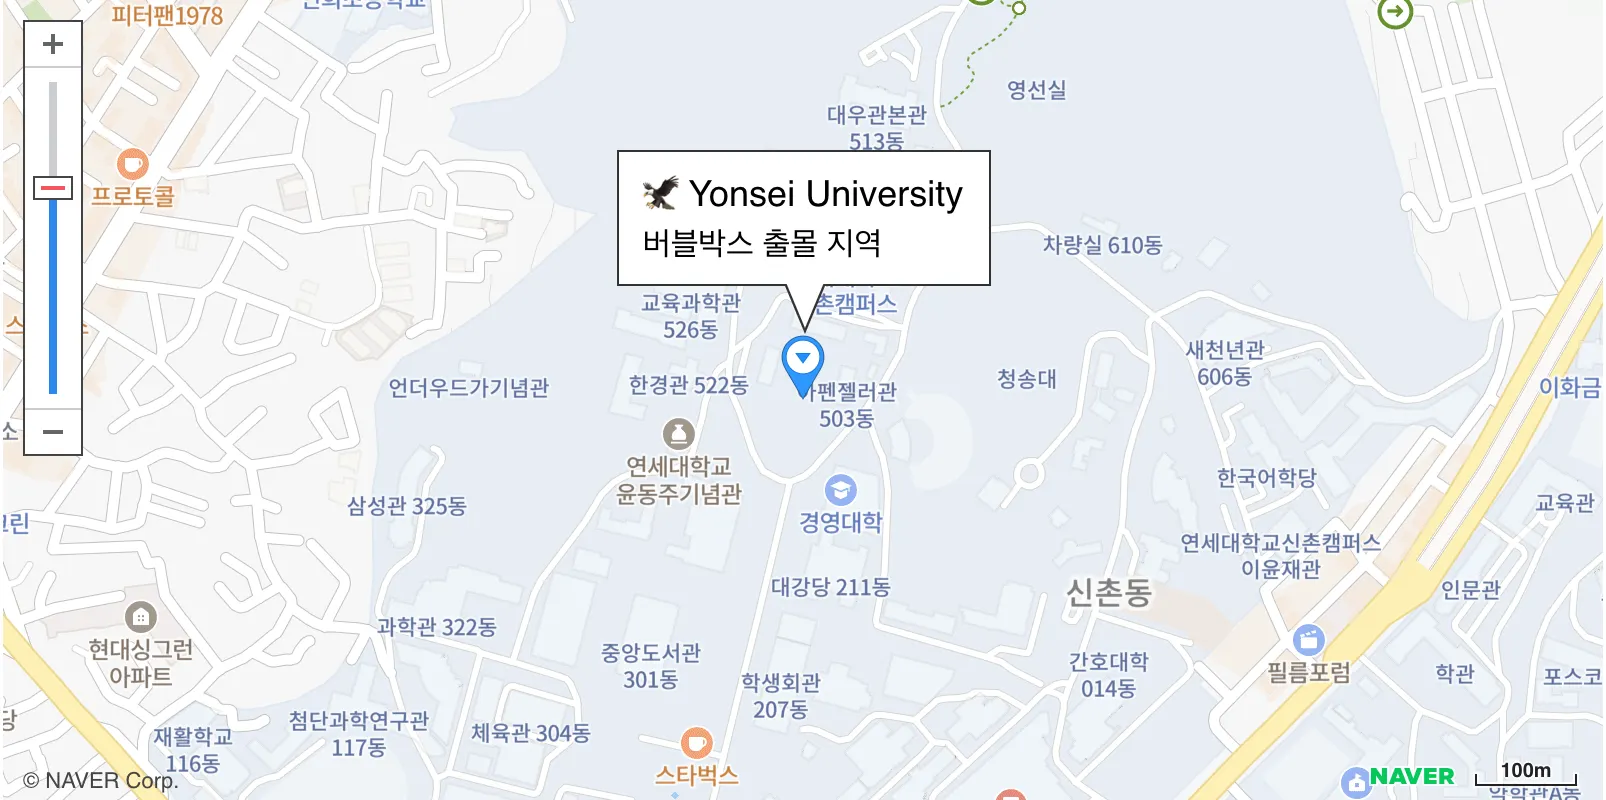
contentHTML | text | Input the information window content in HTML format to be shown when the marker is clicked
마커 클릭 시, 보여줄 윈도우를 HTML 형식으로 입력해주세요 | <div style = "padding : 12px; width: fit-content; border-radius : 8px;">
<h1 style = "padding-bottom : 8px; font-size:18px;"> Yonsei University</h1>
<p> 버블박스 출몰 지역 </p>
</div> | |
contentOpen | boolean | Select whether to display the information window when the map loads
지도가 출력될 때, 윈도우를 보여줄지 선택해주세요 | TRUE |
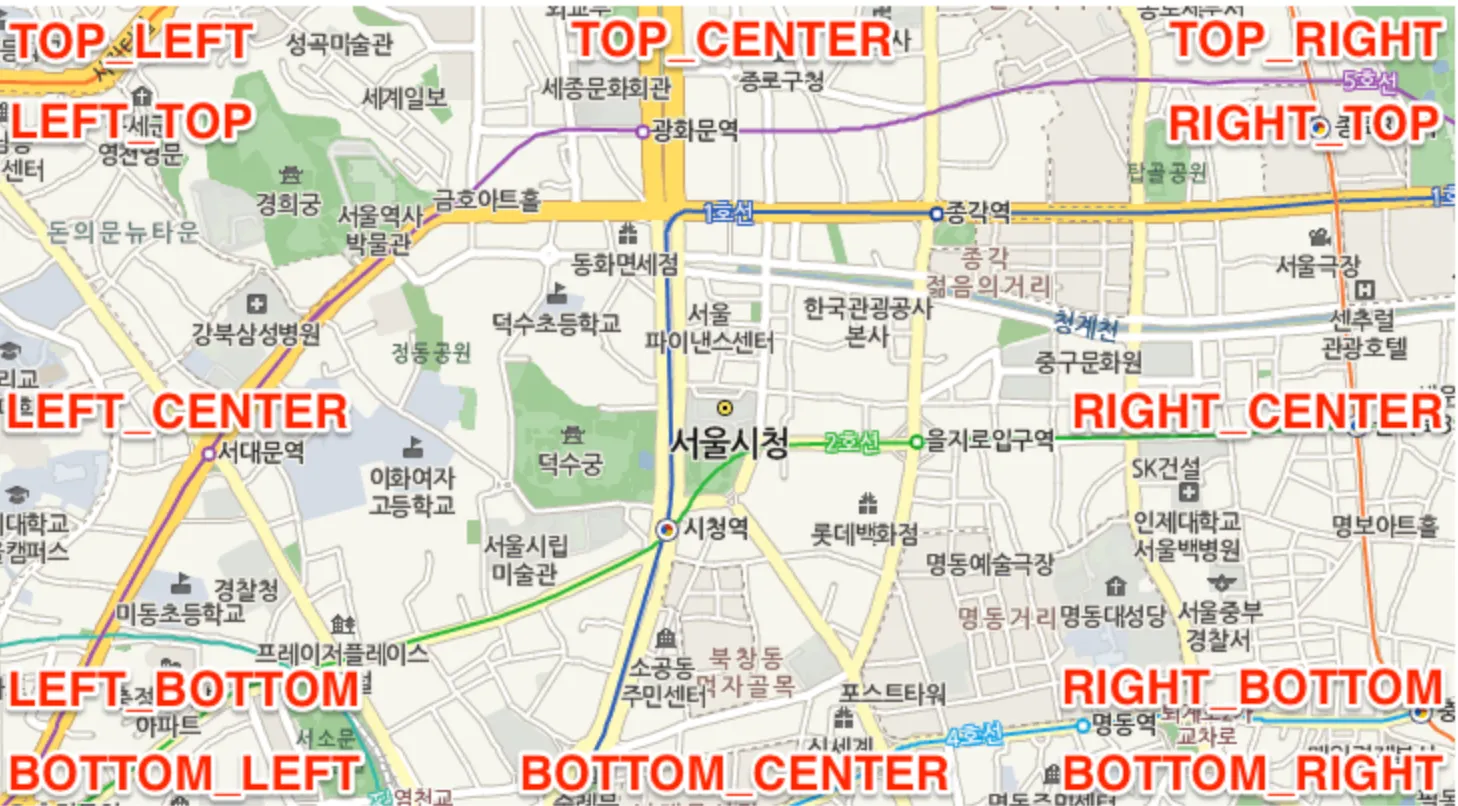
zoomPosition | type | Desc |
0 | CENTER | 요소를 중앙에 배치합니다. |
1 | TOP_LEFT | 요소를 왼쪽 위에 배치합니다. 요소는 왼쪽 위에서 가운데를 향해 쌓입니다. |
2 | TOP_CENTER | 요소를 위쪽 가운데에 배치합니다. |
3 | TOP_RIGHT | 요소를 오른쪽 위에 배치합니다. 요소는 오른쪽 위에서 가운데를 향해 쌓입니다. |
4 | LEFT_CENTER | 요소를 왼쪽 가운데에 배치합니다. |
5 | LEFT_TOP | 요소를 왼쪽 위에 배치합니다. 요소는 왼쪽 위에서 아래를 향해 쌓입니다. |
6 | LEFT_BOTTOM | 요소를 왼쪽 아래에 배치합니다. 요소는 왼쪽 아래에서 위를 향해 쌓입니다. |
7 | RIGHT_TOP | 요소를 오른쪽 위에 배치합니다. 요소는 오른쪽 위에서 아래를 향해 쌓입니다. |
8 | RIGHT_CENTER | 요소를 오른쪽 가운데에 배치합니다. |
9 | RIGHT_BOTTOM | 요소를 오른쪽 아래에 배치합니다. 요소는 오른쪽 아래에서 위를 향해 쌓입니다. |
10 | BOTTOM_LEFT | 요소를 왼쪽 아래에 배치합니다. 요소는 왼쪽 아래에서 가운데를 향해 쌓입니다. |
11 | BOTTOM_CENTER | 요소를 아래쪽 가운데에 배치합니다. |
12 | BOTTOM_RIGHT | 요소를 오른쪽 아래에 배치합니다. 요소는 오른쪽 아래에서 가운데를 향해 쌓입니다. |
b. Geocoding
API Action API Data Call
주소에 따른 위도 및 경도를 확인할 수 있습니다. 해당 정보를 활용해 [naver map]에서 표시할 수 있습니다
You can find the latitude and longitude for a given address. Use this information to display the location on [Naver Map].
Input
field | type | Required | 설명 | 예시 |
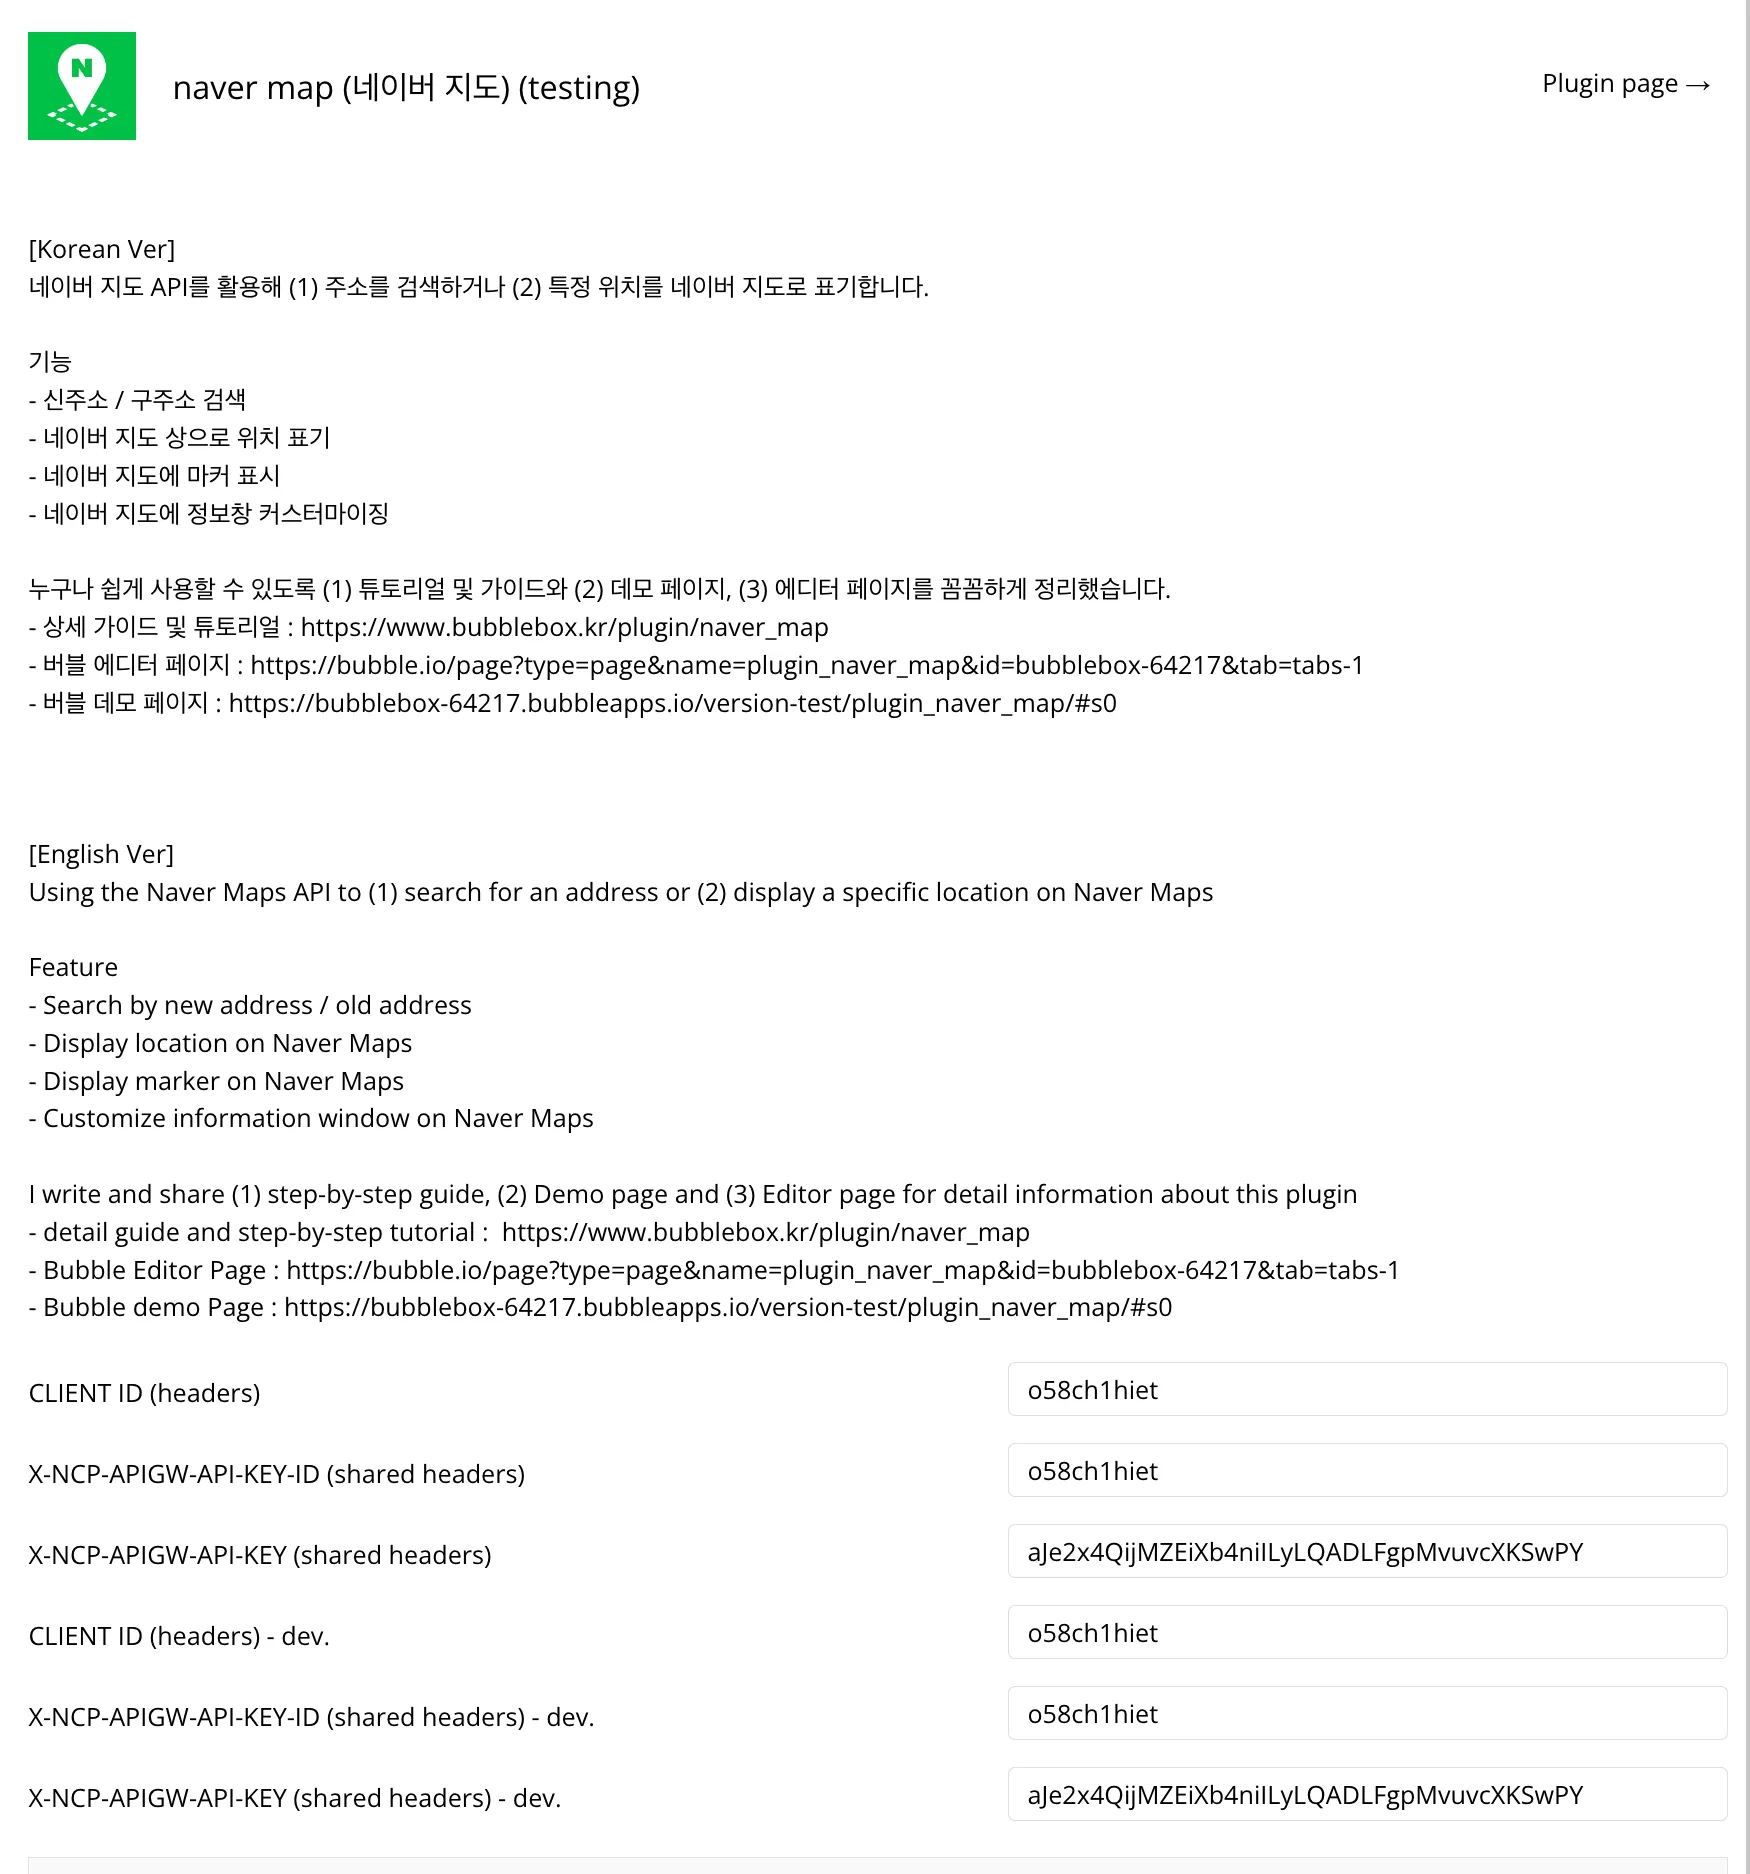
X-NCP-APIGW-API-KEY-ID | number | | Input Client ID for application
어플리케이션에 발급 받은 클라이언트 ID 값을 입력해주세요 | o58ch1hiet |
X-NCP-APIGW-API-KEY-ID | number | | Input Client Secret for application
어플리케이션에 발급 받은 클라이언트 Secret 값을 입력해주세요 | aJe2x4QijMZEiXb4niILyLQADLFgpMvuvcXKSwPY |
query | number | | Input the address
주소를 입력해주세요 | 연세로 50 |
count | boolean | Input the number of search result
검색 결과 갯수를 입력해주세요 | 10 |
Return
{
"status": "OK",
"meta": {
"totalCount": 1,
"page": 1,
"count": 1
},
"addresses": [
{
"roadAddress": "서울특별시 서대문구 연세로 50 연세대학교",
"jibunAddress": "서울특별시 서대문구 신촌동 134 연세대학교",
"englishAddress": "50, Yonsei-ro, Seodaemun-gu, Seoul, Republic of Korea",
"addressElements": [
{
"types": [
"SIDO"
],
"longName": "서울특별시",
"shortName": "서울특별시",
"code": ""
}
],
"x": "126.9390292",
"y": "37.5671131",
"distance": 0
}
],
"errorMessage": ""
}
JSON
복사
c. reverse Geocoding
API Action API Data Call
위도 및 경로에 따른 주소를 확인할 수 있습니다.
You can find the address for a given latitude and longitude.
Input
field | type | Required | 설명 | 예시 |
X-NCP-APIGW-API-KEY-ID | number | | Input Client ID for application
어플리케이션에 발급 받은 클라이언트 ID 값을 입력해주세요 | o58ch1hiet |
X-NCP-APIGW-API-KEY-ID | number | | Input Client Secret for application
어플리케이션에 발급 받은 클라이언트 Secret 값을 입력해주세요 | aJe2x4QijMZEiXb4niILyLQADLFgpMvuvcXKSwPY |
coords | text | | Input the longitude and latitude. each seperated by comma(,)
경도와 위도를 입력하며, 콤마(,)로 구분합니다 | 126.9386,37.56578 |
Return
{
"status": {
"code": 0,
"name": "ok",
"message": "done"
},
"results": [
{
"name": "legalcode",
"code": {
"id": "1141011400",
"type": "L",
"mappingId": "09410114"
},
"region": {
"area0": {
"name": "kr",
"coords": {
"center": {
"crs": "",
"x": 0,
"y": 0
}
}
},
"area1": {
"name": "서울특별시",
"coords": {
"center": {
"crs": "EPSG:4326",
"x": 126.978388,
"y": 37.56661
}
},
"alias": "서울"
},
"area2": {
"name": "서대문구",
"coords": {
"center": {
"crs": "EPSG:4326",
"x": 126.9368,
"y": 37.579225
}
}
},
"area3": {
"name": "신촌동",
"coords": {
"center": {
"crs": "EPSG:4326",
"x": 126.941811,
"y": 37.564092
}
}
},
"area4": {
"name": "",
"coords": {
"center": {
"crs": "",
"x": 0,
"y": 0
}
}
}
},
"land": {
"type": "1",
"number1": "134",
"number2": "",
"addition0": {
"type": "",
"value": ""
},
"addition1": {
"type": "",
"value": ""
},
"addition2": {
"type": "",
"value": ""
},
"addition3": {
"type": "",
"value": ""
},
"addition4": {
"type": "",
"value": ""
},
"coords": {
"center": {
"crs": "",
"x": 0,
"y": 0
}
},
"name": "연세로"
}
}
]
}
JSON
복사
Tutorial
1. Setting API
해당 플러그인을 사용하기 위해서 네이버 클라우드 API가 필요합니다.
To use this plugin, you need a Naver Cloud API.
클라우드 로그인 후, 대시보드에서 [AI Naver API] 로 이동한후, 어플리케이션을 등록해야 합니다. 이때 Service로 (1) Web dynamic map, (2) Geocoding, (3) Reverse Geocoding을 선택합니다. 그리고 Web 서비스로 현재 빌드하고 있는 서비스의 도메인을 입력합니다.
After logging into Naver Cloud, navigate to the [AI Naver API] section from the dashboard and register an application. Select the following services: (1) Web Dynamic Map, (2) Geocoding, and (3) Reverse Geocoding. Enter the domain of the service you are currently building as the web service.
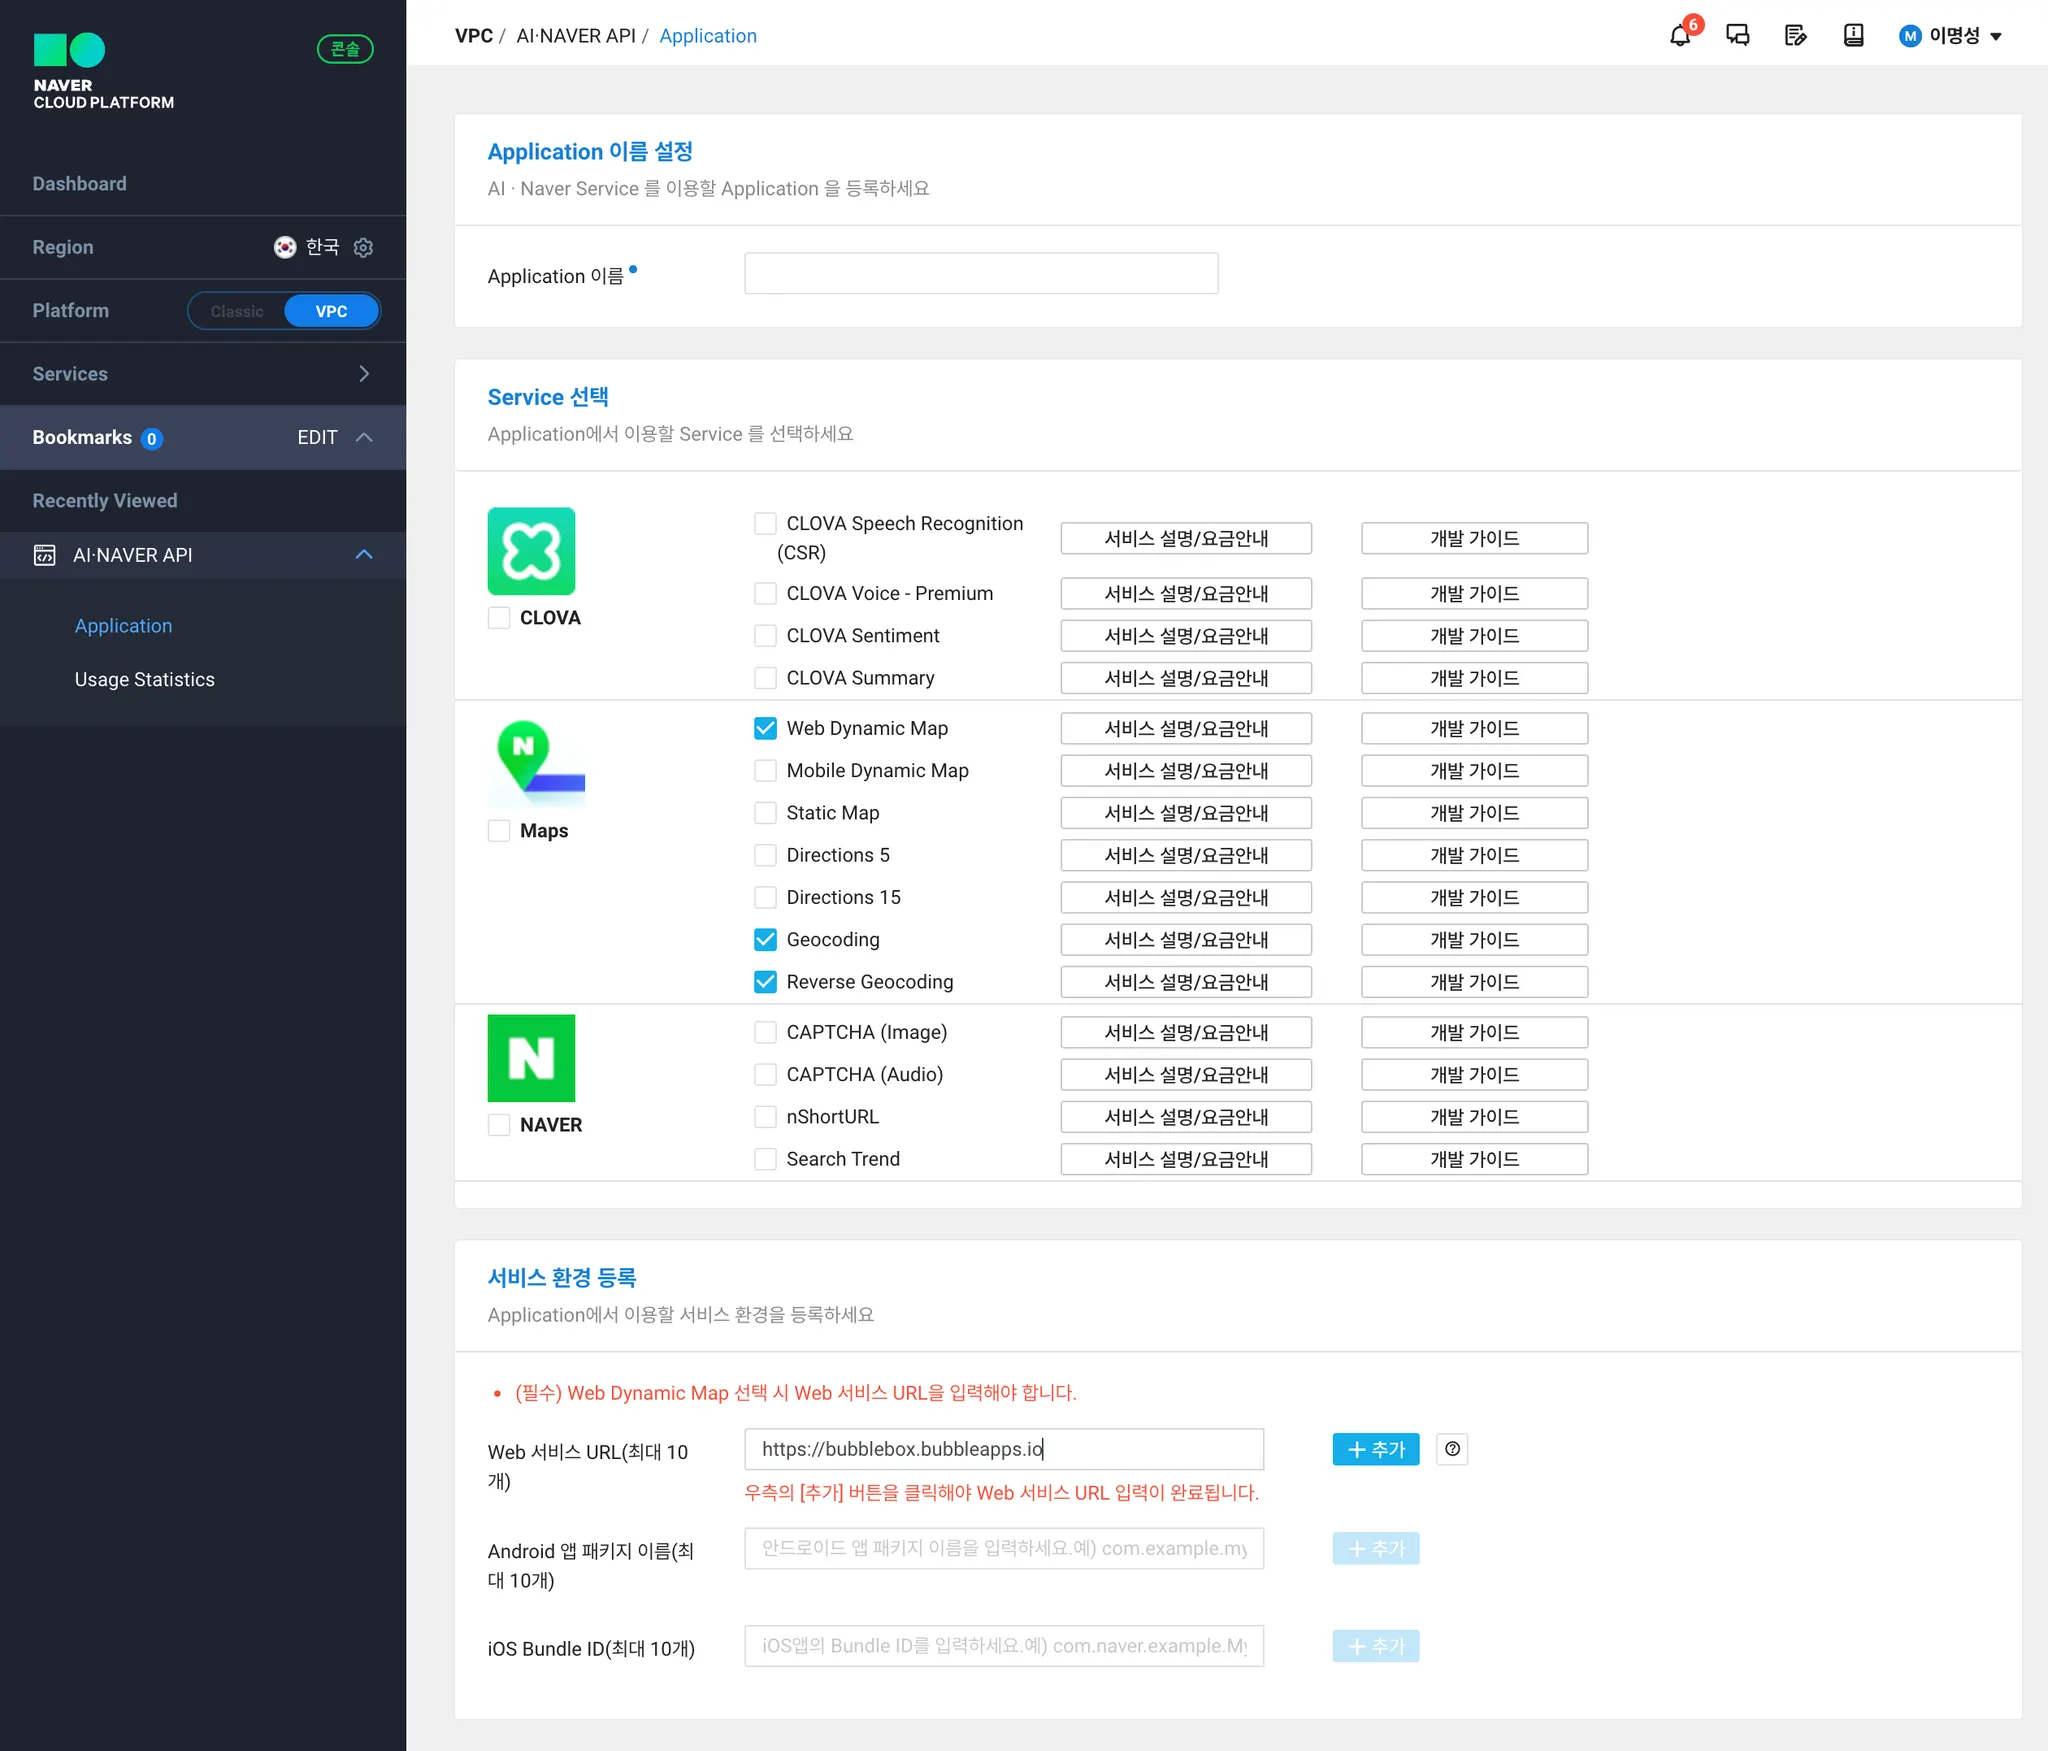
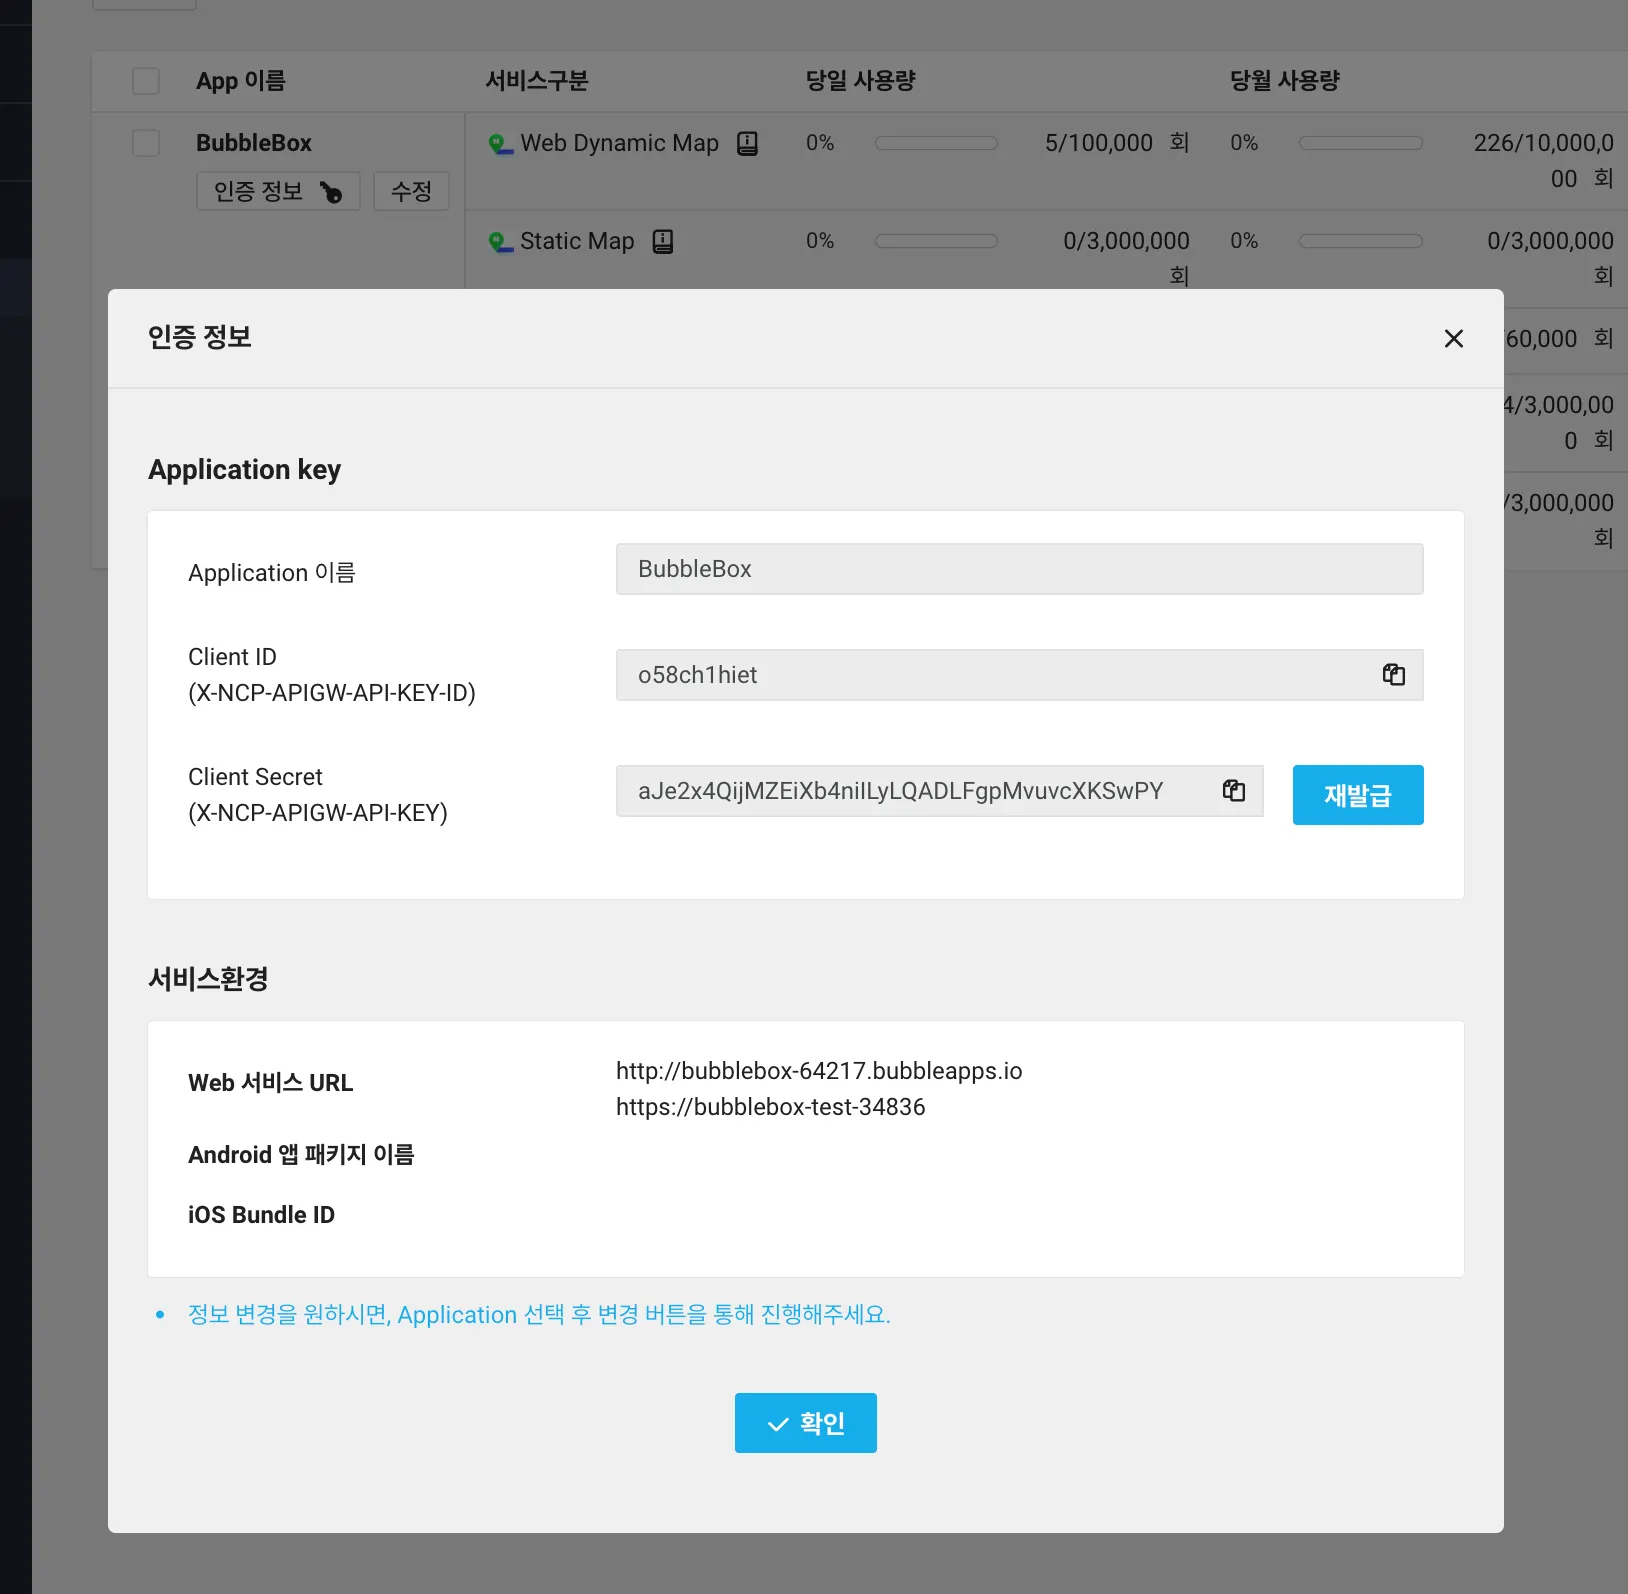
앱 등록 후, [인증 정보]를 클릭해 Clinet ID와 Client Secret을 확인합니다. 해당 값을 복사해 플러그인 설정 페이지에 입력합니다.
After registering the application, click on [Authentication Information] to obtain the Client ID and Client Secret. Copy these values and enter them on the plugin configuration page.
2. static Map
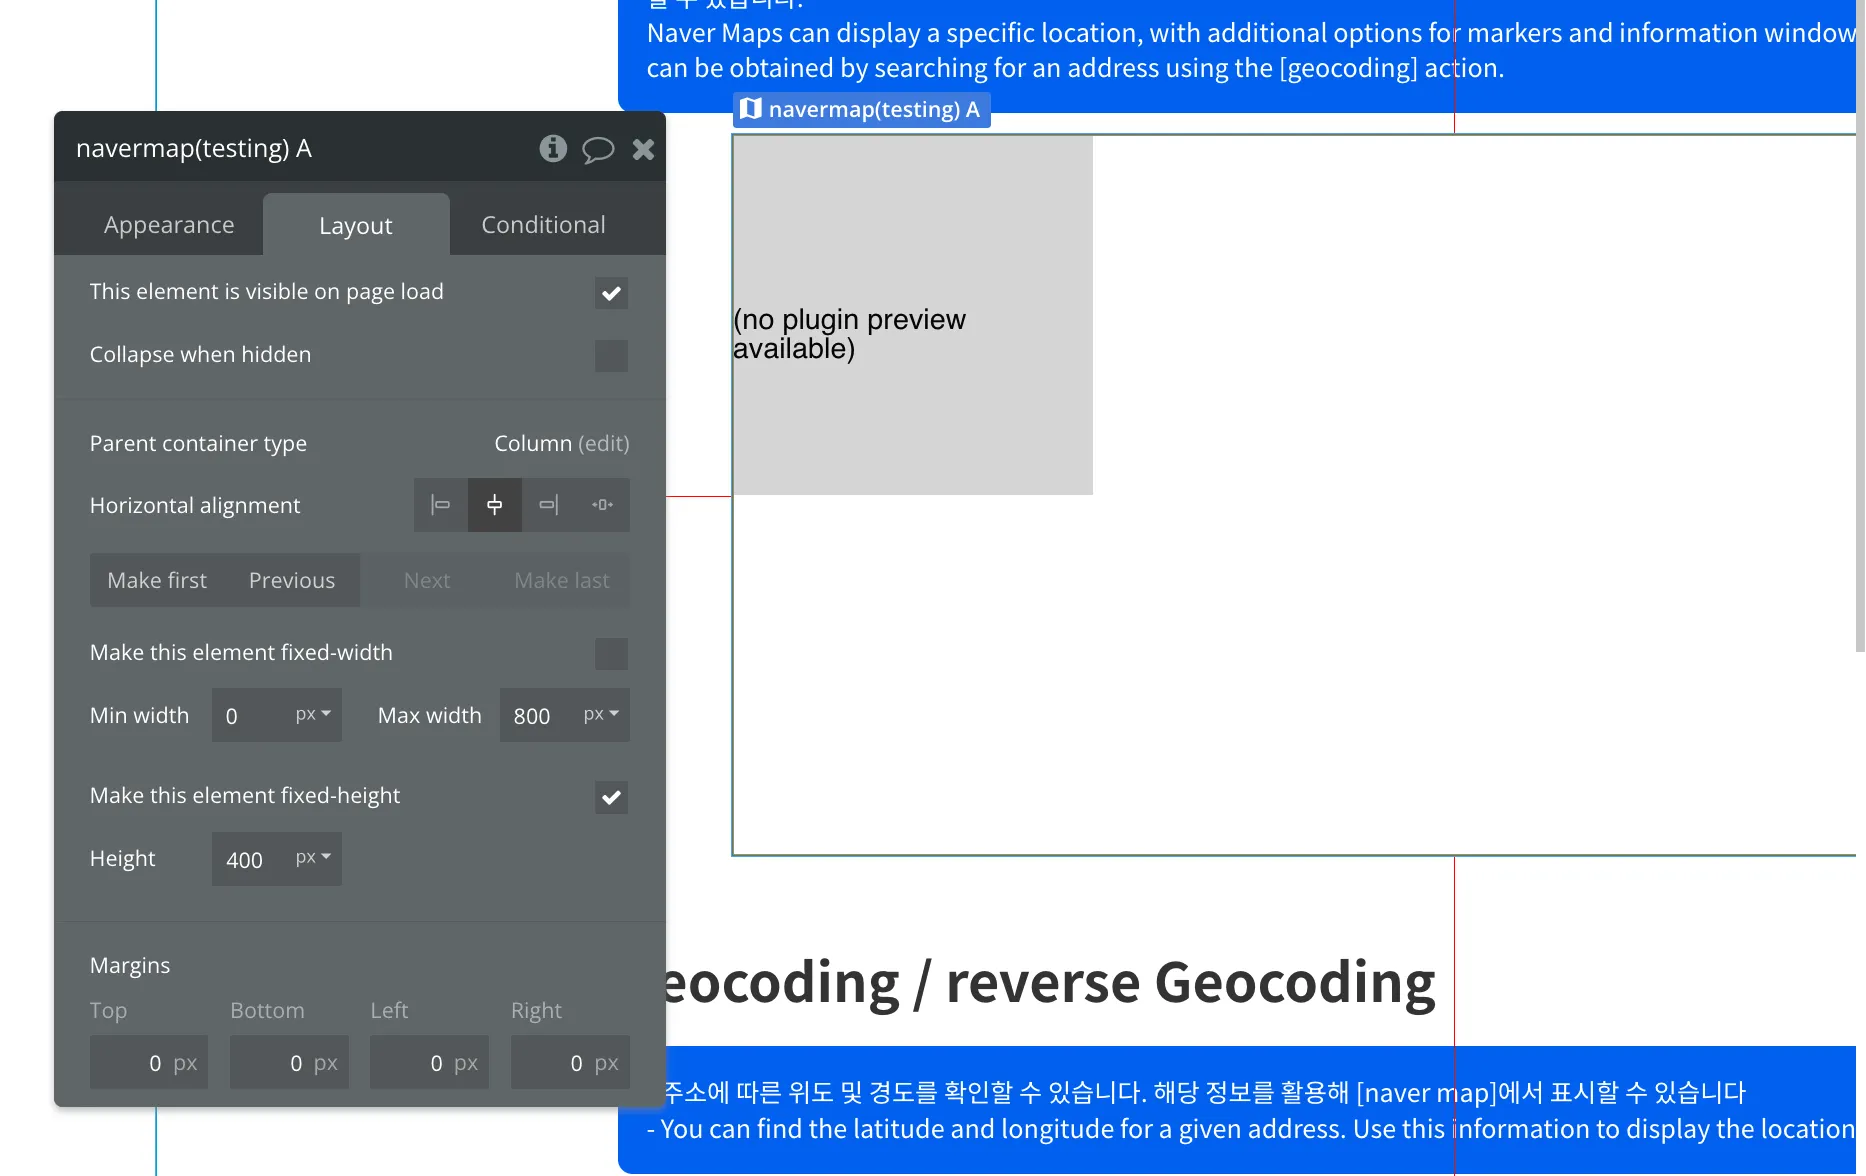
특정 위치를 계속 보여주는 네이버 지도를 생성할 수 있습니다. 페이지에서 [naver map] 요소를 페이지에 생성합니다. 해당 요소의 크기를 꽉 채워서 지도가 생성되므로, width와 height를 반응형을 고려해 적절히 설정합니다.
On the page, create a [naver map] element. This element will display the map, so set the width and height appropriately to make it responsive.
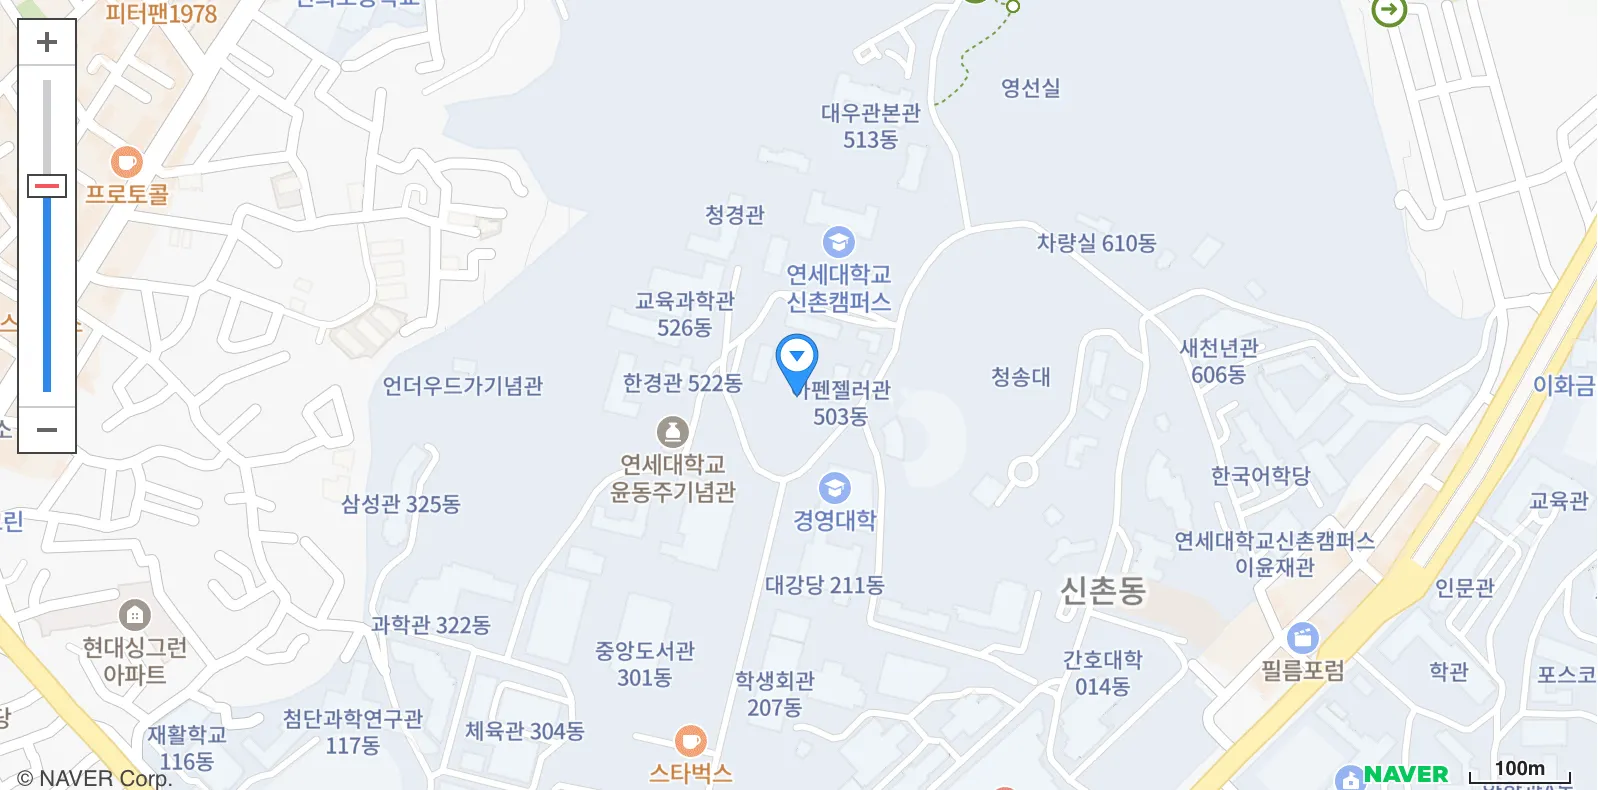
longtiude와 latitude 필드에 위치를 좌표를 입력하면, 해당 좌표를 중심으로 네이버 지도가 생성됩니다. zoom, zoom control과 zoomPosition 필드로 지도의 줌 스타일을 지정할 수 있습니다.
Enter the coordinates in the longitude and latitude fields to center the map on those coordinates. You can customize the map's zoom style using the zoom, zoom control, and zoomPosition fields.
zoomPosition에서 입력한 값에 따라 줌 컨트롤러 위치는 아래처럼 변경됩니다.
The position of the zoom controller will change based on the value entered in the zoomPosition field as follows:
zoomPosition | type | Desc |
0 | CENTER | 요소를 중앙에 배치합니다. |
1 | TOP_LEFT | 요소를 왼쪽 위에 배치합니다. 요소는 왼쪽 위에서 가운데를 향해 쌓입니다. |
2 | TOP_CENTER | 요소를 위쪽 가운데에 배치합니다. |
3 | TOP_RIGHT | 요소를 오른쪽 위에 배치합니다. 요소는 오른쪽 위에서 가운데를 향해 쌓입니다. |
4 | LEFT_CENTER | 요소를 왼쪽 가운데에 배치합니다. |
5 | LEFT_TOP | 요소를 왼쪽 위에 배치합니다. 요소는 왼쪽 위에서 아래를 향해 쌓입니다. |
6 | LEFT_BOTTOM | 요소를 왼쪽 아래에 배치합니다. 요소는 왼쪽 아래에서 위를 향해 쌓입니다. |
7 | RIGHT_TOP | 요소를 오른쪽 위에 배치합니다. 요소는 오른쪽 위에서 아래를 향해 쌓입니다. |
8 | RIGHT_CENTER | 요소를 오른쪽 가운데에 배치합니다. |
9 | RIGHT_BOTTOM | 요소를 오른쪽 아래에 배치합니다. 요소는 오른쪽 아래에서 위를 향해 쌓입니다. |
10 | BOTTOM_LEFT | 요소를 왼쪽 아래에 배치합니다. 요소는 왼쪽 아래에서 가운데를 향해 쌓입니다. |
11 | BOTTOM_CENTER | 요소를 아래쪽 가운데에 배치합니다. |
12 | BOTTOM_RIGHT | 요소를 오른쪽 아래에 배치합니다. 요소는 오른쪽 아래에서 가운데를 향해 쌓입니다. |

markerVisible을 활성화하면, 해당 좌표에 마커가 표시됩니다. 그리고 contentHTML에 HTML 코드를 입력하면, 마커를 클릭할 때 해당 코드로 입력된 윈도우 창이 보여집니다. contentOpen을 활성화하면, 지도가 로딩 완료될 때마다 자동으로 윈도우 창이 실행됩니다.
If you enable markerVisible, a marker will be displayed at the specified coordinates. By entering HTML code in the contentHTML field, an information window with the specified content will be shown when the marker is clicked. If you enable contentOpen, the information window will automatically display every time the map loads.
3. Dynamic Map
유저가 입력한 주소에 따라 변화하는 네이버 지도를 만들 수 있습니다. 이를 위해 아래의 프로세스를 거쳐야 합니다.
To create a Naver Map that changes based on the address input by the user, you need to follow the following process:
1.
유저가 주소를 입력 (User inputs an address)
2.
geocoding action으로 해당 주소의 위도 및 경도를 확인 ( Use the geocoding action to obtain the latitude and longitude of the entered address )
3.
위도 경도 값을 적용해 지도 업데이트 (Update the map with the latitude and longitude values.)
a. get longitude & latitude by Geocoding
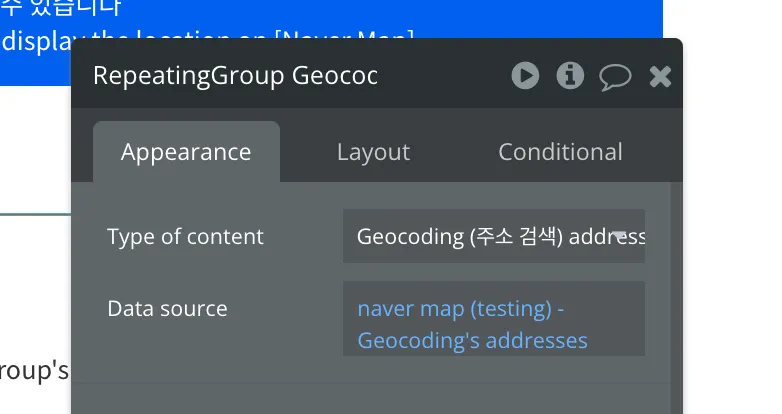
[Geocoding] Action으로 유저가 입력한 주소의 위도 및 경도를 확인할 수 있습니다. 위도 및 경도 값을 받을 요소의 [data source]에 [get data from an external API]를 입력하고, [API Provider]로 [Geocoding]을 선택합니다.
You can confirm the latitude and longitude of the address input by the user using the [Geocoding] Action. In the element's [data source], input [get data from an external API]. and Choose [Geocoding] as the API Provider.
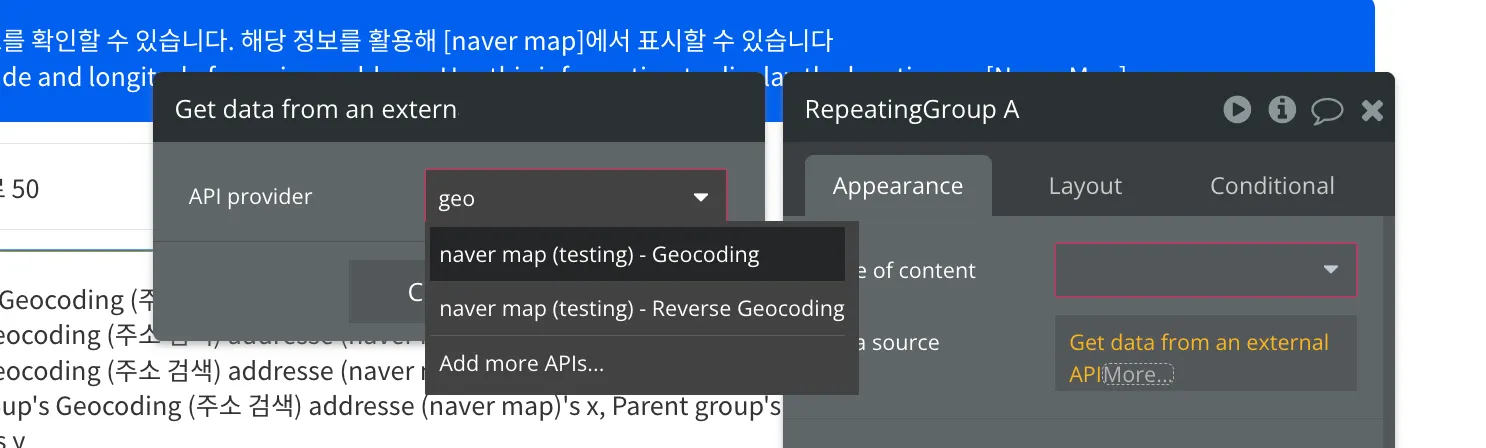
그리고 [query]에 유저가 입력하는 주소 데이터를 전달합니다. 그러면 이제 네이버 API가 작동해 해당 주소의 경로 및 위도 데이터를 불러옵니다. 이때, 위도 및 경도 데이터는 API가 불러온 전체 데이터 중에서 [addresses] 필드 안에 있으므로, 이를 추가 선택합니다.
Then, pass the user's input address data to the [query]. This will trigger the Naver API to fetch the route and latitude data for the specified address. Since latitude and longitude data are in the [addresses] field, select this option as well.
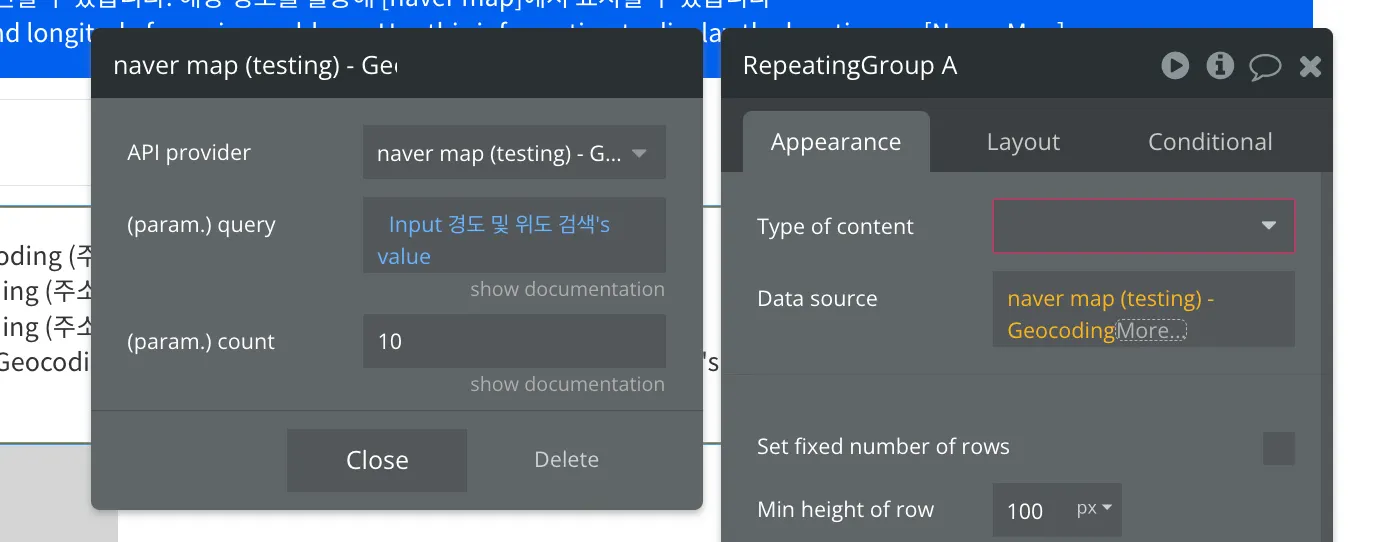
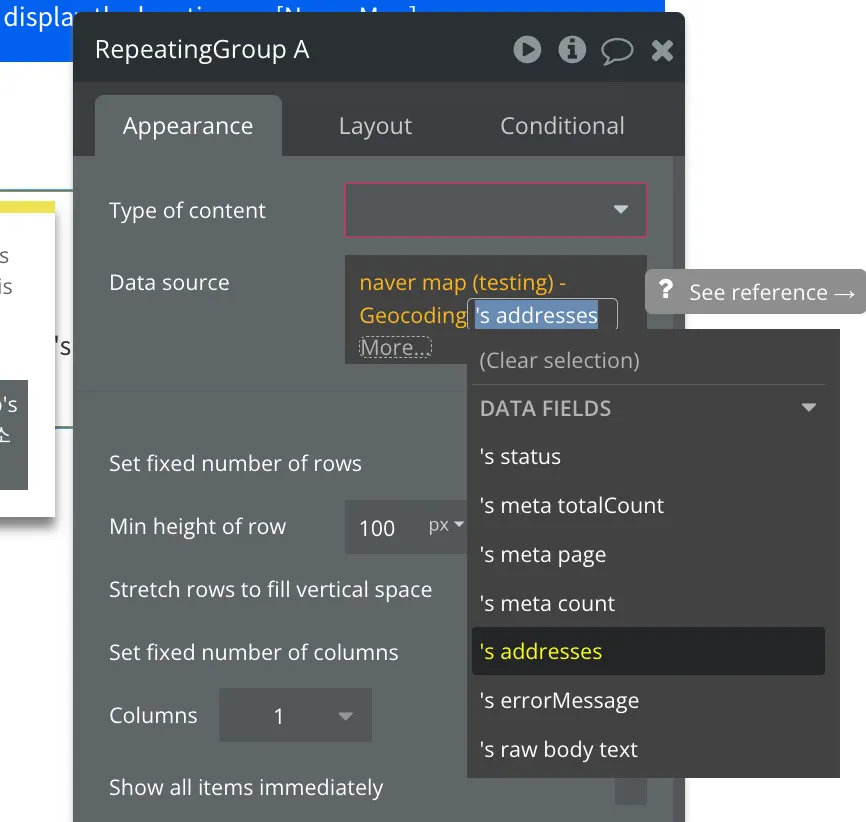
요소의 데이터 타입을 API를 통해 불러온 addresses 데이터 타입과 일치하도록 설정해야 합니다. [Type of content]에 [Geocoding addresse]를 선택합니다. 그러면 API와 요소의 데이터 타입이 일치됩니다.
Ensure that the element's data type matches the data type fetched from the API. Select [Geocoding address] as the [Type of content]. This will align the data type of the API with that of the element.
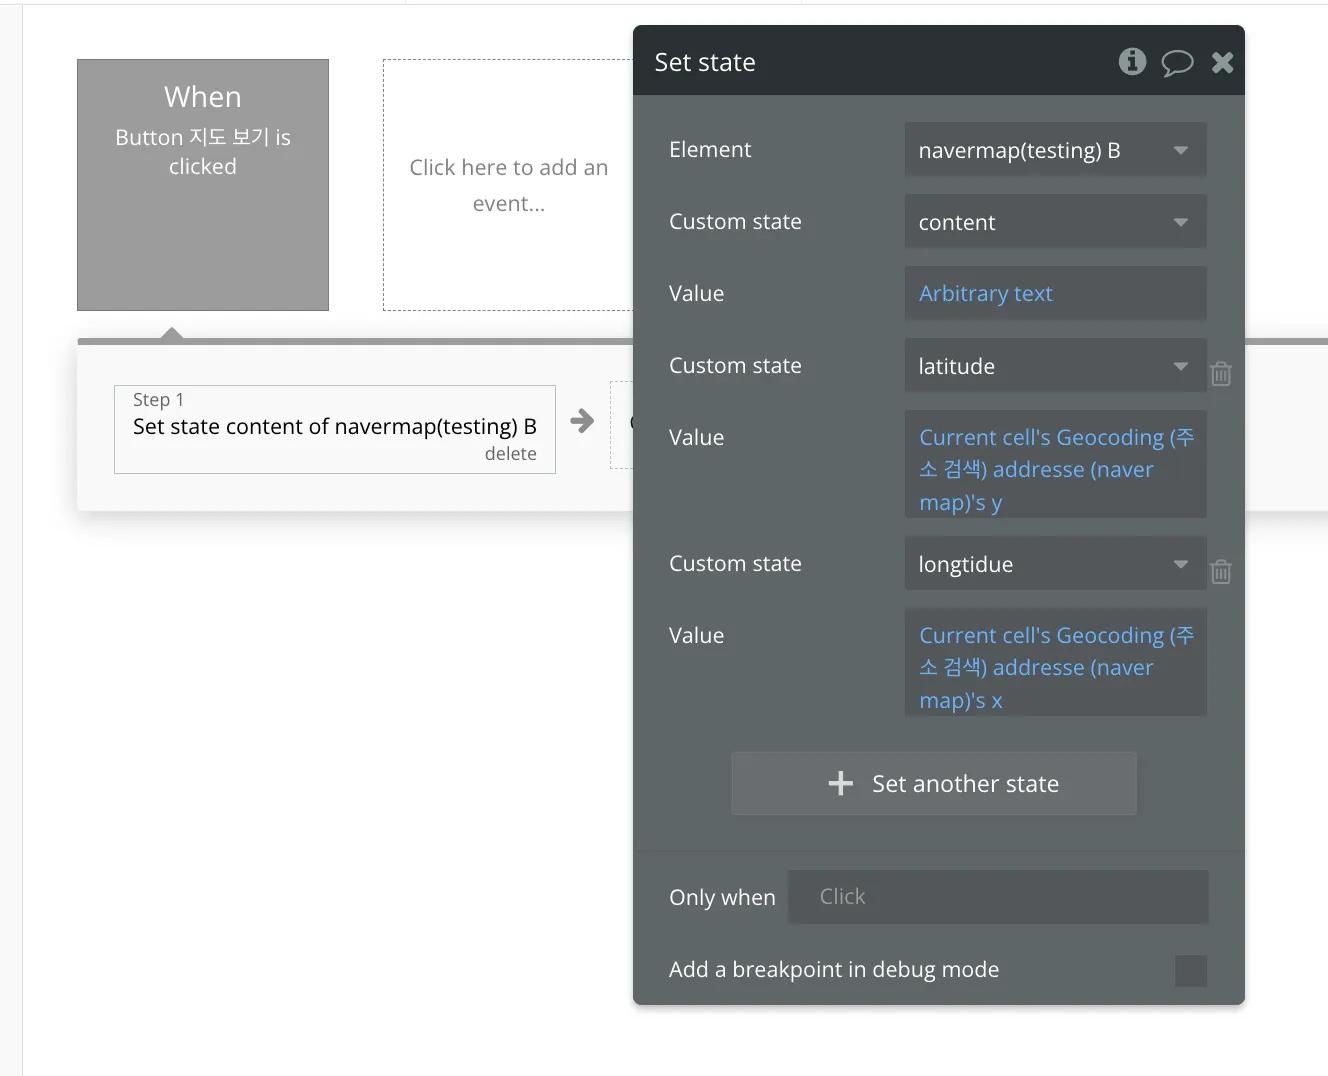
b. update map
API로 불러온 addresses 필드 안에서 [x]와 [y] 값을 활용해 네이버 지도 요소의 [longitude]와 [latitude] 값을 업데이트합니다.
Utilize the [x] and [y] values from the addresses field fetched by the API to update the [longitude] and [latitude] values of the Naver Map element.
중요 공지
“버블박스”가 “노코더스”라는 이름으로 변경됐어요
현재 사이트는 더 이상 운영하지 않으니
노코더스 사이트로 이동해주세요
버블박스가 버블을 주제로 책을 발행할 예정입니다. 출간 알림을 등록하면 추후에 안내 드릴게요!
+ 알림 신청자 중 일부에게 책을 무료로 드릴 예정입니다.
필요한 플러그인이 있다면, 버블박스에게 요청해주세요
햇갈리거나 잘 모르는 이론 및 개념이 있다면 아래에 남겨주세요.
버블 크레딧으로 더 저렴하게 시작하기

버블박스 l BubbleBox
