
한 줄 요약
버블에서 구글 스프레드 시트로 데이터를 추가, 변경 및 삭제할 수 있는 플러그인입니다.
This is a plugin that enables adding, updating and deleting data from Bubble to google Sheet


후원 받은 커피는 더 많은 플러그인을 만드는 원동력이 됩니다.
Core ( 핵심 정보 )
1. Reference
플러그인 페이지


데모 링크


에디터 링크


2. ChangeLog
1.0.0
[KR ver]
•
행 추가
•
행 변경
•
행 삭제
•
셀 값 불러오기
•
워크시트 추가
•
워크시트 삭제
[Eng ver]
•
add row
•
update row
•
delete row
•
read cell’s value
•
create worksheet
•
delete worksheet
3. Instruction
플러그인 실사용 시, 해당 문서의 [튜토리얼]을 참고해 환경 세팅을 완료해야 합니다.
•
API 키 발급
•
유저 권한 설정
•
시트 Id 확인
•
시트에 권한 유저 초대
When using the plugin in real-world scenarios, make sure to refer to the [tutorial] of this document to complete the setup
•
Obtaining an API key
•
Setting user permissions
•
Verifying the Sheet ID
•
Inviting authorized users to the Sheet
4. Actons
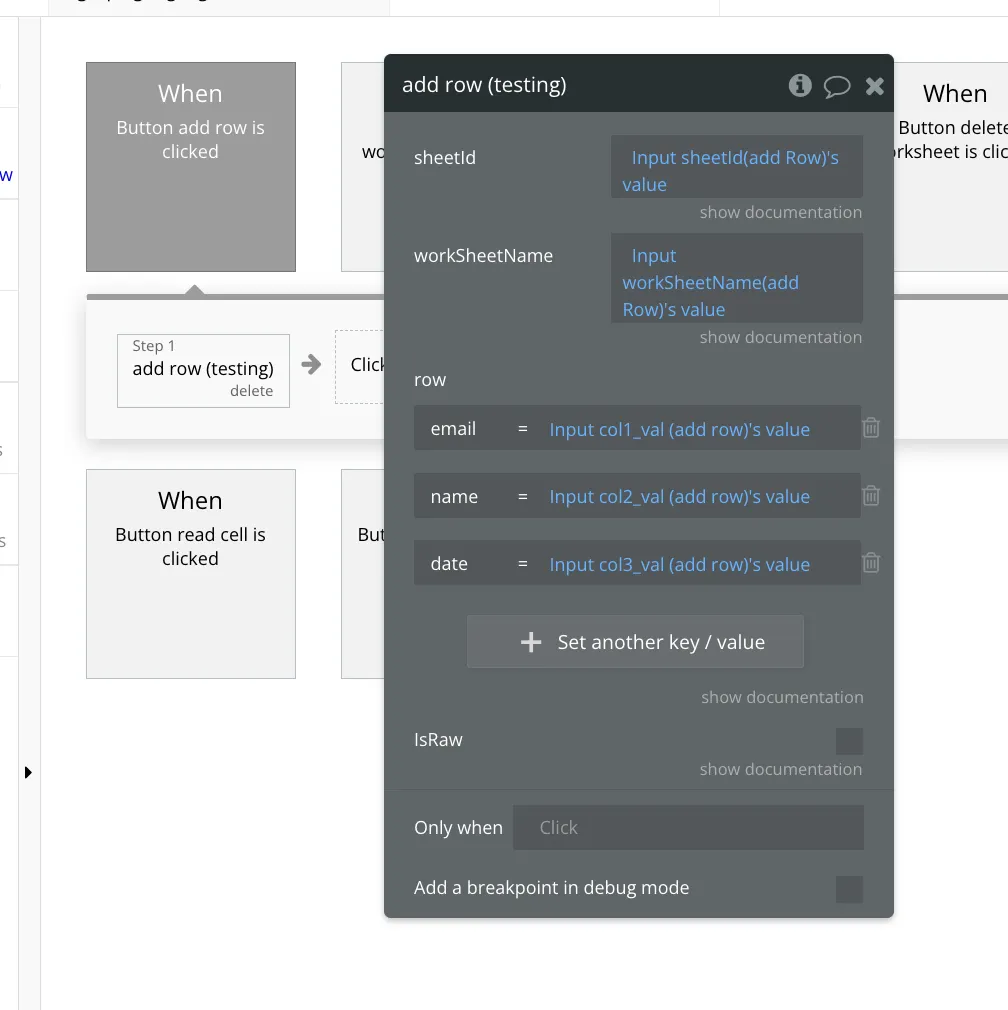
a. add row ( 행 추가 )
구글 시트에 행을 추가합니다.
add row in google Sheet
Input
필드 | 타입 | 설명 |
sheetId | String | 스프레드 시트 Id를 입력합니다. Id는 구글 시트의 URL에서 확인할 수 있습니다.
Write spreadSheet's Id. you can check Id in Google spreadSheet's URL |
workSheetName | String | 워크시트의 이름을 입력합니다.
Write worksheet's name |
row | Array of Key/value | 행에 추가할 내용을 입력합니다. key는 컬럼의 이름을, value는 해당 컬럼에 들어갈 값을 입력합니다.
write the content to be added to the row. Enter the column name for the key and the value for the corresponding column |
isRaw | Boolean | False일 경우, 데이터를 인식해 포맷을 자동 설정해 구글 시트에 입력합니다.
If false, automatically detects data and sets the format to input into Google Sheets. |
{
"sheetId" : "1k5bCw0TN4MjJKrXJn24ZTyNyoiBhbZGNrU6NYMsIEYY",
"workSheetName" : "test worksheet",
"row" : {
"email" : "bubbleboxerofficial@gmail.com",
"name" : "bubblebox update",
"date" : "2023.12.13"
}
"isRaw" : False
}
JSON
복사
return
필드 | 타입 | 설명 |
status | String | 해당 액션이 성공하면 success, 실패하면 fail 값을 반환합니다.
return success if action event is success. Otherwise, return fail |
error | String | 액션이 실패 시, 관련 에러를 반환합니다.
return error message when action event is fail |
///success
{
"status" : "success",
"error" : null
}
///fail
{
"status" : "error",
"error" : "%{error content}"
}
JSON
복사
b. update row
구글 시트에 행을 선택해 값을 변경합니다.
select and update row
Input
필드 | 타입 | 설명 |
sheetId | String | 스프레드 시트 Id를 입력합니다. Id는 구글 시트의 URL에서 확인할 수 있습니다.
Write spreadSheet's Id. you can check Id in Google spreadSheet's URL |
workSheetName | String | 워크시트의 이름을 입력합니다.
Write worksheet's name |
row | Array of Key/value | 선택한 행에 업데이트할 내용을 입력합니다. key는 컬럼의 이름을, value는 해당 컬럼에 들어갈 값을 입력합니다.
write the content to be updated to the selected row. Enter the column name for the key and the value for the corresponding column |
isRaw | Boolean | False일 경우, 데이터를 인식해 포맷을 자동 설정해 구글 시트에 입력합니다.
If false, automatically detects data and sets the format to input into Google Sheets. |
index | int | 변경할 행의 인덱스를 입력합니다. 0부터 시작합니다.
Write row's index to be updated. It start from 0 |
{
"sheetId" : "1k5bCw0TN4MjJKrXJn24ZTyNyoiBhbZGNrU6NYMsIEYY",
"workSheetName" : "test worksheet",
"row" : {
"email" : "bubbleboxerofficial@gmail.com",
"name" : "bubblebox update",
"date" : "2023.12.13"
}
"index" : 0,
"isRaw" : False
}
JSON
복사
return
필드 | 타입 | 설명 |
status | String | 해당 액션이 성공하면 success, 실패하면 fail 값을 반환합니다.
return success if action event is success. Otherwise, return fail |
error | String | 액션이 실패 시, 관련 에러를 반환합니다.
return error message when action event is fail |
///success
{
"status" : "success",
"error" : null
}
///fail
{
"status" : "error",
"error" : "%{error content}"
}
JSON
복사
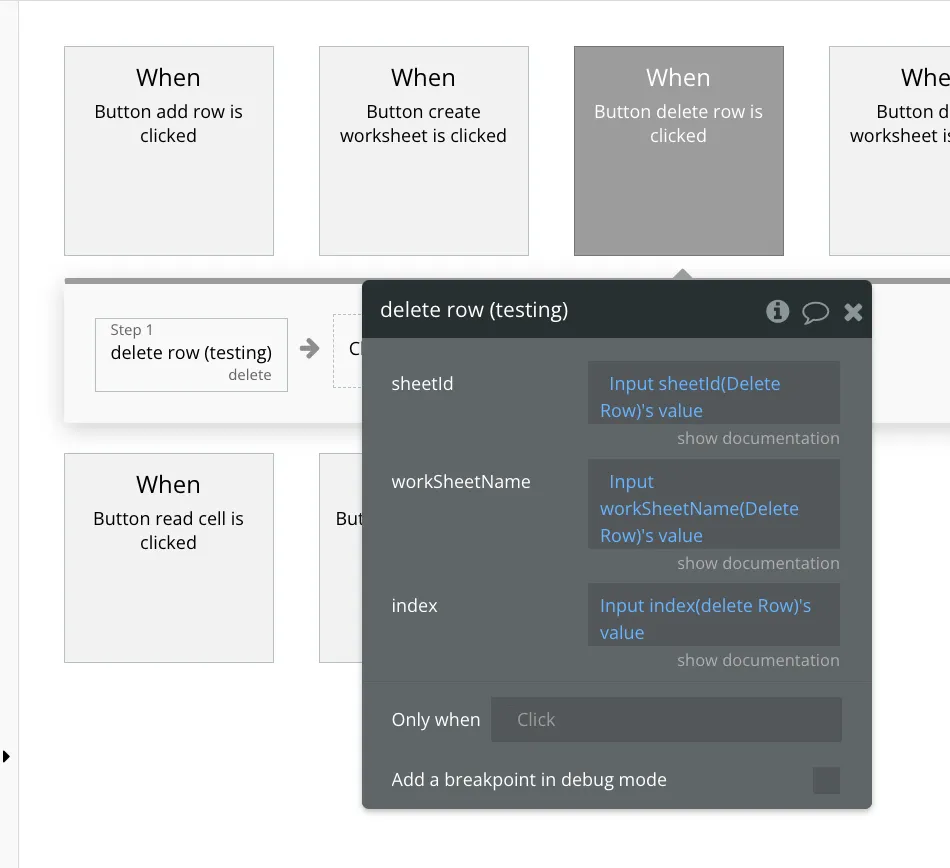
c. delete row
구글 시트에 행을 선택해 삭제합니다.
select and delete row
Input
필드 | 타입 | 설명 |
sheetId | String | 스프레드 시트 Id를 입력합니다. Id는 구글 시트의 URL에서 확인할 수 있습니다.
Write spreadSheet's Id. you can check Id in Google spreadSheet's URL |
workSheetName | String | 워크시트의 이름을 입력합니다.
Write worksheet's name |
index | int | 삭제할 행의 인덱스를 입력합니다. 0부터 시작합니다.
Write row's index to be deleted. It start from 0 |
{
"sheetId" : "1k5bCw0TN4MjJKrXJn24ZTyNyoiBhbZGNrU6NYMsIEYY",
"workSheetName" : "test worksheet",
"index" : 0
}
JSON
복사
return
필드 | 타입 | 설명 |
status | String | 해당 액션이 성공하면 success, 실패하면 fail 값을 반환합니다.
return success if action event is success. Otherwise, return fail |
error | String | 액션이 실패 시, 관련 에러를 반환합니다.
return error message when action event is fail |
///success
{
"status" : "success",
"error" : null
}
///fail
{
"status" : "error",
"error" : "%{error content}"
}
JSON
복사
d. read cell
구글 시트에 행을 선택하고, 행 안의 특정 셀의 값을 불러옵니다.
select some row and read specific cell's value from row
Input
필드 | 타입 | 설명 |
sheetId | String | 스프레드 시트 Id를 입력합니다. Id는 구글 시트의 URL에서 확인할 수 있습니다.
Write spreadSheet's Id. you can check Id in Google spreadSheet's URL |
workSheetName | String | 워크시트의 이름을 입력합니다.
Write worksheet's name |
index | int | 선택할 행의 인덱스를 입력합니다. 0부터 시작합니다.
Write row's index to be selected. It start from 0 |
colName | string | 선택한 행에서 컬럼의 제목을 활용해 불러올 셀을 선택합니다.
Write col's name. This name is used to read cell in selected row |
{
"sheetId" : "1k5bCw0TN4MjJKrXJn24ZTyNyoiBhbZGNrU6NYMsIEYY",
"workSheetName" : "test worksheet",
"index" : 0,
"colName" : "email"
}
JSON
복사
return
필드 | 타입 | 설명 |
status | String | 해당 액션이 성공하면 success, 실패하면 fail 값을 반환합니다.
return success if action event is success. Otherwise, return fail |
error | String | 액션이 실패 시, 관련 에러를 반환합니다.
return error message when action event is fail |
value | String | 액션이 성공 시, 해당 셀의 값을 불러옵니다.
return col’s value when action event is success |
///success
{
"value" : "bubbleboxerofficial@gmail.com",
"status" : "success",
"error" : null
}
///fail
{
"status" : "error",
"error" : "%{error content}"
}
JSON
복사
e. create worksheet
구글 시트에서 워크 시트를 생성합니다.
create new worksheet in google sheet
Input
필드 | 타입 | 설명 |
sheetId | String | 스프레드 시트 Id를 입력합니다. Id는 구글 시트의 URL에서 확인할 수 있습니다.
Write spreadSheet's Id. you can check Id in Google spreadSheet's URL |
workSheetName | String | 추가할 워크시트의 이름을 입력합니다.
Write name of worksheet which you want to create |
header | Array of Key/value | 추가할 워크 시트의 컬럼 정보를 입력합니다. key 값은 중요하지 않고, value 값만 입력하면 됩니다. 각 value 가 컬럼의 제목이 됩니다.
write the column information for the worksheet to be added. The key is not important, only the value needs to be entered. Each value will be the title of a column. |
{
"sheetId" : "1k5bCw0TN4MjJKrXJn24ZTyNyoiBhbZGNrU6NYMsIEYY",
"workSheetName" : "test worksheet2",
"header" : {
"col A" = "email",
"col B" = "name",
"col C" = "date"
}
}
JSON
복사
return
필드 | 타입 | 설명 |
status | String | 해당 액션이 성공하면 success, 실패하면 fail 값을 반환합니다.
return success if action event is success. Otherwise, return fail |
error | String | 액션이 실패 시, 관련 에러를 반환합니다.
return error message when action event is fail |
///success
{
"status" : "success",
"error" : null
}
///fail
{
"status" : "error",
"error" : "%{error content}"
}
JSON
복사
f. delete worksheet
구글 시트에서 워크 시트를 삭제합니다.
delete worksheet in google sheet
Input
필드 | 타입 | 설명 |
sheetId | String | 스프레드 시트 Id를 입력합니다. Id는 구글 시트의 URL에서 확인할 수 있습니다.
Write spreadSheet's Id. you can check Id in Google spreadSheet's URL |
workSheetName | String | 추가할 워크시트의 이름을 입력합니다.
Write name of worksheet which you want to create |
{
"sheetId" : "1k5bCw0TN4MjJKrXJn24ZTyNyoiBhbZGNrU6NYMsIEYY",
"workSheetName" : "test worksheet2",
}
JSON
복사
return
필드 | 타입 | 설명 |
status | String | 해당 액션이 성공하면 success, 실패하면 fail 값을 반환합니다.
return success if action event is success. Otherwise, return fail |
error | String | 액션이 실패 시, 관련 에러를 반환합니다.
return error message when action event is fail |
///success
{
"status" : "success",
"error" : null
}
///fail
{
"status" : "error",
"error" : "%{error content}"
}
JSON
복사
Tutorial ( 튜토리얼 )
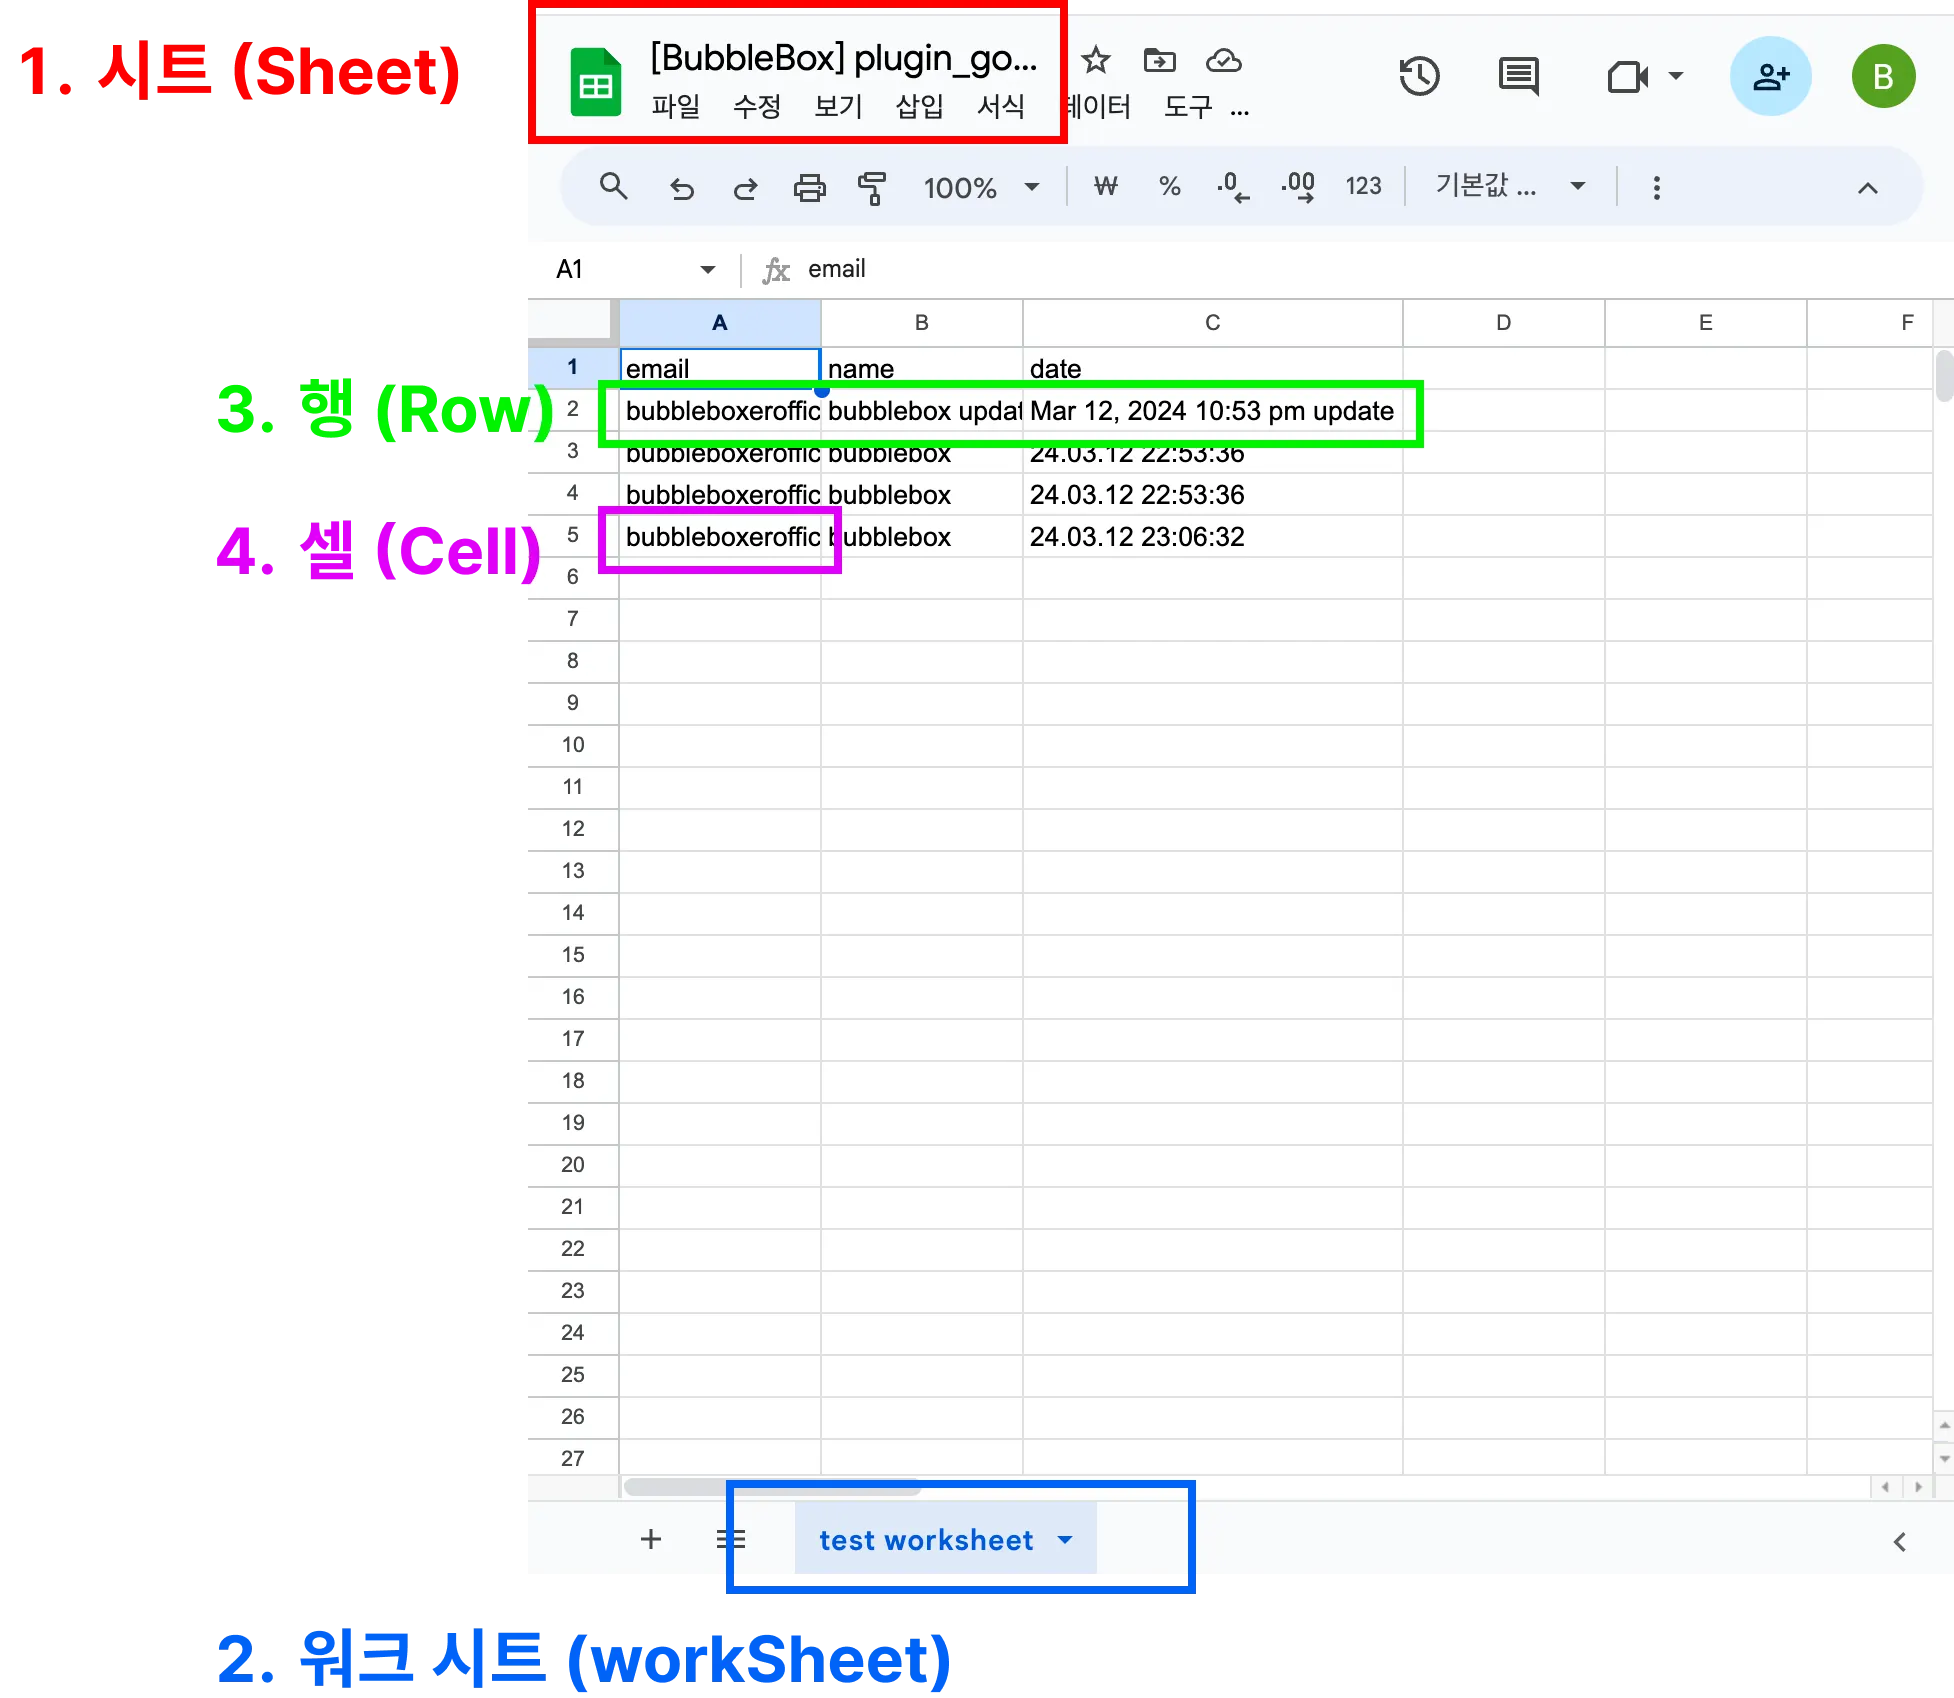
0. GoogleSheet Architecture ( 구글 시트 기본 구조 )
구글 시트는 (1) 시트, (2) 워크 시트, (3) 행과 (4) 셀 순으로 구성됩니다. 문서 및 플러그인도 해당 단어를 사용합니다.
Google Sheets consists of (1) Sheets, (2) Worksheets, (3) Rows, and (4) Cells in order. This docu and plugin use these words
1. Generate Google Sheet’s API key ( 구글 시트 API Key 생성하기 )
버블에서 구글 시트에 데이터를 전송하기 위해서 구글 시트의 API가 필요합니다. 아래 링크에 접속합니다.
for Bubble to send data to Google sheet, we need Google sheet API, Click below link
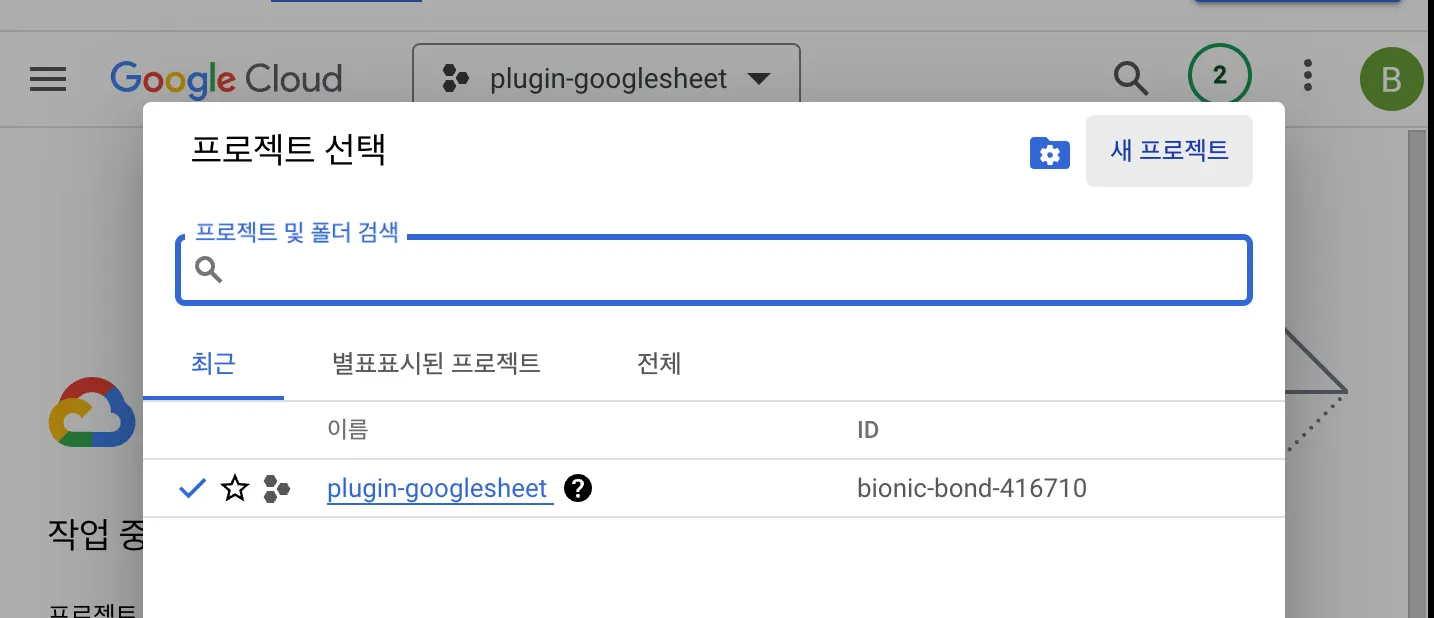
구글 클라우드 계정을 생성하고, 새로운 프로젝트를 생성합니다.
Sign up Google Cloud and Create new proejct
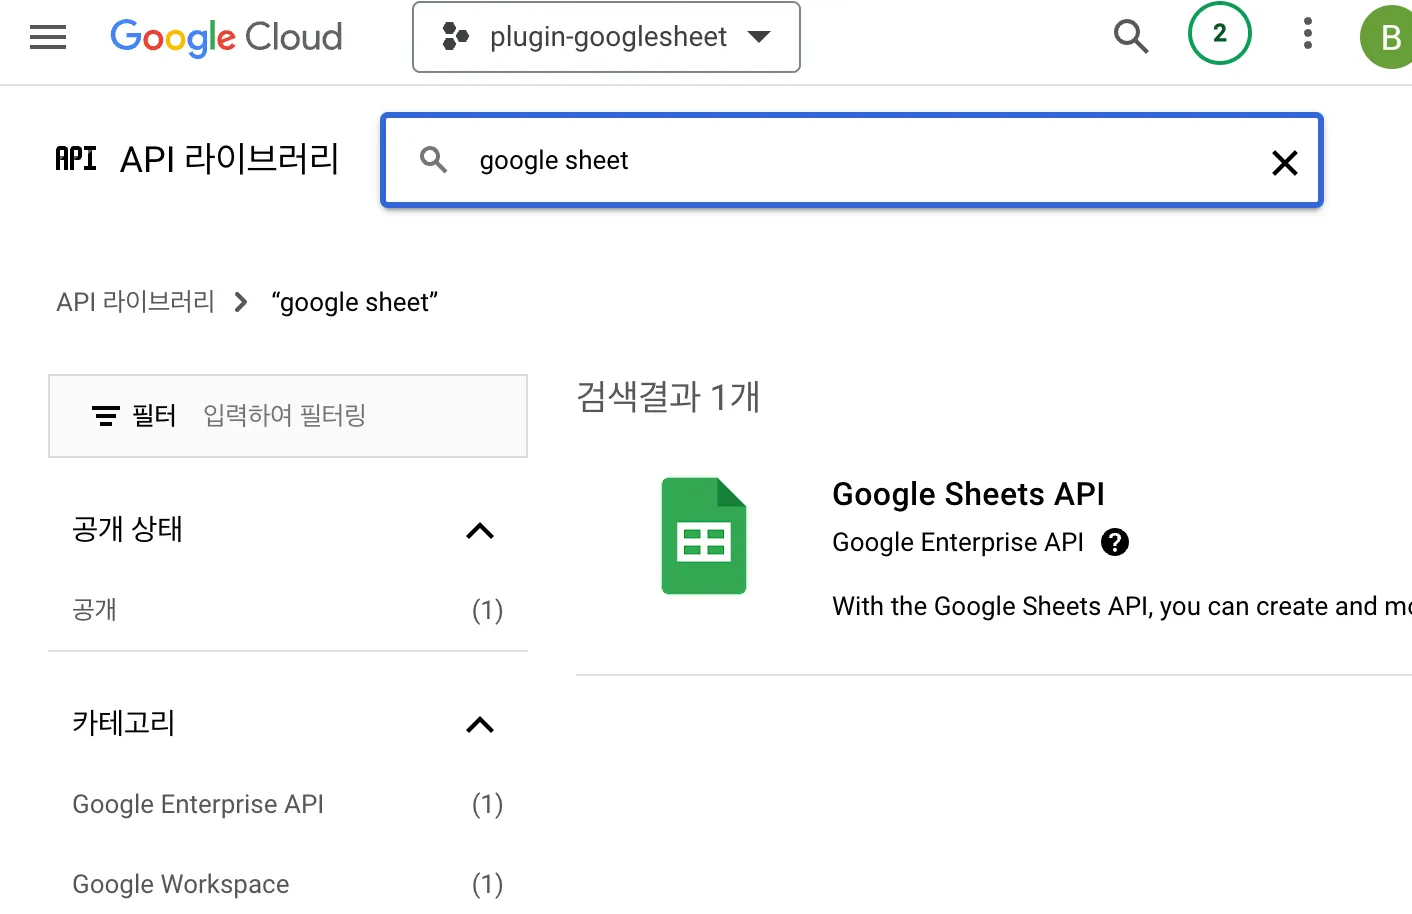
API 라이브러리에 들어간 후, Google Sheets API를 등록합니다.
Navigate [API libirary] and Apply Google sheets API
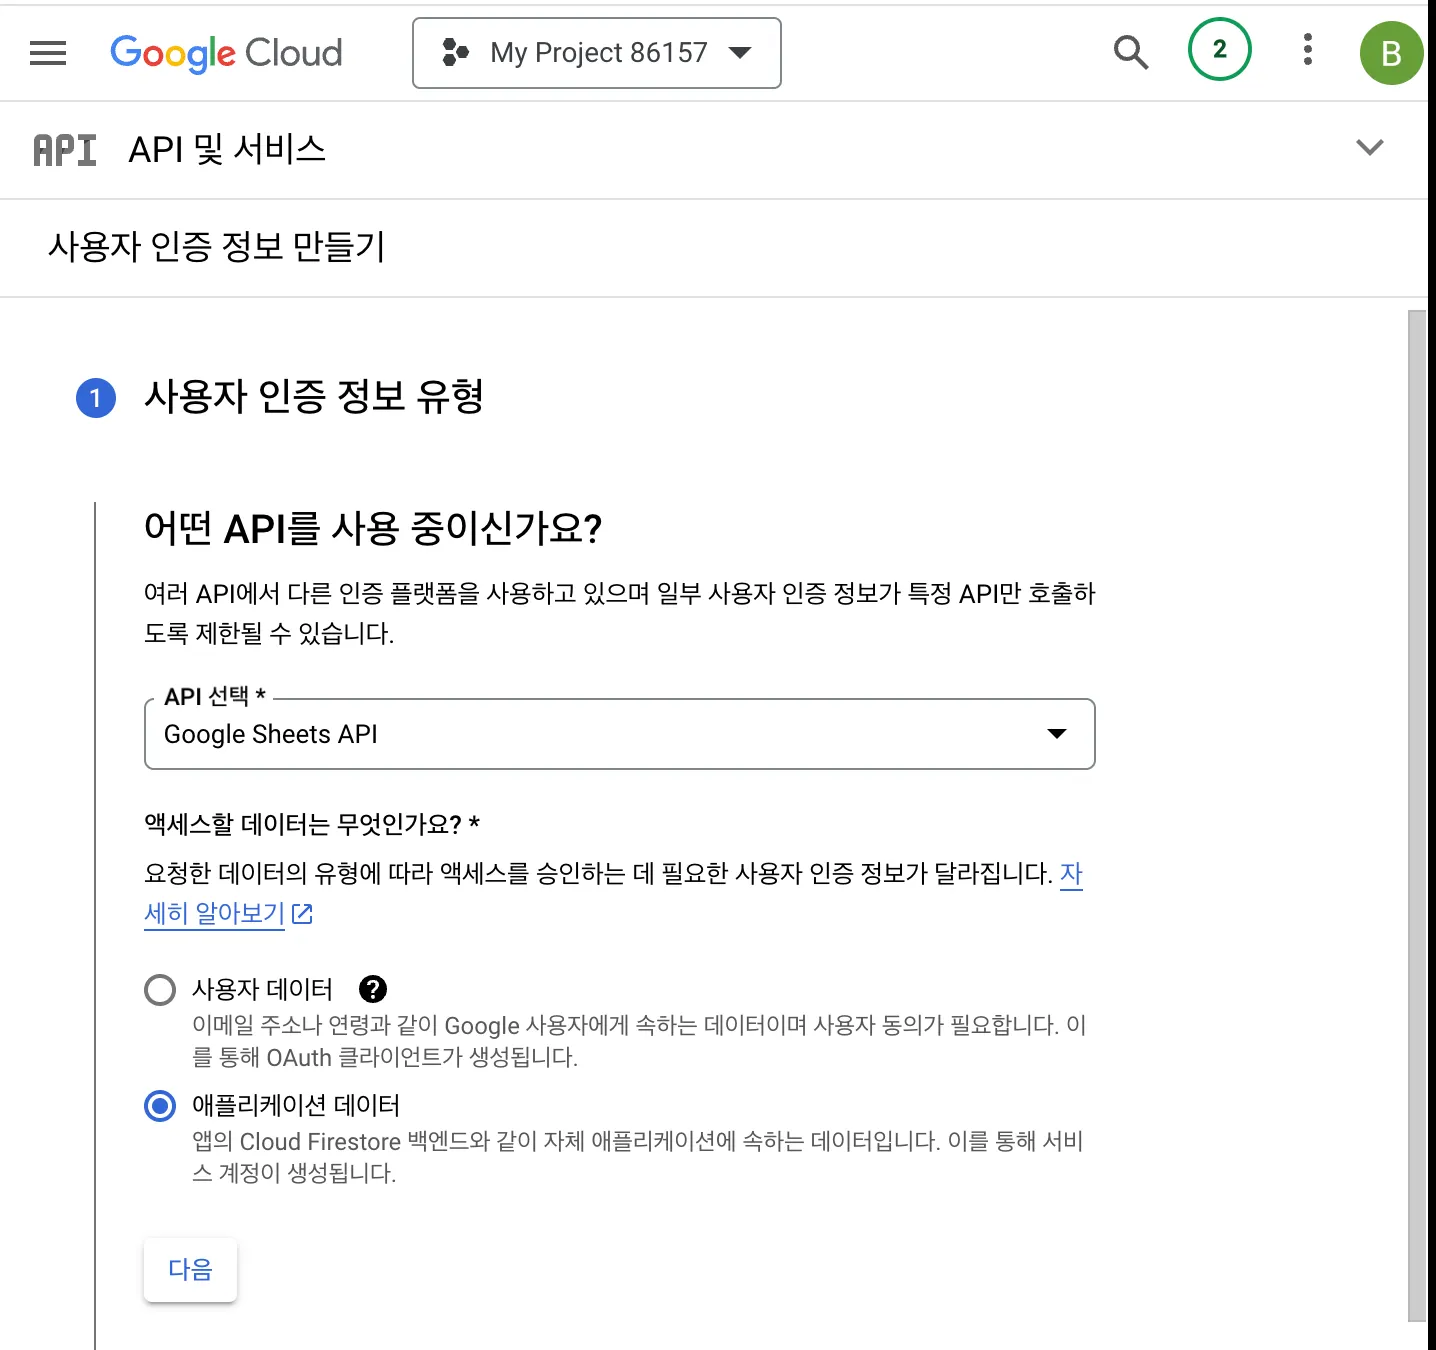
해당 API에 사용자 인증 정보를 생성합니다. 엑세스할 데이터로 [애플리케이션 데이터]를 선택합니다.
Create new user Auth info. on this API. Select [Application data] for accessing data type
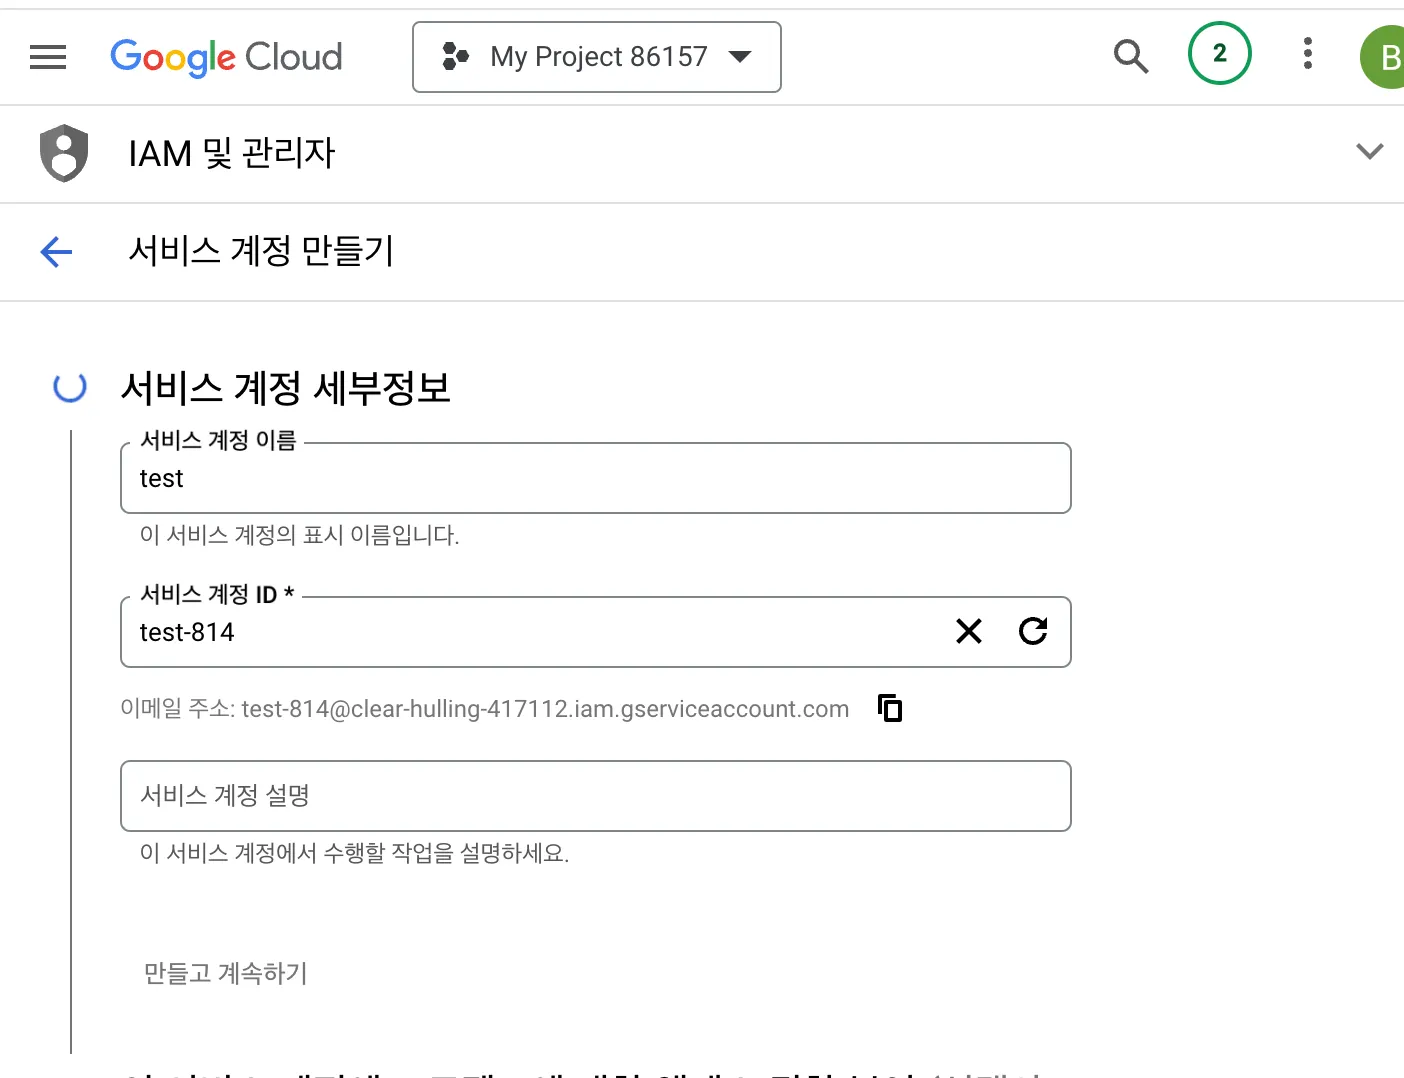
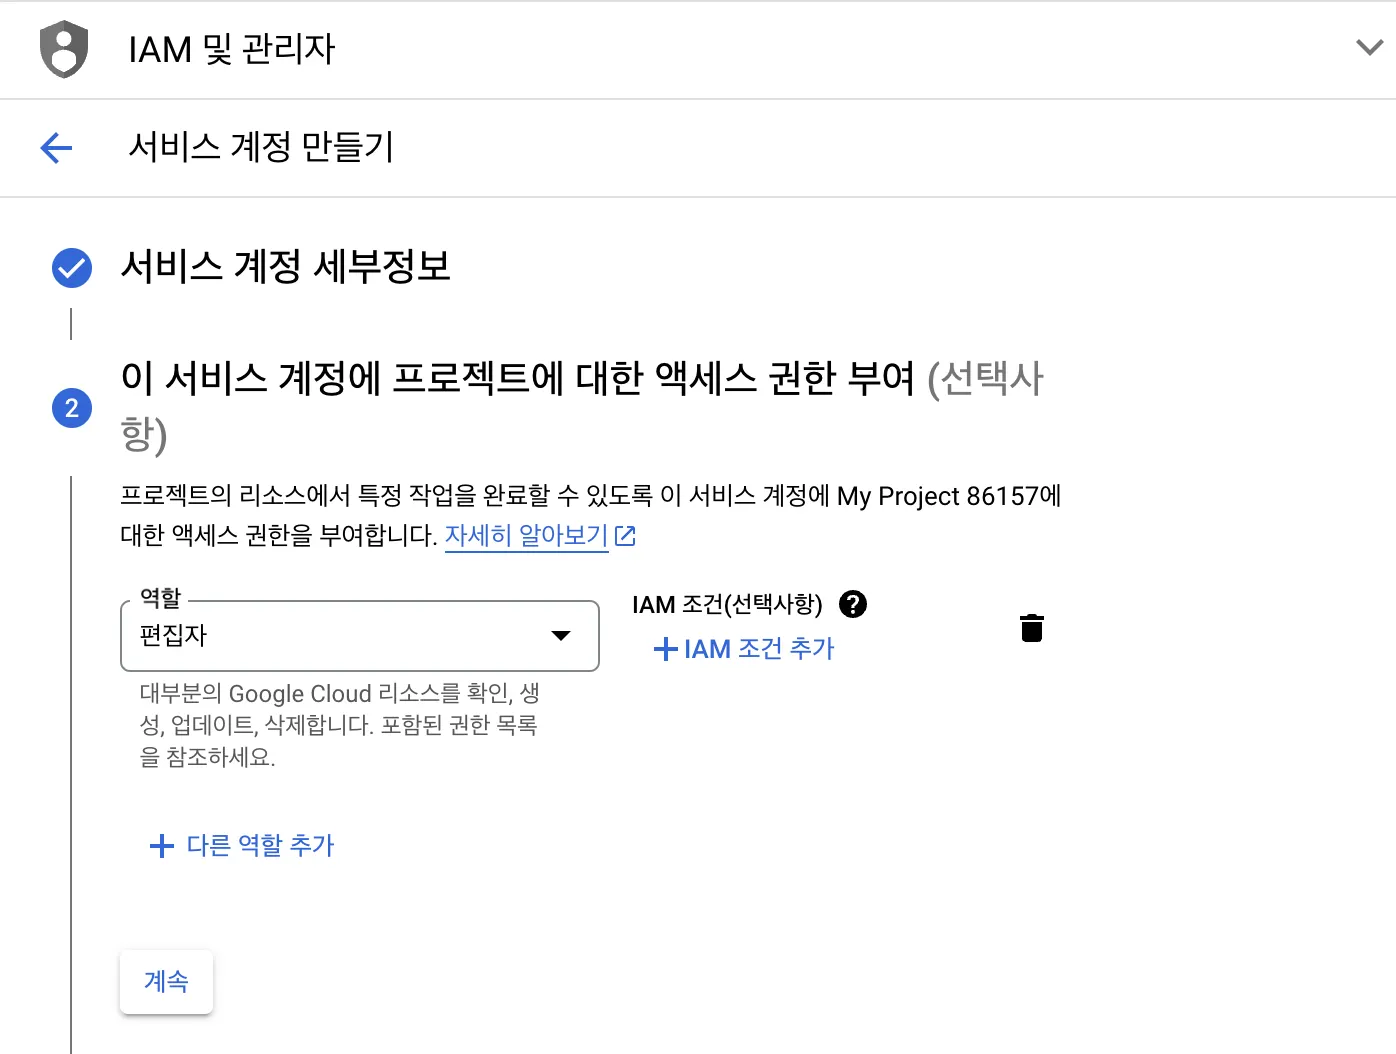
현재 프로젝트에 IAM 계정이 없다면, 자동으로 IAM 계정이 생성됩니다. IAM 계정의 역할로 [편집자]를 설정합니다. 생성한 IAM 계정에 구글 시트 API 권한이 설정됩니다. 버블에서 데이터를 전달 받은 구글 시트에 생성한 IAM 계정을 초대해서 데이터를 관리할 수 있습니다.
If you don’t have any IAM account, automatically generate new IAM account. Select [editor] for this IAM account’ role. If done, this IAM account get Google sheet API’s auth. We manage data in the google sheet to which bubble send data invite this account by inviting this account
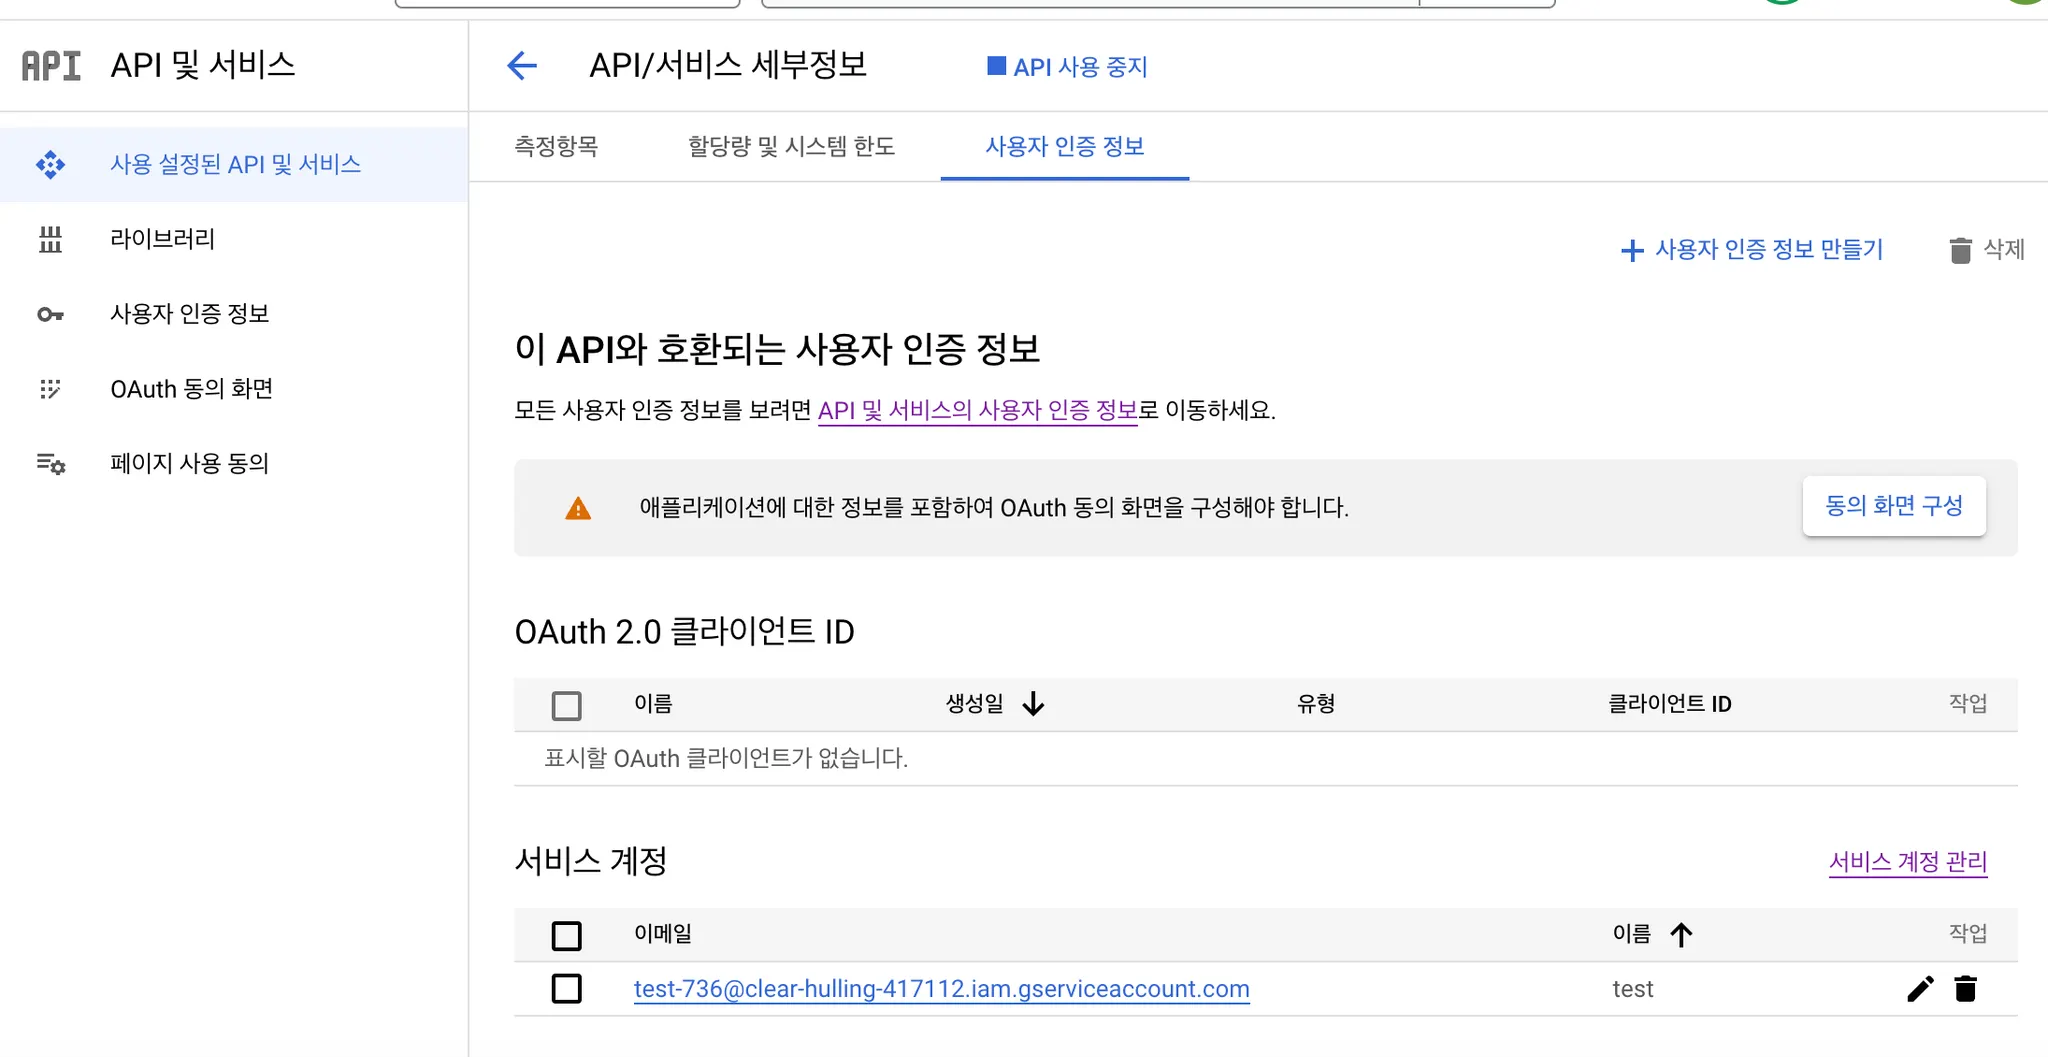
[사용자 인증 정보]로 이동하면, 아래처럼 [서비스 계정]에서 방금 생성한 IAM 계정을 확인할 수 있습니다.
Navigate to [Credential], you can see new account in [Service Accounts] section.
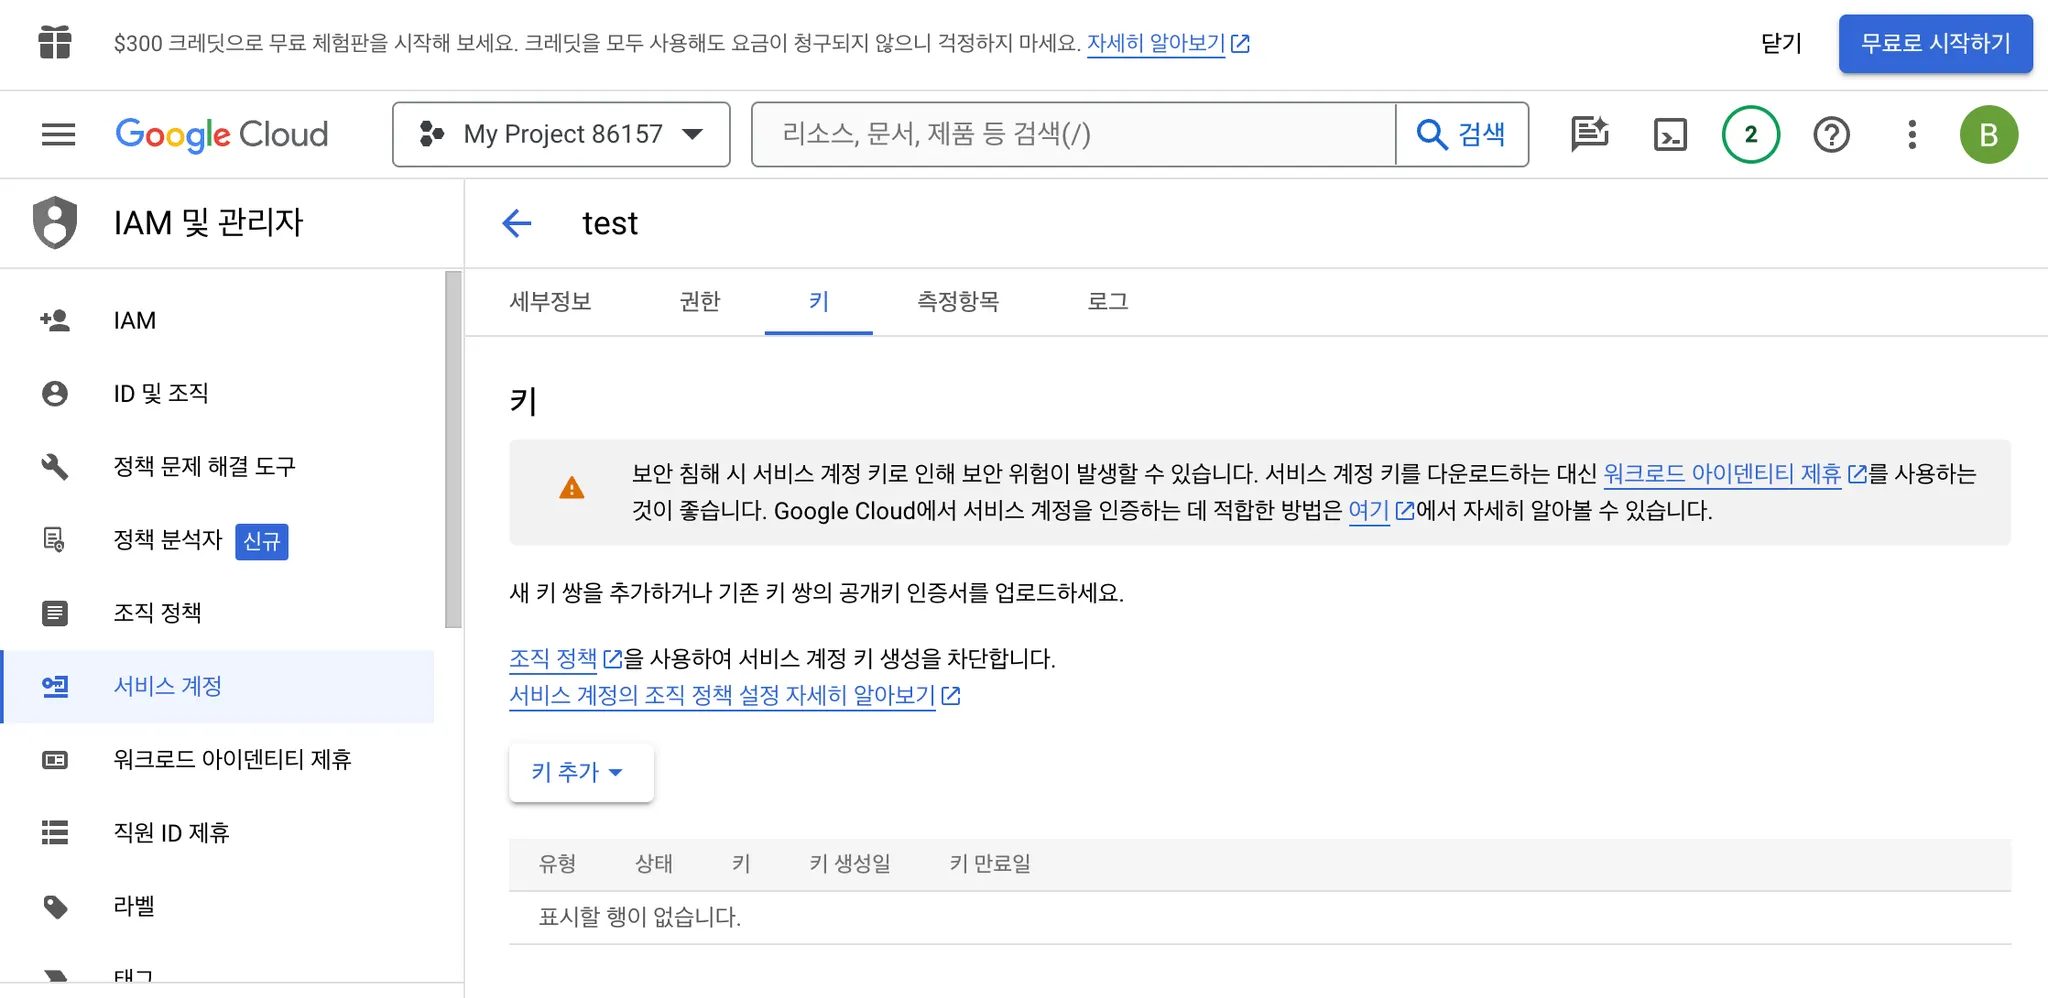
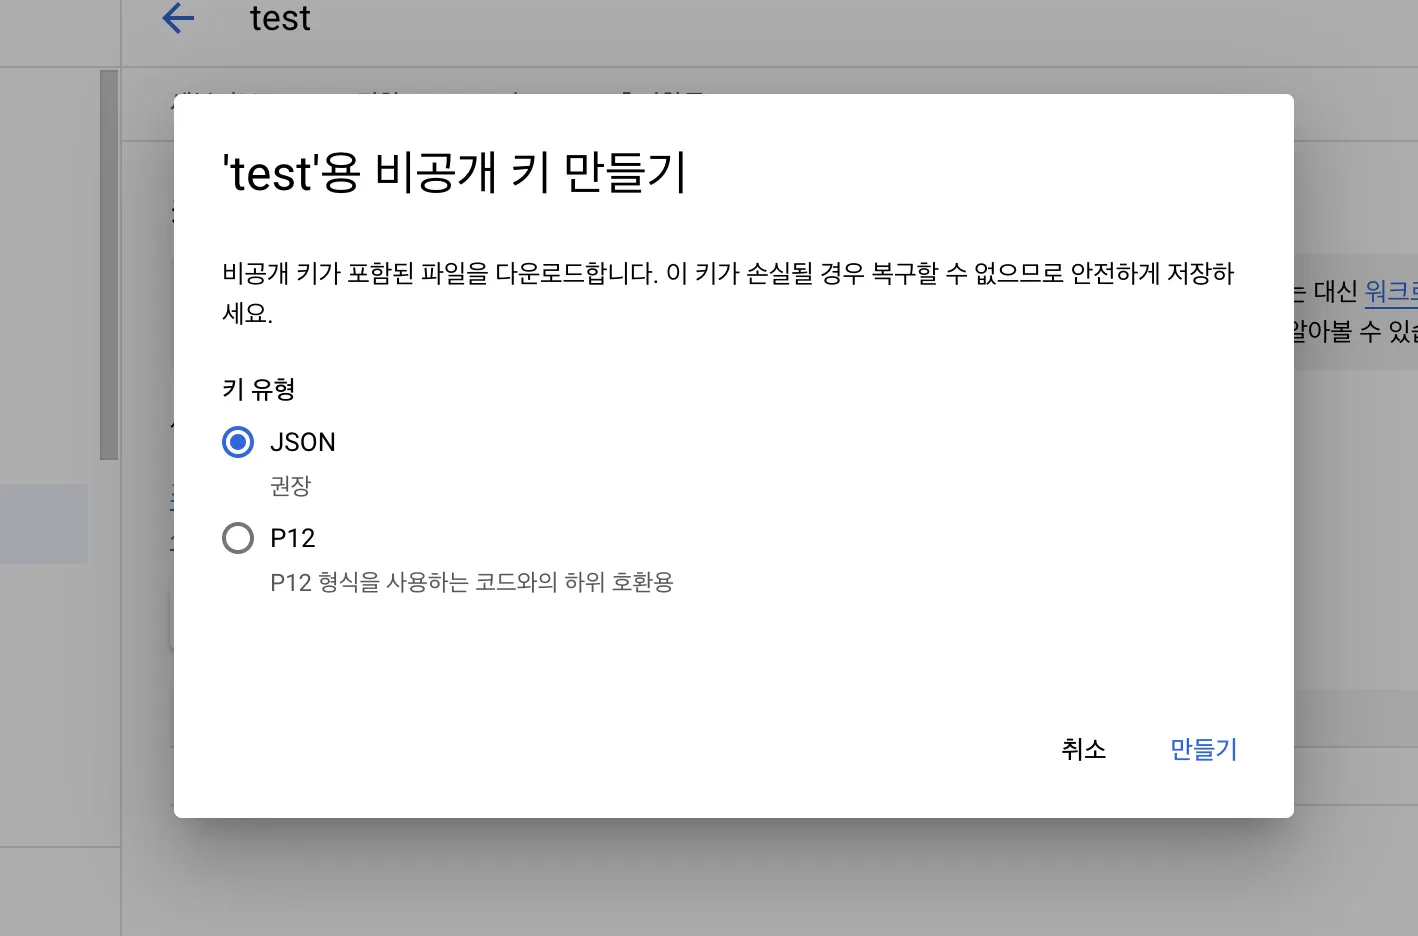
해당 계정을 클릭합니다. 그러면 IAM 페이지로 이동됩니다 여기서 [키] 탭으로 이동하고, [키 추가] 버튼을 클릭해 해당 계정에 종속된 키를 발급 받습니다.
Click this account. Then, navigate to IAM page. Inhere, click [Key] tab and [add key] button to generate new key in this account
이때, 키 유형은 [Json]을 선택합니다. 그러면 파일이 다운 됩니다.
Select [Json] for key type. Then file downloading is starting.
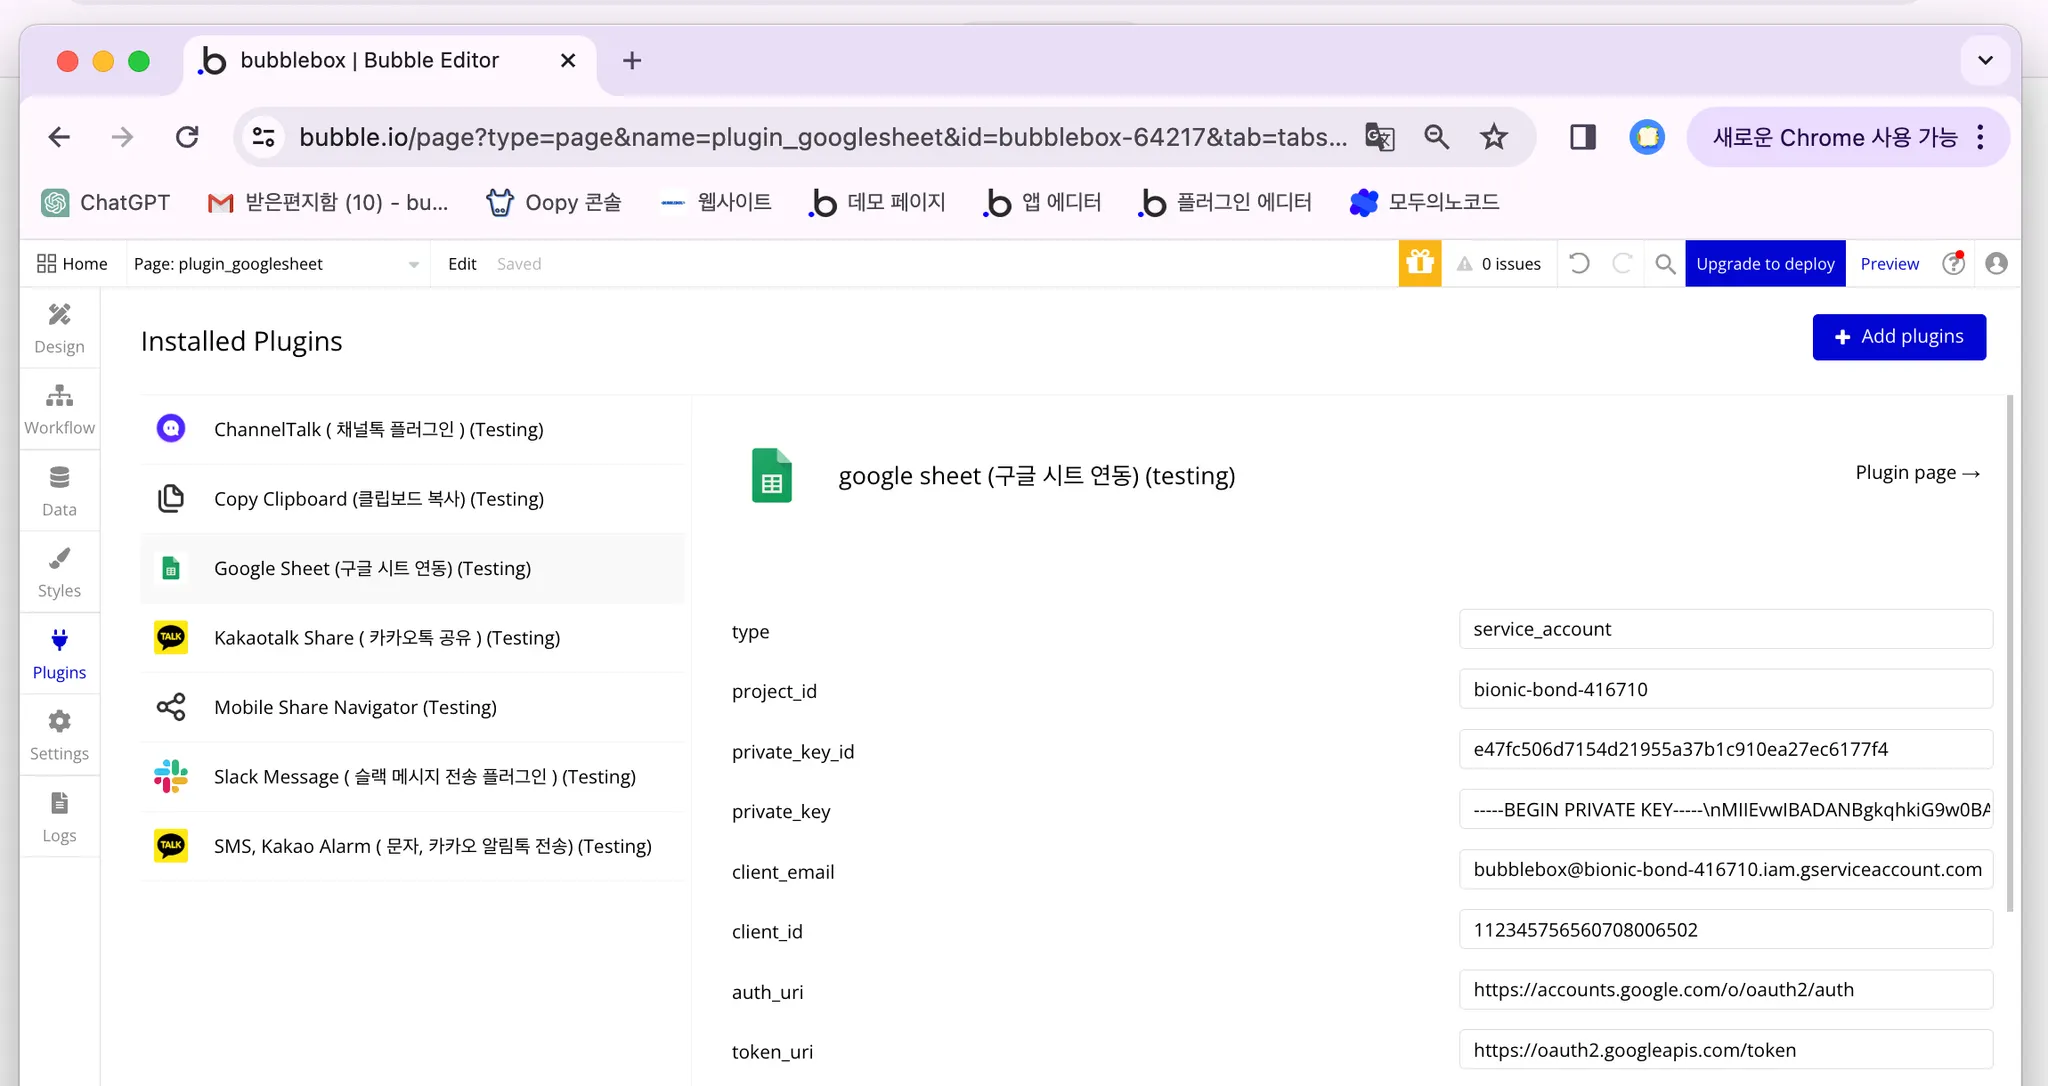
다운 받은 파일을 열어보면 아래와 같은 파라미터 값들을 확인할 수 있습니다.
If you open the download file, you can check below parameter values.
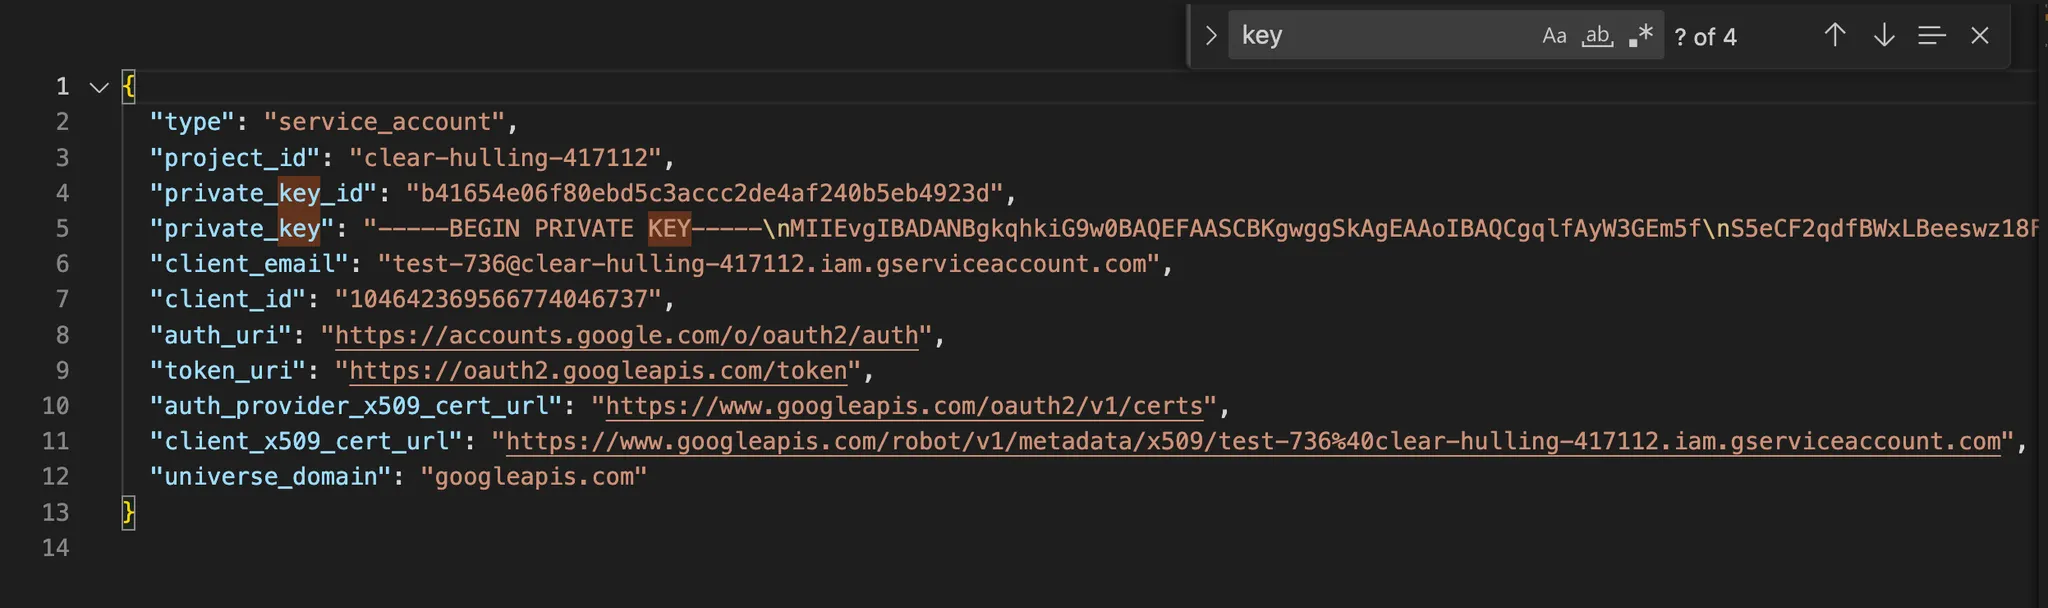
해당 파라미터 값을 그대로 복사해서 버블 에디터의 [플러그인] 탭에 붙여넣기 합니다.
Copy and Pastse these parameter values in Bubble editor’s [Plugin] Tab
2. Prepare Sheet’s Id and access ( 구글 시트 Id와 접근 권한 준비하기 )
모든 액션 이벤트는 (1) 목표 시트의 id를 알아야 하고 (2) API key를 접근할 수 있는 계정을 해당 시트로 초대해야 합니다. 우선 버블과 연동시킬 구글 시트를 생성합니다,
To activate all action events in this plugin, you must need to (1) know target sheet’s Id and (2) invite account having access to API key on target sheet
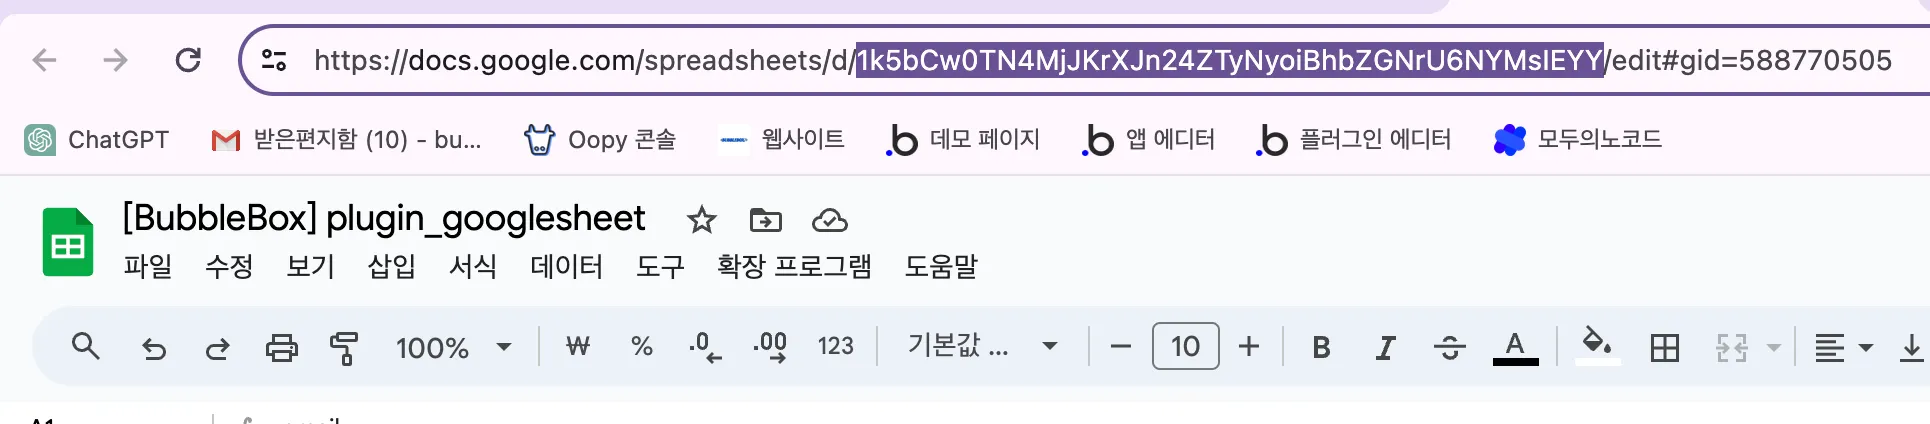
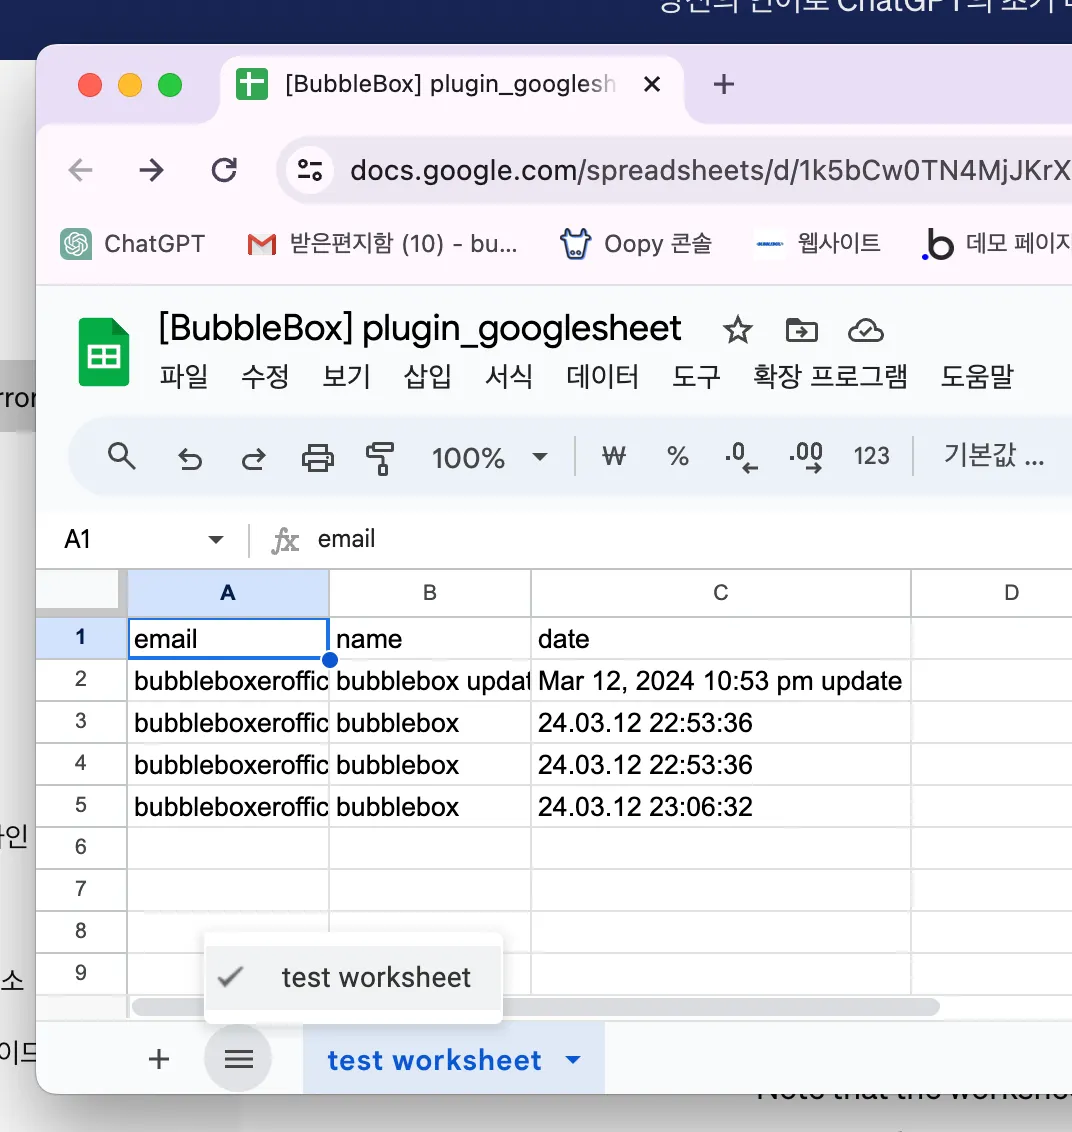
생성한 구글 시트의 url을 보면 d/ 뒤에 있는 경로가 현재 구글 시트의 Id 입니다.
The path after "d/" in the URL of the created Google Sheet is the ID of the current Google Sheet.
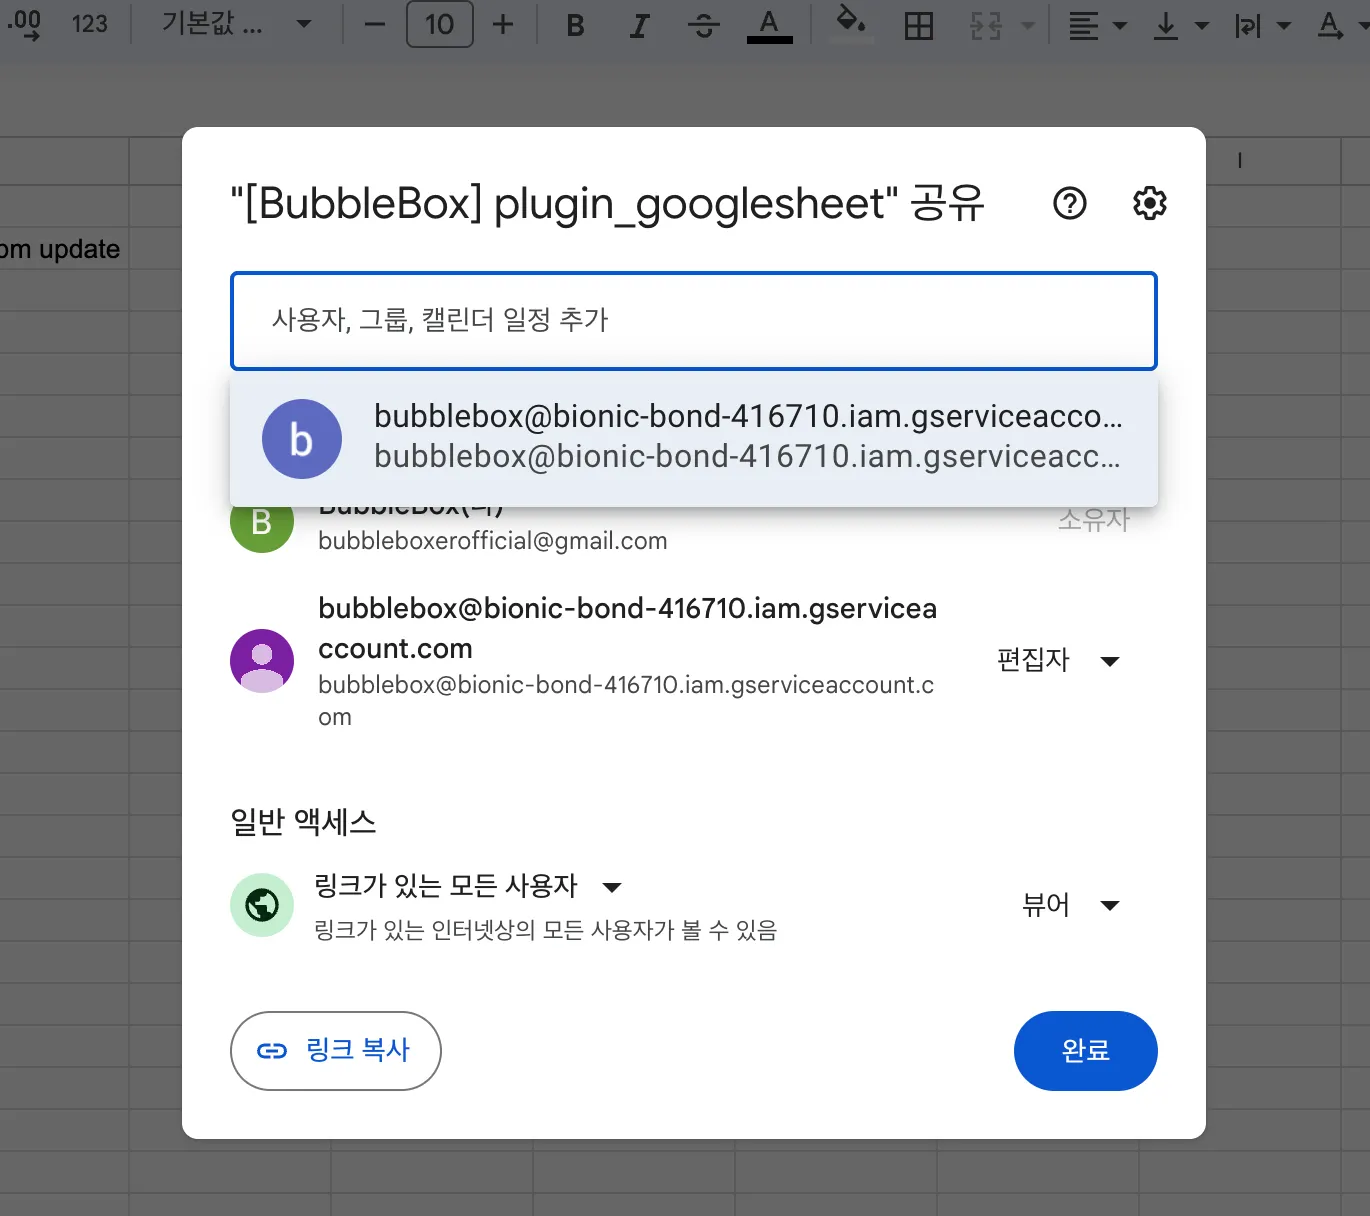
우측 상단의 [공유] 버튼을 누르고, 공유 설정 팝업에서 앞서 API 키 접근 권한이 부여된 계정을 초대합니다.
Press the [Share] button at the top right corner, then in the sharing settings popup, invite the account that has been granted API key access permissions.
3. Create and Delete worksheet ( 워크 시트 추가 및 삭제하기 )
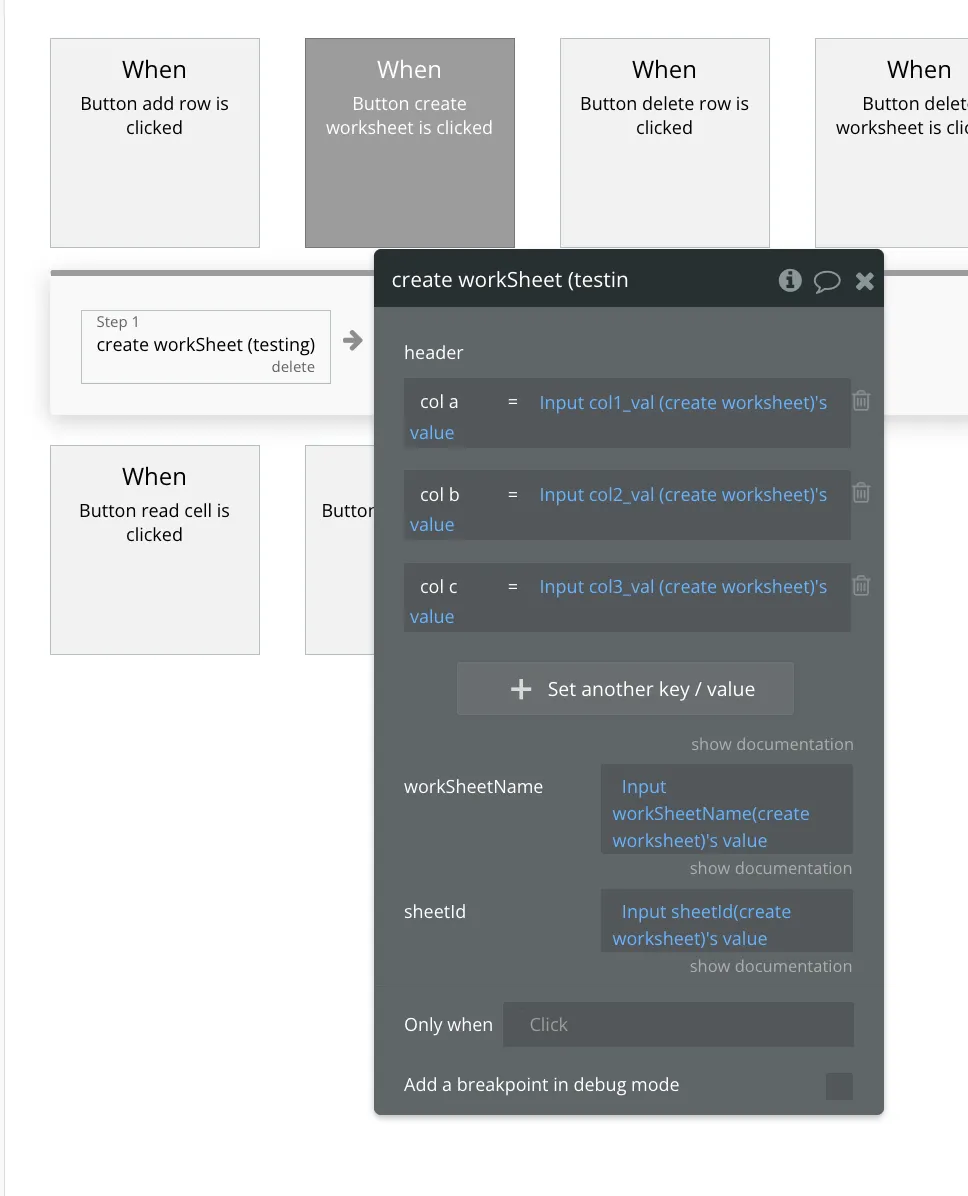
[Create worksheet] 액션 이벤트를 활용해 이전 단계에서 준비한 구글 시트에 특정 워크 시트를 생성할 수 있습니다. [sheetId] 필드에는 앞서 확인한 시트 Id를 입력하고, [worksheetName] 필드에는 생성하고자 한 워크시트의 이름을 입력합니다. 단, 동일한 워크 시트 이름이 존재하면 안 됩니다. 참고로 워크 시트 이름은 좌측 하단에서 확인할 수 있습니다.
You can use the [Create worksheet] action event to create a specific worksheet in the Google Sheet prepared in the previous step. In the [sheetId] field, enter the Sheet Id you confirmed earlier, and in the [worksheetName] field, enter the name of the worksheet you want to create. Note that the worksheet name must be unique. You can confirm the worksheet name at the bottom left corner.
[header] 필드에는 key와 value 쌍을 입력해야 합니다. 이때, key는 중요하지 않고, value에 입력한 데이터가 해당 워크시트의 컬럼 제목으로 설정됩니다. 순서는 위에서 아래 순으로 적용됩니다.
In the [header] field, you need to enter key-value pairs. In this case, the key is not important, and the data entered in the value will be set as the column headers of that worksheet. The order applies from top to bottom.
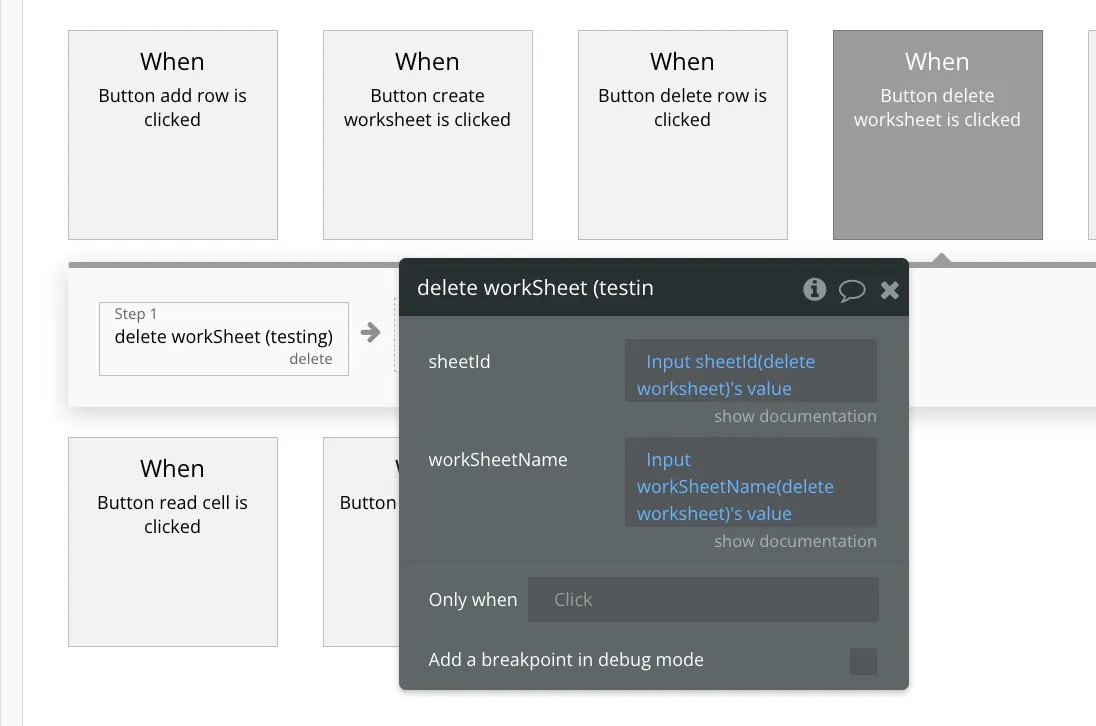
만약 특정 워크 시트를 삭제하고 싶다면, [Delete worksheet] 액션 이벤트를 사용합니다. [sheetId] 필드에는 구글 시트의 Id를, [workSheetName] 필드에는 삭제하고자 한 워크시트의 이름을 입력합니다. 단, 존재하지 않는 워크시트 이름을 입력하면 안 됩니다.
If you want to delete a specific worksheet, use the [Delete worksheet] action event. In the [sheetId] field, input the Google Sheet's ID, and in the [workSheetName] field, input the name of the worksheet you want to delete. However, make sure not to input a worksheet name that doesn't exist.
4. Add row ( 행 추가하기 )
[Add row] 액션 이벤트를 통해 구글 시트를 구성하는 워크 시트를 선택하고, 데이터 행을 추가할 수 있습니다. [SheetId] 필드에는 구글 시트의 Id를, [workSheetName]에는 워크 시트의 이름을 입력합니다. [row] 필드에는 Key와 value 쌍을 입력해야 하는데 Key는 컬럼 제목을, value는 해당 컬럼에 들어갈 데이터를 입력합니다. [IsRaw] 필드를 비활성화하면, 구글 시트에서 자동으로 전달 받은 데이터의 타입을 파악해 적용합니다.
[Add row] action event allows you to select a worksheet within your Google Sheet and add a new data row. In the [SheetId] field, enter the ID of your Google Sheet, and in the [workSheetName] field, enter the name of the worksheet. In the [row] field, you need to input key-value pairs where the key represents the column header and the value represents the data to be entered in that column. Disabling the [IsRaw] field will allow Google Sheets to automatically detect and apply the appropriate data type for the received data.
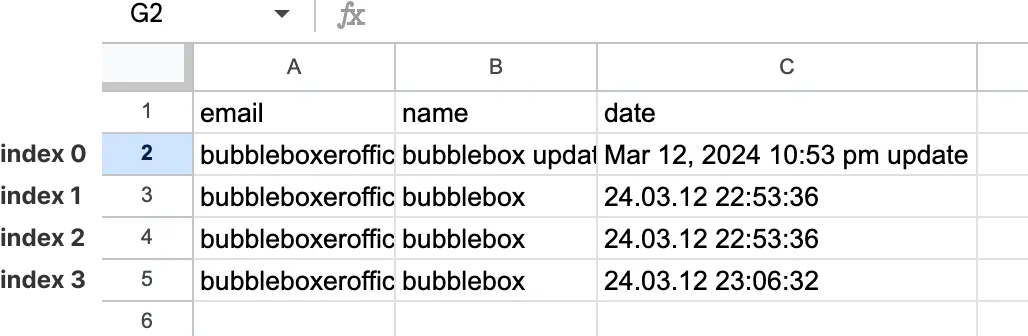
해당 액션 이벤트가 작동하면, 워크 시트에 존재하는 마지막 행의 다음 번으로 새로운 행이 생성됩니다.
When this action event is triggered, a new row will be created after the last existing row in the worksheet.

5. Update row ( 행 변경하기 )
존재하는 행의 데이터를 변경할 수 있습니다. [Update row] 액션 이벤트에서 [sheetId] 필드와 [workSheetName] 필드에 각각 시트의 id와 워크 시트 이름을 입력합니다. [row] 필드에서 Key는 컬럼 제목을, value는 컬럼에 들어갈 데이터를 입력합니다. [IsRaw] 필드를 비활성화하면, 구글 시트에서 자동으로 전달 받은 데이터의 타입을 파악해 적용합니다.
You can modify existing row data using the [Update row] action event. In the [sheetId] field and [workSheetName] field, enter the ID of the sheet and the name of the worksheet respectively. In the [row] field, provide key-value pairs where the key represents the column header and the value represents the data to be entered in that column. Disabling the [IsRaw] field will allow Google Sheets to automatically detect and apply the appropriate data type for the received data.

[Index] 필드에는 변경하고자 한 행의 index를 입력합니다. 컬럼 제목 행을 제외하고, 데이터가 들어가는 행의 index는 0부터 시작합니다.
In the [Index] field, enter the index of the row you want to modify. The index for rows containing data (excluding the column header row) starts from 0.
6. Delete row ( 행 삭제하기 )
존재하는 행을 삭제할 수도 있습니다. [Delete row] 액션 이벤트에서 [sheetId] 필드와 [workSheetName] 필드에 각각 시트의 id와 워크 시트 이름을 입력합니다. [Index] 필드에는 삭제하고자 한 행의 index를 입력합니다.
You can also delete existing rows. In the [Delete row] action event, enter the ID of the sheet in the [sheetId] field and the name of the worksheet in the [workSheetName] field. In the [Index] field, enter the index of the row you want to delete.
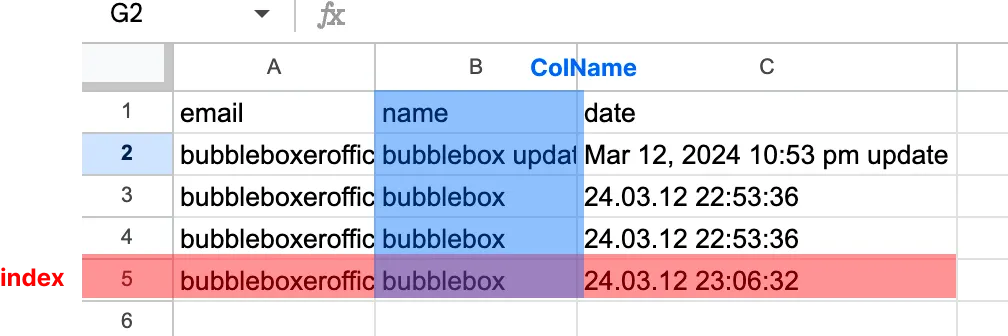
7. read cell ( 셀 값 불러오기 )
특정 셀을 선택하고, 해당 셀에 저장된 값을 불러올 수 잇습니다. [read cell] 액션 이벤트에서 [sheetId] 필드와 [workSheetName] 필드에 각각 시트의 id와 워크 시트 이름을 입력합니다. [Index] 필드에 불러오고자 하는 행의 index를 입력하고, [colName] 필드에 컬럼 이름을 입력합니다.
You can select a specific cell and retrieve the value stored in that cell. In the [read cell] action event, enter the ID of the sheet in the [sheetId] field and the name of the worksheet in the [workSheetName] field. Enter the index of the row you want to retrieve in the [Index] field and the column name in the [colName] field.

그러면 선택한 인덱스에 위치한 행에서 지정한 컬럼열에 있는 데이터 값을 불러옵니다.
Then it retrieves the data value from the specified column in the row located at the selected index.
후원 받은 커피는 더 많은 플러그인과 자료를 만드는 원동력이 됩니다.

